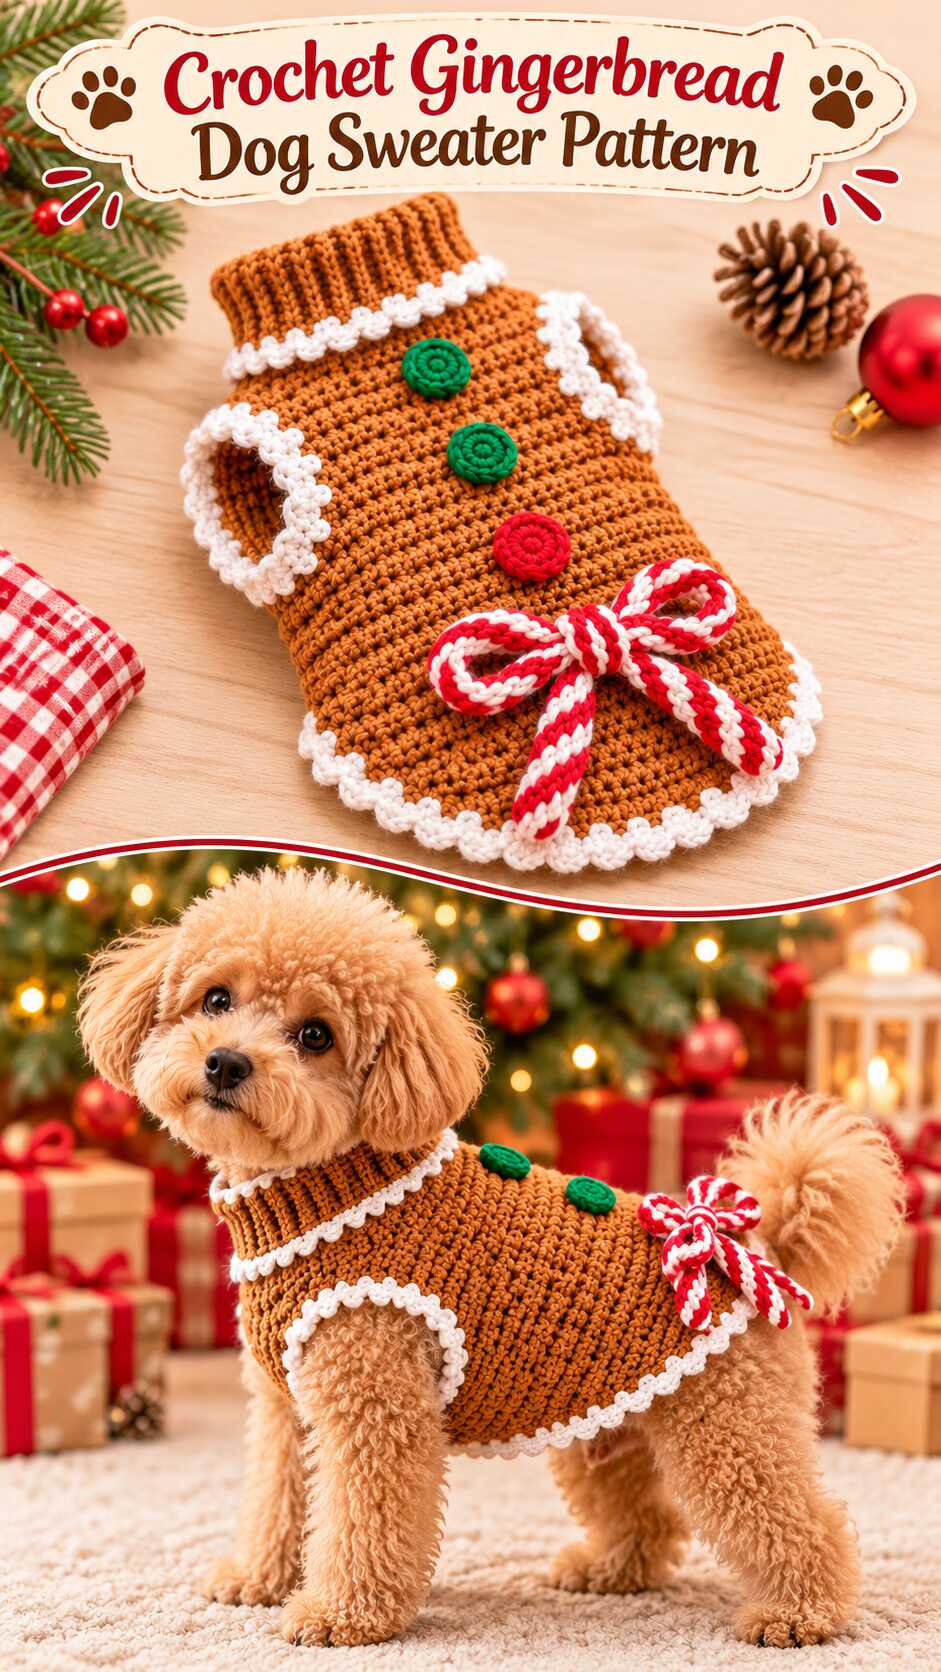
Dressing up a small companion dog for winter walks and family photos is simple and rewarding with this free gingerbread dog sweater crochet pattern. Designed specifically for small breeds such as Toy Poodles, Maltese, and Yorkshire Terriers, this festive crochet project works up from the neck down using approachable US crochet stitches. It is rated for Advanced Beginner makers who are comfortable working single crochet in the back loop, half double crochet in joined rounds, and basic two-stitch decreases. In this complete guide, you will get the full stitch-by-stitch crochet instructions, measurement checkpoints after every stage, built-in icing trim steps, and a practical resizing formula.
Pattern status: draft. This pattern has not been fully physically tested yet. Please make the small test piece first, and tell us how it goes.
Quick Facts
- Craft Type: Crochet (US Crochet Terminology)
- Skill Level: Advanced Beginner
- Finished Size (Small Dog): Collar Circumference: 26.7 cm (10.5 in) | Chest Circumference: 37.3 cm (14.7 in) | Leg Opening Circumference: 14.7 cm (5.8 in) each | Total Back Length: 25.5 cm (10.0 in) | Total Belly Length: 15.6 cm (6.1 in)
- Intended Dog Measurements: Neck: 24.0 cm (9.4 in) | Chest Girth: 34.0 cm (13.4 in) | Front Leg Circumference: 11.0 cm (4.3 in) | Back Length: 25.5 cm (10.0 in)
- Yarn Weight: Category 4 Medium / Worsted weight 100% acrylic yarn (4 colors)
- Crochet Hook Size: 4.5 mm (US 7) crochet hook, or size needed to obtain gauge
- Gauge: 15 sts and 12 rows/rounds = 10 cm (4.0 in) in half double crochet (hdc); 15 rows and 18 sts = 10 cm (4.0 in) in back-loop single crochet (sc BLO) collar ribbing
- Estimated Yardage (1 Sweater): 246–295 yds / 226–270 m (113–135 g total across 4 colors; estimate includes a 10% allowance)
- Estimated Time: Not specified in the pattern guide. [MY TEST NOTES: how long it took]
About This Gingerbread Dog Sweater Crochet Pattern
This holiday dog sweater is a one-piece, top-down crocheted garment designed for small companion breeds, beginning with a stretchy back-loop ribbed turtleneck collar that flows directly into a seamless chest yoke, built-in front leg openings, and a tapered back flap. To ensure reliable stitch counts and beginner-friendly assembly without complex multi-panel seaming, the body uses uniform half double crochet rounds and symmetric two-stitch edge decreases on the lower back, while the decorative icing trims are worked directly onto the finished edges. This reconstructed pattern is a practical interpretation of the reference photograph rather than an exact stitch-for-stitch replica.
Construction Overview
Before you begin crocheting, it helps to understand how the four components fit together in sequence:
- Component 1 (Collar & One-Piece Body): You start by working the turtleneck collar flat in rows of back-loop single crochet (Stage 1A) and slip-stitching the short ends together to form a tube. Next, you work directly into the row-ends around the base of the collar in joined rounds of half double crochet to expand the upper yoke from 40 stitches to 56 stitches (Stage 1B). In Stage 1C, you divide for the two front leg openings by skipping 6 stitches and chaining 6 for each underarm bridge, then work straight in joined rounds to complete the chest tube through Round 13. Finally, in Stage 1D, you leave 20 belly and side stitches unworked for underbody clearance and work flat back and forth across the 36 back stitches for 11 decrease rows (Rows 14–24) to shape the curved tail hem down to 14 stitches.
- Component 2 (Built-In Icing White Edgings): Using Color B (Icing White), you work four built-in surface and edge trims directly onto the sweater body: a single-crochet rim around the top of the collar (Stage 2A), a 20-scallop slip-stitch wave around the collar base (Stage 2B), an 11-scallop trim around each 22-stitch leg opening (Stage 2C), and a 28-scallop border around the 56-stitch lower body and back hem (Stage 2D).
- Component 3 (Green Gumdrop Buttons): You crochet two flat 12-stitch circular appliqués in magic rings using Color C (Holly Green) to sew along the upper back spine.
- Component 4 (Peppermint Candy-Cane Striped Bow): You crochet a 68-stitch red foundation cord in Color D overlaid with a white chain-and-slip-stitch stripe row in Color B, then tie and tack it into a 9.0 cm (3.5 in) bow above the tail base.
Materials
All yarn weights and yardages below are estimates for making 1 sweater (Size Small) and include a 10% allowance for gauge swatching, joining, and finishing.
| Material / Color | Specification | Estimated Grams | Estimated Yardage |
|---|---|---|---|
| Color A (Main Body) — Gingerbread Brown | Category 4 Medium / Worsted weight 100% acrylic yarn (standard 100 g = 200 m / 218 yds) | 85–100 g | 185–218 yds (170–200 m) |
| Color B (Icing Trim) — Icing White | Category 4 Medium / Worsted weight 100% acrylic yarn | 15–20 g | 33–44 yds (30–40 m) |
| Color C (Buttons) — Holly Green | Category 4 Medium / Worsted weight 100% acrylic yarn (makes 2 buttons) | 5 g | 11 yds (10 m) |
| Color D (Bow Stripe) — Candy Red | Category 4 Medium / Worsted weight 100% acrylic yarn (combined with Color B for bow) | 8–10 g | 17–22 yds (16–20 m) |
| Total Yarn (1 Sweater) | 4 Colors Total (Worsted Weight #4 Acrylic) | 113–135 g | 246–295 yds (226–270 m) |
- Crochet Hook: 4.5 mm (US 7) crochet hook, or size needed to obtain gauge.
- Notions: 4 locking stitch markers (to mark front leg openings), blunt tapestry needle for weaving in ends and sewing appliqués, sharp scissors, flexible tape measure, and 1 optional 10 mm gold craft bell (for decorative use under supervision only).
Gauge
Checking your crochet gauge before starting ensures that the neck opening, chest girth, and leg openings fit your dog comfortably without restricting movement.
- Primary Body Gauge (Half Double Crochet): 15 sts and 12 rows/rounds = 10 cm (4.0 in) worked in half double crochet (hdc) using a 4.5 mm (US 7) hook (1.5 sts per cm; 1.2 rows/rounds per cm).
- Collar Ribbing Gauge (Single Crochet in Back Loop Only): 15 rows and 18 sts = 10 cm (4.0 in) slightly relaxed (1.5 rows per cm laterally around neck; 8 sts = 4.4 cm / 1.7 in collar height).
- How to Make the Gauge Swatch: With Color A and your 4.5 mm (US 7) hook, chain 17. Work 1 hdc in the 2nd ch from hook and in each ch across (16 sts). Work 13 more rows of hdc (ch 1 and turn at the start of each row; ch 1 does not count as a stitch). Fasten off and lay flat without stretching. Your completed 16-stitch by 14-row swatch should measure 10.7 cm (4.2 in) wide by 11.7 cm (4.6 in) tall, with the inner 15 sts by 12 rows measuring 10 cm by 10 cm (4.0 in by 4.0 in).
- Hook Adjustment Rule: If the swatch has too many stitches per 10 cm (swatch is narrower than 10 cm), use a larger hook. If the swatch has too few stitches per 10 cm (swatch is wider than 10 cm), use a smaller hook. If row gauge differs from 12 rows per 10 cm, adjust the row count in the body tube or back flap as appropriate and recalculate the finished length dimensions. Adjusting hook size corrects stitch width but does not fix every fit problem automatically if your dog’s proportions differ from standard Size Small measurements.
Abbreviations (US Crochet Terminology)
This pattern uses standard US crochet terminology. Only the abbreviations listed in the table below appear in the pattern instructions.
| Abbreviation | Term | One-Line Definition |
|---|---|---|
| BLO | Back loop only | Insert hook under only the back loop (the loop farthest from you) at the top of the stitch. |
| ch | Chain | Yarn over and pull through the loop on the hook to create one foundation or turning chain. |
| hdc | Half double crochet | Yarn over, insert hook into stitch, yarn over and pull up a loop (3 loops on hook), yarn over and pull through all 3 loops. |
| hdc2tog | Half double crochet 2 together (decrease) | Yarn over, insert hook in first stitch and pull up a loop, insert hook in next stitch and pull up a loop (4 loops on hook), yarn over and pull through all 4 loops (1 stitch decreased). |
| RS | Right side | The public-facing outside surface of the sweater visible when worn. |
| sc | Single crochet | Insert hook into stitch, yarn over and pull up a loop (2 loops on hook), yarn over and pull through both loops. |
| sl st | Slip stitch | Insert hook into stitch, yarn over and pull through both the stitch and the loop on the hook in one motion. |
| st(s) | Stitch(es) | Individual crochet stitches counted at the end of a row or round. |
| WS | Wrong side | The inside surface of the sweater that rests against the dog’s coat. |
Free Gingerbread Dog Sweater Crochet Pattern Instructions
Intended Fit & Setup Notes (Size Small): Designed for a small dog with a 24.0 cm (9.4 in) neck, 34.0 cm (13.4 in) chest girth, 11.0 cm (4.3 in) front leg circumference, and 25.5 cm (10.0 in) back length. The finished sweater provides +2.7 cm (1.1 in) ease at the neck and +3.3 cm (1.3 in) ease at the chest. Turning and starting chains (ch 1 at the start of rows/rounds) never count as a stitch. Join all rounds with a slip stitch to the first stitch of the round.
Component 1: Ribbed Turtleneck Collar & One-Piece Body (Make 1 — Color A)
Construction Method: The collar is worked flat in back-loop single crochet rows and seamed into a tube. The upper yoke and chest tube are then worked directly from the base of the collar in joined rounds (top-down), followed by short rows worked flat over the back stitches to shape the curved tail hem.
Stage 1A — Ribbed Turtleneck Collar (Worked Flat in Rows, Color A)
- Foundation: Leaving a 20 cm (8.0 in) starting tail, ch 9 with Color A. [9 ch]
- Row 1 (RS): Sc in 2nd ch from hook and in each ch across, turn. [8 sts]
- Rows 2–40 (39 rows): Ch 1 (does not count as a st), sc in BLO of each st across, turn. [8 sts per row]
- Collar Tube Join: Fold Row 40 to meet the foundation chain edge of Row 1 without twisting. Working through both thicknesses (front loop of Row 40 and foundation edge of Row 1), work 8 sl st across to seam the collar into a tube. Turn collar RS out. Do not fasten off Color A. [8 seam sl sts; 40 row-ends around edge]
Check: Your seamed collar tube should have 40 ribbed rows around and measure 26.7 cm (10.5 in) in circumference (8.5 cm / 3.3 in diameter) and 4.4 cm (1.7 in) in height.
Stage 1B — Upper Yoke Increases (Worked in Joined Rounds from Collar Base, Color A)
- Round 1 (RS — Collar Base Pickup): Ch 1, work 1 sc into the side of each of the 40 collar rows around, join with sl st to first sc. [40 sts]
- Round 2 (Increase Round): Ch 1, *hdc in next 4 sts, 2 hdc in next st; repeat from * 8 times around, join with sl st to first hdc. [48 sts]
- Round 3 (Increase Round): Ch 1, *hdc in next 5 sts, 2 hdc in next st; repeat from * 8 times around, join with sl st to first hdc. [56 sts]
- Round 4: Ch 1, hdc in each st around, join with sl st to first hdc. [56 sts]
Check: Your yoke should measure 37.3 cm (14.7 in) in circumference (11.9 cm / 4.7 in diameter), with the 4 yoke rounds measuring 3.3 cm (1.3 in) in height below the collar (7.7 cm / 3.0 in total length from top of collar).
Stage 1C — Front Leg Openings & Chest Tube (Worked in Joined Rounds, Color A)
- Round 5 (Leghole Divide Round): Ch 1, hdc in first 8 sts (center belly panel), ch 6, skip next 6 sts for first leg opening (place Marker 1 in first skipped st and Marker 2 in 6th skipped st), hdc in next 36 sts (back panel), ch 6, skip next 6 sts for second leg opening (place Marker 3 in first skipped st and Marker 4 in 6th skipped st), join with sl st to first hdc. [56 sts total: 44 hdc and 12 foundation ch]
- Round 6 (Body Tube Rejoin): Ch 1, hdc in first 8 sts, work 1 hdc in each of the 6 ch across first leg opening, hdc in next 36 sts, work 1 hdc in each of the 6 ch across second leg opening, join with sl st to first hdc. [56 sts]
- Rounds 7–13 (7 rounds): Ch 1, hdc in each st around, join with sl st to first hdc. Fasten off Color A at the end of Round 13. [56 sts per round]
Check: Your chest tube should measure 37.3 cm (14.7 in) in circumference and 10.8 cm (4.3 in) from the collar base to the end of Round 13 (15.2 cm / 6.0 in total belly length before trim). Each un-trimmed leg opening should measure approximately 14.7 cm (5.8 in) in inner perimeter.
Stage 1D — Curved Back Flap Shaping (Worked Flat in Rows over Back Stitches, Color A)
- Setup: With RS facing on Round 13, skip the first 14 sts (the 8 center belly sts plus 6 left-side sts). Join Color A with a sl st in the 15th st of Round 13. You will work across the 36 centered back stitches while leaving the remaining 6 right-side sts unworked (20 total belly and side sts left unworked for underbody clearance).
- Row 14 (RS — Decrease Row): Ch 1, hdc2tog over first 2 sts, hdc in next 32 sts, hdc2tog over last 2 sts (36 sts used), turn, leaving remaining 20 belly/side sts unworked. [34 sts]
- Row 15 (WS — Decrease Row): Ch 1, hdc2tog over first 2 sts, hdc in next 30 sts, hdc2tog over last 2 sts, turn. [32 sts]
- Row 16 (RS — Decrease Row): Ch 1, hdc2tog over first 2 sts, hdc in next 28 sts, hdc2tog over last 2 sts, turn. [30 sts]
- Row 17 (WS — Decrease Row): Ch 1, hdc2tog over first 2 sts, hdc in next 26 sts, hdc2tog over last 2 sts, turn. [28 sts]
- Row 18 (RS — Decrease Row): Ch 1, hdc2tog over first 2 sts, hdc in next 24 sts, hdc2tog over last 2 sts, turn. [26 sts]
- Row 19 (WS — Decrease Row): Ch 1, hdc2tog over first 2 sts, hdc in next 22 sts, hdc2tog over last 2 sts, turn. [24 sts]
- Row 20 (RS — Decrease Row): Ch 1, hdc2tog over first 2 sts, hdc in next 20 sts, hdc2tog over last 2 sts, turn. [22 sts]
- Row 21 (WS — Decrease Row): Ch 1, hdc2tog over first 2 sts, hdc in next 18 sts, hdc2tog over last 2 sts, turn. [20 sts]
- Row 22 (RS — Decrease Row): Ch 1, hdc2tog over first 2 sts, hdc in next 16 sts, hdc2tog over last 2 sts, turn. [18 sts]
- Row 23 (WS — Decrease Row): Ch 1, hdc2tog over first 2 sts, hdc in next 14 sts, hdc2tog over last 2 sts, turn. [16 sts]
- Row 24 (RS — Final Decrease Row): Ch 1, hdc2tog over first 2 sts, hdc in next 12 sts, hdc2tog over last 2 sts. Fasten off Color A. [14 sts]
Check: Your curved back flap should add 9.2 cm (3.6 in) in length below Round 13, tapering cleanly to 9.3 cm (3.7 in) wide across the final 14 stitches at the tail base (24.4 cm / 9.6 in length before icing trim).
Test Point — Underbody & Leg Opening Fit: Because the reference photographs show the sweater from a three-quarter standing angle and a folded side flat-lay, the exact belly strap width (8 sts / 5.3 cm between leg openings) cannot be directly observed. Try the sweater on your dog after completing Stage 1C (Round 13) to verify that the leg spacing matches your dog’s chest width and that the belly cut clears the lower abdomen comfortably before adding the white icing trim.
Component 2: Built-In Icing White Piping & Scalloped Edgings (Make 1 Set — Color B)
Construction Method: All four white icing trims are worked directly onto the completed edges of Component 1 in joined rounds with RS facing.
Stage 2A — Top Collar Rim Trim & Stage 2B — Collar Base Icing Wave (Built-In, Color B)
- Stage 2A — Round 1 (RS): Join Color B with a sl st at the seam on the top edge of the collar. Ch 1, work 1 sc into the side of each of the 40 collar rows around, join with sl st to first sc. Fasten off Color B. [40 sts]
- Stage 2B — Round 1 (RS): Join Color B with a sl st into the stitch space between Collar Round 1 and Yoke Round 2. *Ch 2, sl st in next 2 sts around the collar base; repeat from * 20 times around (40 base sts used), join with sl st to first st. Fasten off Color B. [20 mini-scallops; 60 sts & ch]
Check: Both collar trims should lie flat without puckering and stretch comfortably to at least 28.0 cm (11.0 in) so the sweater slips easily over the dog’s head.
Stage 2C — Front Leg Opening Icing Trim (Make 2 — Left & Right Legholes, Built-In, Color B)
- Round 1 (RS): Join Color B with a sl st at the center bottom of the leg opening. Ch 1, work 22 sc around the leg opening as follows: 6 sc across the 6 bottom foundation chains of Round 5, 5 sc evenly up the first side edge, 6 sc across the 6 skipped yoke stitches between Markers 1 and 2 (or Markers 3 and 4), and 5 sc evenly down the second side edge; join with sl st to first sc. Remove markers. [22 sts]
- Round 2 (RS — Icing Scallops): *Ch 2, sl st in next 2 sts; repeat from * 11 times around (22 sts used), join with sl st to first st. Fasten off Color B. Repeat for second leg opening. [11 icing scallops per leghole; 33 sts & ch]
Check: Each finished leg opening should measure 14.7 cm (5.8 in) in circumference (4.7 cm / 1.9 in diameter) with 11 even white icing scallops.
Stage 2D — Lower Body & Curved Back Hem Icing Trim (Built-In, Color B)
- Round 1 (RS — Base Edge Pickup): Join Color B with a sl st at the center belly stitch of Round 13. Ch 1, work 56 sc around the entire lower opening as follows: 1 sc in each of the 20 unworked belly/side sts of Round 13, 1 sc into the side of each of the 11 decrease row-ends up the left back curve (Rows 14–24), 1 sc in each of the 14 sts across the tail edge of Row 24, and 1 sc into the side of each of the 11 decrease row-ends down the right back curve; join with sl st to first sc. [56 sts]
- Round 2 (RS — Ruffled Icing Scallop Border): *(Sc, ch 2, sc) all in next st, sl st in next st; repeat from * 28 times around (56 sts used), join with sl st to first sc. Fasten off Color B. [28 icing scallops; 112 sts & ch]
Check: The finished sweater should now measure 25.5 cm (10.0 in) in total back length and 15.6 cm (6.1 in) in total belly length, bordered by 28 crisp white icing scallops.
Component 3: Green Gumdrop Buttons (Make 2 — Color C)
Construction Method: Worked in joined rounds in a magic ring to form flat circular decorative appliqués.
- Round 1 (RS): With Color C, make a magic ring. Ch 1 (does not count as a st), work 6 sc into the ring, pull tail tight to close center, join with sl st to first sc. [6 sts]
- Round 2 (RS): Ch 1, work 2 sc in each st around (6 repeats of 2 sc), join with sl st to first sc. Fasten off Color C, leaving a 20 cm (8.0 in) tail for sewing onto the back spine. [12 sts]
Check: Each completed green button should lie flat and measure 2.5 cm (1.0 in) in diameter (8.0 cm / 3.1 in circumference).
Component 4: Peppermint Candy-Cane Striped Bow (Make 1 — Color D & Color B)
Construction Method: Worked flat as a narrow two-row striped cord, then folded and tied into a double-loop bow.
- Foundation (Color D — Candy Red): Leaving a 15 cm (6.0 in) tail, ch 69 with Color D. [69 ch]
- Row 1 (RS — Color D): Sl st in 2nd ch from hook and in each ch across. Fasten off Color D. [68 sts]
- Row 2 (RS — Color B Candy-Cane Stripe Overlay): Do not turn. Join Color B with a sl st in the first st at the start of Row 1. *Ch 1, skip 1 st, sl st in next st; repeat from * 34 times across (68 sts used), creating an alternating red-and-white diagonal stripe. Fasten off Color B, weave in the outer cord ends, and tie the cord into a double-loop bow with two 8.0 cm (3.1 in) loops and two 6.5 cm (2.6 in) tails. Use a 25 cm (10.0 in) strand of Color D wrapped 4 times around the center knot to secure the bow shape, leaving the tail attached for sewing. [68 sts & ch]
Check: Before tying, your striped cord should measure 45.3 cm (17.8 in) long by 0.8 cm (0.3 in) wide; once tied and secured at the center knot, the finished bow should measure 9.0 cm (3.5 in) wide across the loops.
Assembly
Because the ribbed collar (Component 1A), yoke and body (Components 1B–1D), and all four white icing trims (Components 2A–2D) are worked directly into one another as built-in components, no body panel seaming is required. Complete the final embellishment attachment in the exact numbered order below:
- Orient the Sweater Spine: Lay the completed sweater flat with the back facing up (RS facing) and the ribbed collar pointing to the left. Fold the sweater in half lengthwise so the two front leg openings (22 sts each) align directly on top of each other. The top fold line marks the exact center back spine (Stitch 26 of the 36 back stitches).
- Position and Sew First Green Gumdrop Button (Component 3, Button 1 of 2): Place the first 12-stitch green button centered on the back spine over Yoke Rounds 4–5 (2.5 cm / 1.0 in below the white collar base wave). Using the 20 cm Color C yarn tail and a tapestry needle, work 12 whipstitches through the back loops of the 12 button edge stitches into the surface of Rounds 4–5. Knot securely on the WS and weave in the tail.
- Position and Sew Second Green Gumdrop Button (Component 3, Button 2 of 2): Place the second 12-stitch green button centered on the back spine over Body Rounds 10–11 (leaving a 2.5 cm / 1.0 in gap below the first button). Sew all 12 button edge stitches securely to Rounds 10–11 using 12 whipstitches, knot on the WS, and weave in the tail.
- Attach the Peppermint Striped Bow (Component 4, Qty 1): Position the center knot of the tied peppermint bow on the center back spine over Back Flap Rows 19–21 (3.0 cm / 1.2 in above the white tail-edge icing scallops, and 4.5 cm / 1.8 in below the second green button). Using the 25 cm Color D center-knot tail, work 6 firm pass-through stitches through the back of the bow knot and through the middle 4 stitches of Row 20 so the bow will not flop or untie when the dog shakes.
- Optional Collar Bell Attachment: If attaching the optional 10 mm gold bell for supervised holiday photo sessions, stitch it securely to the center front base of the collar (directly above the 4th stitch of the 8-stitch belly panel on Round 1) using 4 passes of Color B yarn. Omit the bell if your dog chews on attachments.
Changing the Size
To customize this pattern for a smaller or larger dog, measure your dog’s neck circumference, widest chest girth (just behind the front legs), and back length (from collar base to tail base), then apply the gauge formulas below using 1.5 sts per cm and 1.2 rounds/rows per cm:
- Step 1 — Collar Rows (Multiples of 8): Add 2.5 to 3.5 cm (1.0 to 1.4 in) of ease to your dog’s neck measurement, multiply by 1.5 rows per cm, and round to the nearest multiple of 8 rows (so the yoke increase repeats divide evenly by 8, and the collar base wave divides evenly by 2). Formula:
Collar Rows = round_to_multiple_of_8((Neck_cm + 3.0) × 1.5). - Step 2 — Chest Stitches & Yoke Increases (Multiples of 8): Add 3.0 to 4.0 cm (1.2 to 1.6 in) of ease to your dog’s chest girth, multiply by 1.5 sts per cm, and round to the nearest multiple of 8 stitches. Each yoke increase round adds 8 stitches (+5.3 cm / 2.1 in of circumference). Work additional increase rounds following the progression
*hdc in next (N) sts, 2 hdc in next st* × 8until your target chest stitch count is reached. - Step 3 — Leg Opening & Belly Proportions: Allocate approximately 15% of total chest stitches to the center belly panel, 10–12% to each skipped leghole chain, and the remaining 62–65% (must be an even number) to the back panel so the lower hem icing trim (multiple of 2 sts) comes out even.
- Step 4 — Back & Belly Length Adjustment: Subtract the collar height (4.4 cm), yoke height, and back flap height (9.2 cm) from your dog’s target back length, then multiply the remaining length by 1.2 rounds per cm to determine how many even chest-tube rounds to work in Stage 1C before starting the back flap decreases.
Troubleshooting
| Problem | Likely Cause | Practical Fix |
|---|---|---|
| 1. Collar opening feels too tight over the dog’s head | Slip-stitch join round (Stage 2A) or collar base wave (Stage 2B) was worked with tight tension. | Work Stage 2A and Stage 2B using a 5.0 mm (US H-8) hook, or omit Stage 2A top sc edging and work the white stripe in BLO on Rows 1–40 of the collar instead. |
| 2. Leg openings pull inward or chafe under the front legs | Foundation chains in Round 5 (ch 6) were pulled too tightly or leghole sc pickup was uneven. | Work the two 6-chain underarm bridges in Round 5 loosely, or increase Round 2C leg pickup from 22 sc to 24 sc (12 scallops) for broader-chested dogs. |
| 3. Lower back hem flips or curls upward near the tail | Decrease edges (hdc2tog on Rows 14–24) were pulled tightly, drawing the curve inward. | Steam-block the lower back curve lightly before adding Component 2D, and work 2 sc into each corner stitch of Row 24 during Round 1 of Stage 2D. |
| 4. Icing scallop trim comes out with 1 leftover stitch | An odd number of base stitches was picked up along the row-ends of the back flap or leghole. | Count your Round 1 pickup stitches before starting Round 2 scallops; every scallop repeat uses 2 sts. Add or skip 1 sc along the side row-ends to achieve an even count. |
| 5. Green buttons cup into bowls instead of lying flat | Magic ring center was over-tightened or hook tension was too tight on Round 2 increases. | Press the button flat with fingers before fastening off, and stitch through all 12 outer loops when whipstitching to the sweater spine. |
| 6. Peppermint bow unties or droops during wear | Acrylic slip-stitch cord is smooth and can loosen under movement if only tied by hand. | Tack the center knot AND the back of both upper bow loops directly to the sweater with 2 hidden stitches of Color D yarn so the loops stay perky. |
Finishing and Care
- Weaving in Ends: Thread each yarn tail onto a blunt tapestry needle and weave it securely back and forth three times (at least 4 cm / 1.5 in) through the wrong side (WS) of matching-color stitches so no knots rub against your dog’s coat. Trim excess tails close to the fabric.
- Blocking: Lay the finished sweater flat on a foam blocking mat or clean towel. Mist lightly with cool water (or hold a garment steamer 10 cm / 4 in above the acrylic fabric—never touch a hot iron directly to acrylic yarn, as it will melt). Finger-shape the 28 lower icing scallops, 11 leghole scallops, and peppermint bow loops, and allow to dry completely.
- Seaming & Appliqué Check: Gently tug both green buttons and the peppermint bow to confirm all sewing tails are locked before placing the sweater on your pet.
- Washing Instructions: Turn the sweater inside out, place it in a mesh delicates laundry bag, and machine wash cold on a gentle cycle (30°C / 86°F) using mild pet-safe detergent, or hand wash in cool water. Lay flat on a towel to air-dry; do not wring or hang from the collar.
- Storage Recommendations: Fold flat with the peppermint bow facing upward in a dry drawer or breathable cotton storage bag away from direct sunlight between holiday seasons.
Maker’s Progress Checklist
- Materials prepared: All 4 worsted-weight acrylic yarn colors (A, B, C, D), 4.5 mm (US 7) hook, 4 stitch markers, tapestry needle, and tape measure gathered.
- Gauge checked: 16 st × 14 row hdc swatch worked and verified at 15 sts × 12 rows = 10 cm (4.0 in).
- All pieces completed: Collar & Body (1), Icing Trims (4 built-in edges), Green Buttons (2), and Peppermint Striped Bow (1) crocheted.
- Stitch counts checked: Collar (40 rows × 8 sts), Yoke/Chest (56 sts), Back Flap tail edge (14 sts), Legholes (22 sts each), Buttons (12 sts each), Bow (68 sts) verified.
- Assembly completed: Buttons sewn on spine at Rounds 4–5 and 10–11; peppermint bow stitched securely at Rows 19–21.
- Ends secured: All starting and fastening-off tails woven 3 ways into matching colors on the wrong side (WS) and trimmed.
- Final measurements checked: Collar 26.7 cm (10.5 in), Chest 37.3 cm (14.7 in), Legholes 14.7 cm (5.8 in), Back Length 25.5 cm (10.0 in), Belly Length 15.6 cm (6.1 in).
Frequently Asked Questions (FAQ)
1. How do I put this top-down crochet sweater on my dog safely?
Because the sweater is constructed as a seamless chest tube (Stages 1B and 1C), slip the stretchy ribbed turtleneck collar gently over your dog’s head first, then guide one front paw at a time through the two 22-stitch leg openings before smoothing the curved back flap toward the tail. Always verify during Stage 2A and Stage 2B that your collar stretches to at least 28.0 cm (11.0 in) so it slides comfortably over your dog’s ears and skull.
2. Why is the belly panel shorter than the back of the sweater?
The chest tube ends after Round 13 on the underside (giving a total belly length of 15.6 cm / 6.1 in including the collar and icing trim), while Rows 14–24 continue flat over the 36 back stitches to reach 25.5 cm (10.0 in) at the tail base. Leaving the 20 belly and side stitches unworked after Round 13 provides essential underbody clearance so male and female dogs stay clean and dry outdoors.
3. Can I substitute cotton or wool yarn for the worsted-weight acrylic?
The pattern guide specifies Category 4 Medium / Worsted weight 100% acrylic yarn because it is lightweight, machine-washable in cold water, and offers good elasticity in back-loop single crochet ribbing. The guide does not provide tested stitch adjustments for non-acrylic fibers; if you substitute another Category 4 yarn, work the 16-stitch by 14-row half double crochet gauge swatch first to verify that you achieve 15 sts and 12 rows per 10 cm (4.0 in) and check that the collar retains enough stretch.
4. What should I do if my dog has a broader chest but a short back length?
Follow the formulas in the Changing the Size section independently: use Step 2 (Chest Stitches in multiples of 8 at 1.5 sts per cm) to add an extra yoke increase round (+8 stitches / +5.3 cm of chest circumference), and then use Step 4 (Back & Belly Length at 1.2 rounds per cm) to work fewer even rounds in Stage 1C before starting the back flap decreases in Stage 1D.
5. Is the small gold bell on the collar required?
No. The 10 mm gold craft bell listed in the notions is completely optional and intended only for supervised holiday photos. If your dog tends to chew on collar attachments or if the sweater will be worn unattended, leave the bell off entirely.
Share Your Finished Sweater
If you make a test piece or complete this gingerbread holiday dog sweater for your pup, we would love to hear how the fit and stitch counts worked for you and see your finished photos!
(c) 2026 Abby Marlow / Abby’s Stitches. Personal use only. Please do not copy or republish this pattern.