
Introduction
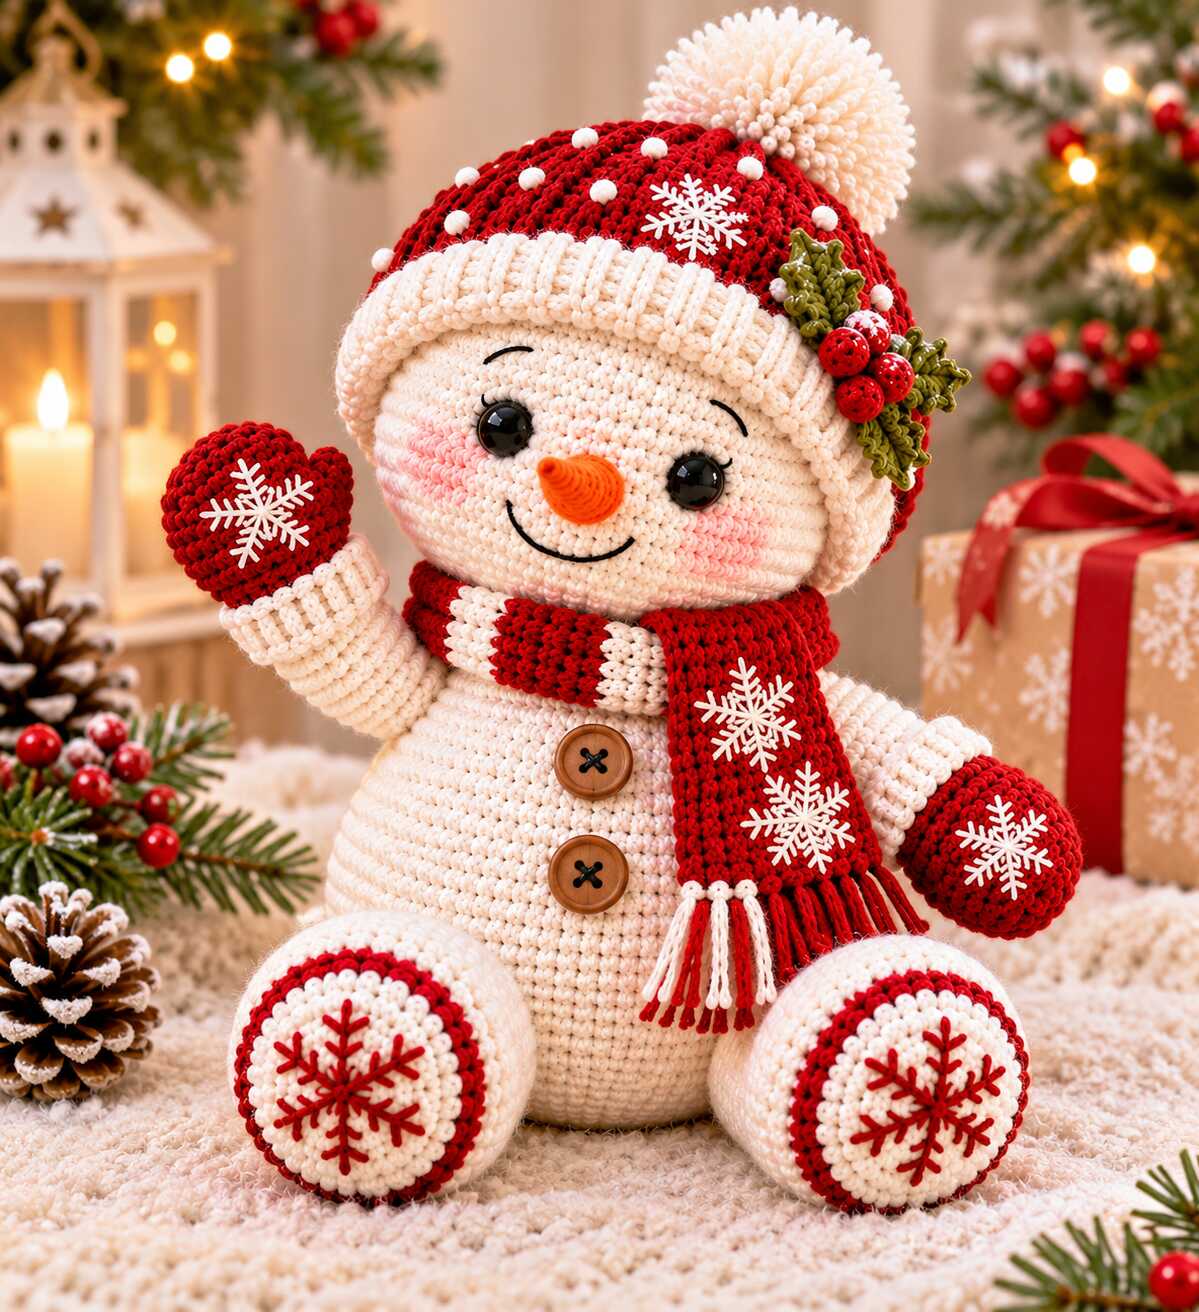
Looking for a cozy winter centerpiece or handmade holiday gift? This free crochet snowman pattern walks you through making the Festive Snowflake Snowman, a seated amigurumi plush dressed in a pom-pom snowflake beanie, ribbed mittens, a striped fringed scarf, and a crocheted holly accent. Designed for intermediate crocheters comfortable with continuous spiral rounds, invisible decreases, color changes, back-loop-only ribbing, and basic surface embroidery, this US crochet guide gives you every round, row, stitch count, measurement checkpoint, and numbered assembly step right on this page. You will also find sizing formulas, troubleshooting fixes, and care tips to help you finish your snowman cleanly.
Pattern status: draft. This pattern has not been fully physically tested yet. Please make the small test piece first, and tell us how it goes.
Quick Facts
- Craft type: Crochet (US terminology)
- Skill level: Intermediate
- Finished size: Approx. 26 cm × 18 cm (10.2 in × 7.1 in) seated
- Yarn weight: Medium / Worsted (CYC #4)
- Hook size: 3.5 mm (US E-4)
- Gauge: 20 stitches × 22 rounds = 10 cm × 10 cm (4 in × 4 in) in continuous spiral sc; approx. 15.4 rows = 10 cm (4 in) unstretched in BLO sc ribbing
- Estimated yardage: Approx. 232–284 m (255–311 yds) total across 5 colors (estimate, includes 15% allowance)
- Estimated time: Not specified in the pattern guide. [MY TEST NOTES: how long it took]
About This Design
The Festive Snowflake Snowman is a seated decorative plush worked entirely in US crochet, featuring a one-piece bottom-up body and head, forward-facing feet with embroidered snowflakes, mittens with ribbed cuffs, a striped scarf, and a pom-pom beanie trimmed with holly leaves and berries. To keep assembly sturdy and straightforward compared with the reference photograph, the body and head are worked continuously with no neck seam, the hat brim and mitten cuffs use back-loop-only single crochet ribbing, and the snowflakes and hat snow dots are added with surface embroidery after crocheting. Because this is a draft pattern created from a reference photo, make a small gauge swatch first and check proportions as you assemble.
Construction Overview
Every structural piece of this snowman is crocheted with a single 3.5 mm (US E-4) hook. You begin by crocheting the body and head in one continuous piece from the bottom up in spiral rounds, inserting the safety eyes before closing the top of the head. Next, you crochet the carrot nose, two continuous mitten-to-arm pieces with separate sewn thumbs and flat back-loop-only (BLO) ribbed cuffs, and two seated legs worked from the front circular foot pad backward. Finally, you crochet the top-down red beanie crown, flat BLO ribbed brim, yarn pom-pom, two picot-edged holly leaves, three small berries, and a flat striped scarf with fringe, then add surface-embroidered snowflakes and assemble all pieces.
Materials
Yarn: Medium / Worsted Weight (CYC #4) 100% acrylic or cotton-blend yarn, approx. 180 m (197 yds) per 100 g skein. Quantities below are estimates for 1 complete snowman and include a 15% allowance for joining, finishing, and a gauge swatch.
| Color Role | Shade | Estimated Yardage | Estimated Weight |
|---|---|---|---|
| MC (Main Color) | Cream / Off-White | 155–189 m (169–207 yds) | Approx. 95 g |
| CC1 (Accent 1) | Crimson Red | 66–80 m (72–88 yds) | Approx. 41 g |
| CC2 (Accent 2) | Olive Green | 1–2 m (2 yds) | Approx. 1–2 g |
| CC3 (Accent 3) | Tangerine Orange | 2–3 m (3 yds) | Approx. 1–2 g |
| CC4 (Embroidery) | Bright White | 8–10 m (9–11 yds) | Approx. 5 g |
Hook & Notions
- Crochet Hook: 3.5 mm (US E-4), or size needed to achieve tight amigurumi gauge with no stuffing showing.
- Safety Eyes: One pair of 14 mm glossy black safety eyes with washers (replace with embroidered eyes if making for children under 3 years).
- Buttons: Two 18 mm brown wooden 2-hole or 4-hole buttons.
- Stuffing: Approx. 150–180 g polyester fiberfill.
- Embroidery Thread: Black 6-strand embroidery floss (approx. 2 m) for eyebrows, eyelashes, smile, and sewing buttons; optional fabric-safe pink pastel or blush for cheeks.
- Tools: 6 locking stitch markers, yarn needle (blunt tapestry needle), embroidery needle, scissors, sewing pins, and a 6 cm cardboard strip (or 5.5 cm pom-pom maker).
Gauge
Main Amigurumi Gauge (Single Crochet in Continuous Rounds): 20 stitches × 22 rounds = 10 cm × 10 cm (4 in × 4 in) using a 3.5 mm (US E-4) hook in Worsted (CYC #4) yarn (2.0 sts/cm; 2.2 rnds/cm).
BLO Ribbing Gauge (Hat Brim & Cuffs): Approx. 15.4 rows = 10 cm (4 in) unstretched in back-loop-only single crochet.
How to Make Your Gauge Swatch
With MC and a 3.5 mm (US E-4) hook, chain 25. Work 24 sc across (starting in 2nd ch from hook), ch 1, turn. Repeat sc across for 26 rows. Lay the swatch flat without stretching and measure a 10 cm × 10 cm (4 in × 4 in) square in the center. Expected swatch size: approx. 12 cm wide × 11.8 cm tall.
Hook Adjustment Rule: If your swatch has too many stitches per 10 cm, switch to a larger hook. If your swatch has too few stitches per 10 cm, switch to a smaller hook. If your row gauge differs, adjust the number of even rounds or rows proportionally and recalculate finished height. Note that changing hook size changes fabric firmness as well as size; always keep stitches tight enough to hold fiberfill cleanly.
Abbreviations (US Crochet Terms)
| Abbreviation | Meaning & One-Line Explanation |
|---|---|
| BLO | Back loop only — insert hook only into the back loop of the stitch. |
| CC1 / CC2 / CC3 / CC4 | Contrast Color 1 (Red), 2 (Green), 3 (Orange), 4 (White). |
| ch | Chain — yarn over and pull through the loop on the hook. |
| dc | Double crochet — yarn over, insert hook, pull up loop, (yarn over, pull through 2 loops) twice. |
| hdc | Half double crochet — yarn over, insert hook, pull up loop, yarn over, pull through all 3 loops. |
| inc | Increase — work 2 single crochet stitches into the same stitch. |
| invdec | Invisible decrease — insert hook through front loops of next 2 sts, yarn over, pull through 2 loops, yarn over, pull through 2 loops. |
| MC | Main Color (Cream / Off-White). |
| MR | Magic ring — adjustable starting loop pulled tight to close the center hole. |
| picot | Decorative pointed tip — ch 2, sl st into the 2nd ch from the hook. |
| Rnd(s) | Round(s) — worked in continuous spirals unless instructed to join. |
| sc | Single crochet — insert hook, yarn over, pull up loop, yarn over, pull through both loops. |
| sl st | Slip stitch — insert hook, yarn over, pull through stitch and loop on hook in one motion. |
| st(s) | Stitch(es). |
| (…) × N | Repeat the instructions inside parentheses N times around. |
Free Crochet Snowman Pattern Instructions
Pattern Note: All spiral rounds are worked continuously without joining or turning unless noted. Place a stitch marker in the first stitch of each round and move it up as you go. For flat rows (brim, cuffs, scarf), the turning ch 1 does not count as a stitch.
Test Point — Read Before Starting: Because this draft pattern is interpreted from a photograph, check two key physical checkpoints as you work: (1) confirm the hat brim wraps smoothly around the finished stuffed head before sewing the brim to the crown, and (2) pin the seated legs on a flat table before sewing so the snowman balances upright without tipping backward.
1. Body & Head (One Piece, Bottom-Up)
Quantity: Make 1 | Color: MC (Cream) | Construction: Continuous spiral rounds from base to crown.
Rnd 1: Work 6 sc into a MR. Pull tight. [6 sts]
Rnd 2: (inc) × 6. [12 sts]
Rnd 3: (sc, inc) × 6. [18 sts]
Rnd 4: (2 sc, inc) × 6. [24 sts]
Rnd 5: (3 sc, inc) × 6. [30 sts]
Rnd 6: (4 sc, inc) × 6. [36 sts]
Rnd 7: (5 sc, inc) × 6. [42 sts]
Rnd 8: (6 sc, inc) × 6. [48 sts]
Rnd 9: (7 sc, inc) × 6. [54 sts]
Rnd 10: (8 sc, inc) × 6. [60 sts]
Rnd 11: (9 sc, inc) × 6. [66 sts]
Rnd 12: (10 sc, inc) × 6. [72 sts]
Rnd 13: (11 sc, inc) × 6. [78 sts]
Check (Body Base): Flat circle should measure approx. 12.4 cm (4.9 in) across; circumference approx. 39.0 cm (15.4 in).
Rnds 14–21 (8 rounds): Sc in each st around. [78 sts per rnd]
Rnd 22: (11 sc, invdec) × 6. [72 sts]
Rnd 23: (10 sc, invdec) × 6. [66 sts]
Rnd 24: (9 sc, invdec) × 6. [60 sts]
Rnd 25: (8 sc, invdec) × 6. [54 sts]
Rnd 26: (7 sc, invdec) × 6. [48 sts]
Rnd 27: (6 sc, invdec) × 6. [42 sts]
Rnd 28: (5 sc, invdec) × 6. [36 sts]
Rnd 29 (Neck): Sc in each st around. Stuff the body firmly now, shaping a flat seated base. [36 sts]
Check (Body & Neck): Neck opening should measure approx. 5.7 cm (2.3 in) across (18.0 cm / 7.1 in circumference). Seated body height approx. 10.5 cm (4.1 in).
Rnd 30: (5 sc, inc) × 6. [42 sts]
Rnd 31: (6 sc, inc) × 6. [48 sts]
Rnd 32: (7 sc, inc) × 6. [54 sts]
Rnd 33: (8 sc, inc) × 6. [60 sts]
Rnd 34: (9 sc, inc) × 6. [66 sts]
Rnd 35: (10 sc, inc) × 6. [72 sts]
Rnds 36–44 (9 rounds): Sc in each st around. [72 sts per rnd]
Eye Placement: Insert the two 14 mm safety eyes on the front of the head between Rnds 39 and 40, leaving 10 visible stitches between the eye posts. Attach washers firmly inside.
Check (Head Width & Eyes): Head circumference should measure approx. 36.0 cm (14.2 in), diameter approx. 11.5 cm (4.5 in). Confirm both eyes sit level and centered over the front belly.
Rnd 45: (10 sc, invdec) × 6. [66 sts]
Rnd 46: (9 sc, invdec) × 6. [60 sts]
Rnd 47: (8 sc, invdec) × 6. [54 sts]
Rnd 48: (7 sc, invdec) × 6. [48 sts]
Rnd 49: (6 sc, invdec) × 6. [42 sts]
Rnd 50: (5 sc, invdec) × 6. Add firm stuffing into neck and lower head so the head stays upright. [36 sts]
Rnd 51: (4 sc, invdec) × 6. [30 sts]
Rnd 52: (3 sc, invdec) × 6. [24 sts]
Rnd 53: (2 sc, invdec) × 6. Finish stuffing head firmly. [18 sts]
Rnd 54: (sc, invdec) × 6. [12 sts]
Rnd 55: (invdec) × 6. Fasten off, leaving a 15 cm tail. Weave tail through front loops of the final 6 sts, pull tight to close, and bury end. [6 sts]
Check (Completed Body & Head): Total seated height without hat should measure approx. 20.5–21.5 cm (8.1–8.5 in).
2. Carrot Nose
Quantity: Make 1 | Color: CC3 (Orange) | Construction: Continuous spiral rounds from tip to base.
Rnd 1: Work 4 sc into a MR. [4 sts]
Rnd 2: (sc, inc) × 2. [6 sts]
Rnd 3: Sc in each st around. [6 sts]
Rnd 4: (2 sc, inc) × 2. [8 sts]
Rnd 5: (3 sc, inc) × 2. [10 sts]
Rnd 6: (4 sc, inc) × 2. [12 sts]
Rnd 7: Sc in each st around. Sl st in next st and fasten off, leaving a 20 cm tail for sewing. Lightly stuff tip with a pinch of fiberfill. [12 sts]
Check (Carrot Nose): Nose should measure approx. 3.2 cm (1.3 in) long and 1.9 cm (0.75 in) wide at the open base.
3. Arms with Mittens, Thumbs & Ribbed Cuffs
Quantity: Make 2 Arms, 2 Thumbs, 2 Cuffs | Colors: CC1 (Red) & MC (Cream) | Construction: Continuous spiral rounds from mitten tip to shoulder; separate thumb and BLO ribbed cuff.
Main Arm & Mitten (Make 2 — start with CC1 Red):
Rnd 1: Work 6 sc into a MR. [6 sts]
Rnd 2: (inc) × 6. [12 sts]
Rnd 3: (sc, inc) × 6. [18 sts]
Rnd 4: (2 sc, inc) × 6. [24 sts]
Rnds 5–8 (4 rounds): Sc in each st around. [24 sts per rnd]
Rnd 9: (4 sc, invdec) × 4. Switch to MC (Cream) on the final yarn-over of the last stitch. [20 sts]
Rnd 10 (MC): Working in BLO, sc in each st around. (Creates a crisp wrist edge.) [20 sts]
Rnds 11–18 (8 rounds, MC): Sc in each st around. Stuff the red mitten firmly and the lower arm moderately. [20 sts per rnd]
Rnd 19 (MC): (3 sc, invdec) × 4. [16 sts]
Rnd 20 (MC): Sc in each st around. Lightly stuff upper arm, leaving top 2 rounds unstuffed so it flattens neatly. Fasten off, leaving a 25 cm tail for sewing. [16 sts]
Check (Arm & Mitten): Total length approx. 9.1 cm (3.6 in); mitten diameter approx. 3.8 cm (1.5 in); wrist circumference approx. 10.0 cm (3.9 in).
Mitten Thumb (Make 2 — CC1 Red):
Rnd 1: Work 6 sc into a MR. [6 sts]
Rnd 2: (sc, inc) × 3. [9 sts]
Rnds 3–4 (2 rounds): Sc in each st around. Sl st in next st and fasten off, leaving a 15 cm tail. Stuff lightly. [9 sts per rnd]
Mitten Ribbed Cuff (Make 2 — MC Cream, worked flat):
Row 1: Ch 5. Sc in 2nd ch from hook and in each remaining ch across. Ch 1, turn. [4 sts]
Rows 2–16 (15 rows): Working in BLO, sc in each st across. Ch 1, turn (omit ch 1 after Row 16). [4 sts per row]
Join Cuff: Fold Row 16 to meet Row 1 and sl st the 4 sts together to form a ring. Fasten off, leaving a 25 cm tail. [4 sl sts]
Check (Thumb & Cuff): Thumb length approx. 1.8 cm (0.7 in). Cuff ring measures approx. 10.4 cm (4.1 in) around × 2.0 cm (0.8 in) wide and slides cleanly over the wrist.
4. Seated Legs & Feet
Quantity: Make 2 | Colors: MC (Cream) & CC1 (Red) | Construction: Continuous spiral rounds from front foot pad backward.
Rnd 1 (MC): Work 6 sc into a MR. [6 sts]
Rnd 2 (MC): (inc) × 6. [12 sts]
Rnd 3 (MC): (sc, inc) × 6. [18 sts]
Rnd 4 (MC): (2 sc, inc) × 6. [24 sts]
Rnd 5 (MC): (3 sc, inc) × 6. Switch to CC1 (Red) on the final yarn-over of the last stitch. [30 sts]
Rnd 6 (CC1): (4 sc, inc) × 6. Switch back to MC (Cream) on the final yarn-over of the last stitch. [36 sts]
Check (Foot Pad): Flat circular foot pad should measure approx. 5.7 cm (2.3 in) across with a crisp red outer border.
Rnd 7 (MC): Working in BLO, sc in each st around. (Turns the edge of the foot pad sharply.) [36 sts]
Rnds 8–13 (6 rounds, MC): Sc in each st around. [36 sts per rnd]
Rnd 14 (MC): (4 sc, invdec) × 6. [30 sts]
Rnd 15 (MC): Sc in each st around. [30 sts]
Rnd 16 (MC): (3 sc, invdec) × 6. [24 sts]
Rnd 17 (MC): Sc in each st around. Sl st in next st and fasten off, leaving a 30 cm tail for sewing. Embroider the red snowflake on the flat Cream foot pad before stuffing, then stuff the leg firmly. [24 sts]
Check (Leg Depth): Leg cylinder depth (Rnds 7–17) should measure approx. 5.0 cm (2.0 in); open attachment edge circumference approx. 12.0 cm (4.7 in).
5. Snowflake Beanie Hat & Ribbed Brim
Quantity: Make 1 Crown, 1 Brim, 1 Pom-Pom | Colors: CC1 (Red) & MC (Cream) | Construction: Top-down spiral crown + flat BLO ribbed brim.
Hat Crown (CC1 Red):
Rnd 1: Work 6 sc into a MR. [6 sts]
Rnd 2: (inc) × 6. [12 sts]
Rnd 3: (sc, inc) × 6. [18 sts]
Rnd 4: (2 sc, inc) × 6. [24 sts]
Rnd 5: (3 sc, inc) × 6. [30 sts]
Rnd 6: (4 sc, inc) × 6. [36 sts]
Rnd 7: (5 sc, inc) × 6. [42 sts]
Rnd 8: (6 sc, inc) × 6. [48 sts]
Rnd 9: (7 sc, inc) × 6. [54 sts]
Rnd 10: (8 sc, inc) × 6. [60 sts]
Rnd 11: (9 sc, inc) × 6. [66 sts]
Rnd 12: (10 sc, inc) × 6. [72 sts]
Rnd 13: (11 sc, inc) × 6. [78 sts]
Rnds 14–20 (7 rounds): Sc in each st around. Sl st in next st and fasten off, weaving in the red tail. [78 sts per rnd]
Check (Hat Crown): Bottom circumference should measure approx. 39.0 cm (15.4 in) — giving +3.0 cm (1.2 in) ease over the 36.0 cm head.
Hat Ribbed Brim (MC Cream, worked flat):
Row 1: Ch 8. Sc in 2nd ch from hook and in each remaining ch across. Ch 1, turn. [7 sts]
Rows 2–60 (59 rows): Working in BLO, sc in each st across. Ch 1, turn (omit ch 1 after Row 60). [7 sts per row]
Join Brim: Fold Row 60 to meet Row 1 and sl st the 7 sts together to form a ring. Leave a 60 cm tail for sewing to the crown. [7 sl sts]
Pom-Pom (MC Cream): Wrap MC yarn 140 times around a 6 cm wide cardboard strip. Tie tightly around the center with a 30 cm strand of MC, cut both loops, and trim evenly into a dense 5.5 cm (2.2 in) sphere. Keep tie strands for sewing.
Check (Hat Brim): Brim ring should measure approx. 39.0 cm (15.4 in) around × 3.5 cm (1.4 in) tall. Test-fit over the snowman’s head before joining to the crown.
6. Holly Leaves & Berries
Quantity: Make 2 Leaves, 3 Berries | Colors: CC2 (Olive Green) & CC1 (Red) | Construction: Leaves worked around a foundation chain; berries worked in spiral rounds.
Holly Leaf (Make 2 — CC2 Olive Green):
Foundation: Ch 8. (7 workable chains.)
Side 1: Working down the chain from 2nd ch from hook: sl st in 2nd ch, sc in next ch, (hdc, picot) in next ch, dc in next ch, (hdc, picot) in next ch, sc in next ch, (sc, picot, sc) in last ch (leaf tip). [8 sts + 3 picots]
Side 2: Rotate to work back along the 6 underside loops: sc in next ch, (hdc, picot) in next ch, dc in next ch, (hdc, picot) in next ch, sc in next ch, sl st in last ch. Fasten off, leaving a 20 cm tail. [6 sts + 2 picots; 14 base sts total]
Holly Berry (Make 3 — CC1 Red):
Rnd 1: Work 6 sc into a MR. [6 sts]
Rnd 2: Sc in each st around. Fasten off, leaving a 15 cm tail. Weave tail through front loops of the 6 sts, pull closed into a small ball (no stuffing needed). [6 sts]
Check (Holly Accent): Each leaf should measure approx. 4.2 cm (1.7 in) long with 5 pointed tips; each berry approx. 1.0 cm (0.4 in) wide.
7. Striped Snowflake Scarf
Quantity: Make 1 | Colors: CC1 (Red) & MC (Cream) | Construction: Worked flat in rows of sc; ch 1 at end of each row does not count as a stitch.
Row 1 (CC1 Red): Ch 10. Sc in 2nd ch from hook and in each remaining ch across. Ch 1, turn. [9 sts]
Rows 2–28 (27 rows, CC1 Red): Sc in each st across. Ch 1, turn. Switch to MC on final yarn-over of Row 28. [9 sts per row]
Rows 29–64 (36 rows — Neck Stripes): Work 3 rows MC, then 3 rows CC1. Repeat this 6-row stripe sequence 6 times total (18 rows MC, 18 rows CC1). Carry unused yarn loosely up the side edge or fasten off cleanly at each color change. [9 sts per row]
Rows 65–92 (28 rows, CC1 Red): Sc in each st across. Ch 1, turn (omit ch 1 after Row 92). Fasten off and weave in ends. [9 sts per row]
Fringe: Cut 10 strands of CC1 and 10 strands of MC, each 12 cm (4.7 in) long. Fold each strand in half and lark’s-head knot 10 strands (alternating Red and Cream) evenly across the 9 stitches of each short end (place 1 knot per stitch and 1 extra at the center stitch). Trim fringe to 3.5 cm (1.4 in).
Check (Scarf): Scarf body (excluding fringe) should measure approx. 4.5 cm wide × 41.8 cm long (1.8 in × 16.5 in) and wrap once around the 18.0 cm neck with two front tails.
Assembly
Complete all surface embroidery before sewing parts to the body where noted so you can hide yarn knots neatly on the wrong side.
- Embroider Snowflakes & Dots (Before Final Assembly): Using CC4 (White), embroider 1 six-pointed snowflake (approx. 2.5 cm wide, 3 crossed straight stitches with small V-branches on each arm) onto the front of each Red mitten (spanning Rnds 3–7), 2 snowflakes onto the first Red scarf tail (spanning Rows 6–13 and Rows 16–23), and 1 snowflake on the front-center of the Red hat crown (spanning Rnds 12–18). Add 18–20 small White French knots spaced 3–4 rounds apart around the rest of the hat crown. Using CC1 (Red), embroider 1 six-pointed snowflake onto the flat Cream center of each foot pad (Rnds 1–5) before stuffing the legs.
- Assemble the Arms & Mittens (2 pieces): Sew 1 Red thumb (9-st opening) onto the inner side of each mitten spanning Rnds 5–7 (mirror left and right so thumbs point inward toward the body). Slip 1 ribbed Cream cuff ring over each wrist (covering Rnd 9–10 junction). Place 4 stitch markers around the 20-st wrist (every 5 sts) and 4 markers around the 16-row cuff edge (every 4 row-ends). Whipstitch each quadrant by joining 3 cuff row-ends 1-to-1 to 3 wrist stitches, then catching 2 wrist stitches into the 4th cuff row-end (4 × 5 = 20 sts).
- Attach the Seated Legs (2 pieces): Stuff both legs firmly. Place the snowman on a flat table and pin both legs symmetrically to the lower front of the body spanning Body Rnds 5–12, leaving exactly 8 body stitches centered between the inner edges of the two legs. Confirm the snowman sits upright without tipping. Whipstitch all 24 open stitches of each leg directly to the body, adding a small extra pinch of stuffing before closing the final 4 stitches.
- Attach the Arms (2 pieces): Flatten the 16-st top opening of each arm (8 pairs of stitches across). Pin the arms to the left and right sides of the body spanning Body Rnds 23–25 (2 rounds below the neck). Angle the snowman’s right arm slightly upward for a waving pose and the left arm slightly downward, or position both symmetrically. Whipstitch through both layers of the flattened arm edge directly into the body.
- Embroider the Face & Attach the Nose: Pin the Orange carrot nose (12-st base) centered between the eyes, spanning Head Rnds 37–39, and whipstitch all 12 base stitches securely to the head. Using black embroidery floss, stitch a gentle curved smile spanning Head Rnds 34–35 (6 stitches wide, centered below the nose), 2 small curved eyebrows spanning Head Rnds 42–43 (3 stitches wide above each eye), and 2 tiny diagonal eyelashes at the outer corner of each safety eye. Optionally dab soft pink cheek blush onto Rnds 36–38 just outside each eye.
- Sew the Belly Buttons: Thread black embroidery floss through the two 18 mm wooden buttons and sew them vertically down the front center of the belly using an X stitch: place the upper button centered on Body Rnds 21–22 and the lower button centered on Body Rnds 15–16.
- Assemble & Attach the Hat: Divide the 78-st bottom edge of the Red crown into 6 equal sections with stitch markers (13 sts per section). Divide the 60-row Cream brim ring into 6 equal sections (10 row-ends per section). Align markers with the brim seam at the back. In each section, whipstitch 7 brim row-ends 1-to-1 to 7 crown stitches, and catch 2 crown stitches into the 3rd, 6th, and 9th brim row-ends (7 × 1 + 3 × 2 = 13 crown sts per section; 6 × 13 = 78 sts total). Sew the Cream pom-pom tightly to Rnd 1 at the crown peak. Sew the 2 Olive Green holly leaves in a V-shape onto the right side of the brim, then cluster the 3 Red berries over the leaf stems. Place the finished hat snugly onto the head (tilted slightly back so eyebrows remain visible) and tack it discreetly to the head at 6 points around the inside brim edge.
- Wrap the Scarf: Wrap the striped neck section (Rows 29–64) once around Body Rnd 29 (the neck), crossing the longer snowflake-embroidered Red tail over the front right side of the belly. Tack the scarf unobtrusively at the front crossover with 2 tiny red stitches so it stays neatly in place.
Changing the Size
Because amigurumi pieces are shaped in 6-stitch multiples, the cleanest way to resize this snowman without rewriting every round is to change yarn weight and hook size together, or scale stitch counts proportionally using your swatch gauge:
- Method 1 — Yarn & Hook Scaling (Easiest): Work the exact same stitch counts with a different yarn weight and matching tight amigurumi hook. For example, switching to DK (CYC #3) yarn with a 2.75 mm (US C-2) hook yields approx. 24 sts/10 cm and a smaller snowman (~21.5 cm / 8.5 in tall); switching to Bulky (CYC #5) yarn with a 5.0 mm (US H-8) hook yields approx. 14 sts/10 cm and a larger plush (~37 cm / 14.5 in tall). Scale safety eyes and buttons proportionally (10–12 mm eyes for DK; 18–20 mm eyes for Bulky).
- Method 2 — Gauge Formula (Same Yarn): To target a new body diameter D (in cm), calculate required maximum body stitches as: Max Body Stitches = round to nearest multiple of 6 of (D × 3.14 × Your Stitches per cm). Scale the head maximum stitches to approx. 92% of body stitches (rounded to a multiple of 6), the neck to 46%, and the hat crown to equal the new body maximum stitches (+6 sts over head). Adjust the number of even rounds on the body and head using: Even Rounds = Target Section Height (cm) × Your Rounds per cm. For the hat brim, calculate: Brim Rows = (New Hat Crown Stitches ÷ Your Stitches per cm) × Your BLO Ribbing Rows per cm.
Troubleshooting
| Problem | Practical Fix |
|---|---|
| 1. Stuffing shows through stitch gaps | Drop down one hook size (to 3.25 mm or 3.0 mm) and use invisible decreases (front loops only) instead of standard sc2tog. Avoid overstuffing until stitches stretch apart. |
| 2. Snowman leans or tips backward | Reposition the seated legs 1–2 rounds lower toward the front base and pack dense fiberfill firmly into the bottom of the belly so the base sits flat. |
| 3. Head wobbles on the neck | Pack extra fiberfill tightly through the 36-st neck (Rnd 29) before closing the head, or insert a folded 10 cm cardboard tube or foam curler vertically through the neck core. |
| 4. Hat brim feels too tight or too loose | Check your BLO ribbing row gauge before joining. Add 2–4 rows (in multiples of 2) if tight, or remove 2–4 rows if loose, and adjust the 6-section whipstitch ratio accordingly. |
| 5. Visible jog at Red/Cream foot ring | Complete the final yarn-over of the last Cream stitch in Rnd 5 with Red, and work the first stitch of Rnd 7 in BLO as a slip stitch + sc, or align the color-change jog to the underside of the foot. |
| 6. Snowflakes look uneven or sink into fabric | Use a blunt tapestry needle so you pass between stitches rather than splitting yarn plies, keep embroidery tension relaxed so stitches sit flat on the surface, and mark the 6 snowflake points with pins first. |
Finishing and Care
- Weaving in Ends: Thread all remaining yarn tails onto a blunt yarn needle, weave back and forth through the stuffing or inner fabric for at least 4–5 stitches, and trim flush so ends cannot pop out.
- Blocking: Do not wet-block stuffed amigurumi components. If the striped scarf curls slightly along its edges, lightly steam-block it flat from 2 cm away (never press a hot iron directly onto acrylic yarn) and allow it to cool flat.
- Seaming & Security: Gently tug the hat, nose, holly leaves, berries, and buttons to confirm every seam is secure. If gifting to a child under 3 years, replace safety eyes and wooden buttons with stitched yarn eyes and crocheted circles.
- Washing Instructions: Spot-clean gently with cool water and mild soap using a damp cloth, then air-dry flat away from direct heat. Avoid machine washing or tumble drying, which can shift fiberfill and loosen embroidery or blush.
- Storage: Store in a breathable cotton bag or lidded bin in a cool, dry place between holiday seasons; avoid compressing the pom-pom or carrot nose under heavy items.
Frequently Asked Questions
Is this snowman pattern beginner-friendly?
This pattern is rated Intermediate rather than Beginner because it combines continuous spiral shaping, back-loop-only ribbing, color changes, small picot-edged holly leaves, surface embroidery, and multi-piece 3D amigurumi assembly. Confident advanced beginners can make it by taking each Check box one stage at a time.
Can I make this crochet snowman safe for toddlers or babies?
Yes, with two important substitutions noted in the guide: replace the 14 mm plastic safety eyes with embroidered black yarn eyes, and replace the two 18 mm wooden belly buttons with flat crocheted circles or stitched details so there are no small detachable parts.
Why is the body and head crocheted in one piece?
Working the body and head continuously from the bottom up eliminates a neck seam, keeps the head more securely attached to the body, and makes it easier to wrap the striped scarf neatly around Round 29.
Can I use cotton yarn instead of acrylic yarn?
Yes. The guide specifies Medium / Worsted Weight (CYC #4) 100% acrylic or cotton-blend yarn at approx. 180 m (197 yds) per 100 g. Cotton gives crisp stitch definition for amigurumi, though it stretches slightly less than acrylic, so be sure to test-fit the BLO ribbed hat brim over the finished head before joining it to the crown.
Final Notes
If you try this draft pattern, I would love to see your finished snowman and hear how your gauge swatch and test pieces turned out! Feel free to share your photos and feedback.
(c) 2026 Abby Marlow / Abby’s Stitches. Personal use only. Please do not copy or republish this pattern.