
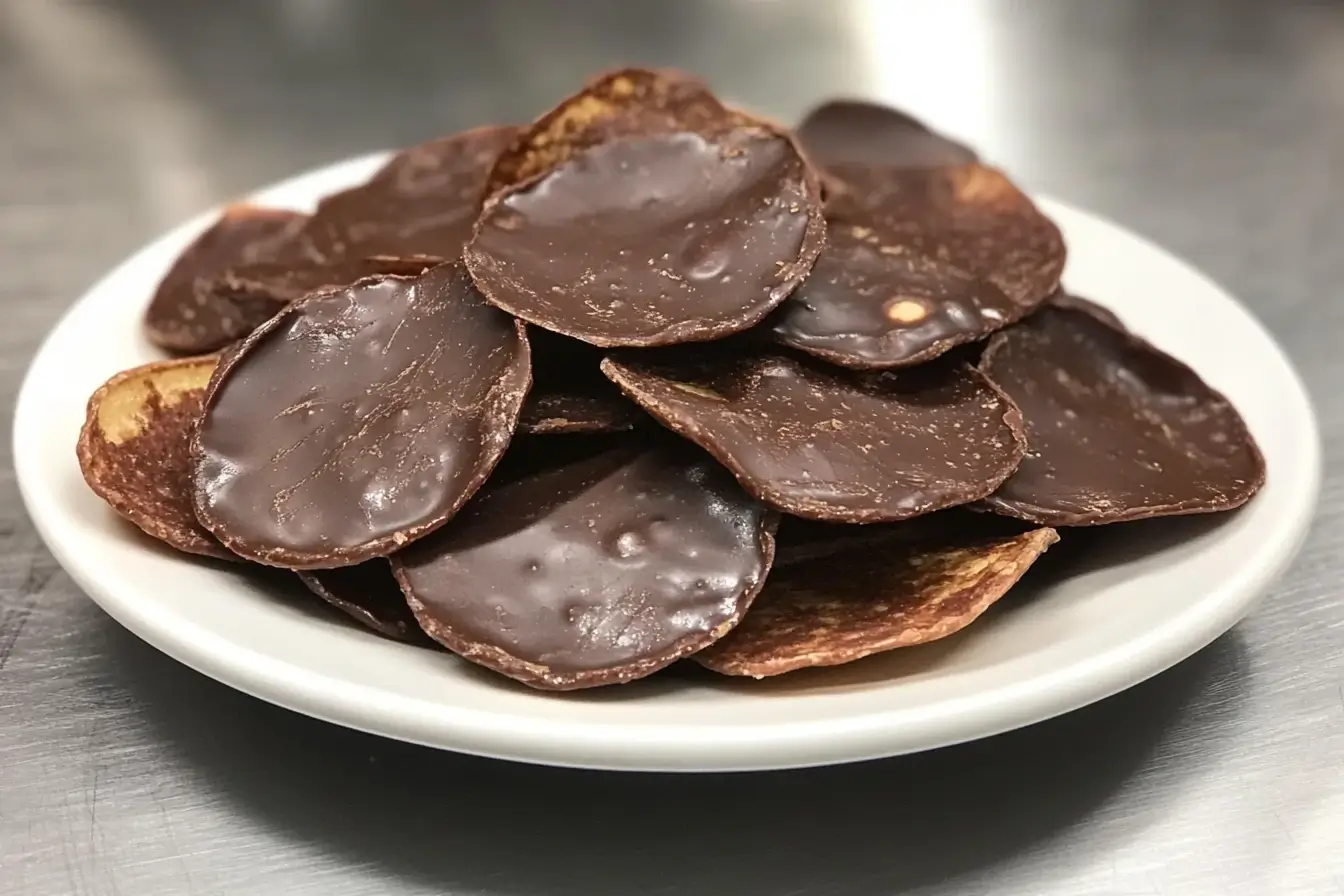
Are you craving something both salty and sweet, but you don’t want to settle for store-bought treats? If you’re looking for a snack that combines the irresistible crunch of potato chips with the smooth indulgence of chocolate, you’re in for a real treat. Making chocolate-covered chips at home is not only simple but gives you full control over the sweetness and flavors. By the end of this article, you’ll know exactly how to make chocolate-covered chips from scratch, with all the right tools and tips to ensure your snack turns out just perfect every time.
Why Chocolate-Covered Chips?
There’s something magical about the combination of salty and sweet. Picture yourself sitting down with a bowl of crispy potato chips, each one covered in rich, velvety chocolate. The moment you take a bite, the crunch of the chip contrasts beautifully with the smoothness of the chocolate, creating the perfect snack experience. Whether you’re preparing a quick indulgence for yourself or making them to share at a party, chocolate-covered chips are always a crowd-pleaser.
But making them at home offers even more advantages than grabbing a bag off the shelf. You get to control the quality of the ingredients, adjust the sweetness to your liking, and get creative with toppings. Plus, it’s a fun and easy way to treat yourself or others to something unique. It’s the ideal combination of simplicity and indulgence.
Kitchen Equipment Needed
Before we jump into the ingredients and the steps, let’s first take a look at the tools you’ll need to get started. Having the right kitchen equipment on hand will ensure that the process goes smoothly and that your chocolate-covered chips turn out perfectly.
Essential Tools & Equipment:
- Microwave or Double Boiler: You’ll need one of these to melt the chocolate without burning it. Both methods are straightforward, and you likely already have one of them in your kitchen.
- Baking Sheet or Tray: This will be used to place the chips as they’re coated in chocolate, ensuring they don’t stick to the surface.
- Parchment Paper or Wax Paper: Lining the tray with parchment paper ensures that the chips won’t stick as the chocolate sets, making cleanup easier.
- Spatula or Spoon: A spatula or spoon will help you evenly coat each chip with the melted chocolate.
- Tongs or Forks: These are handy for dipping the chips into the melted chocolate, allowing you to avoid getting your fingers messy.
Optional Equipment:
- Chocolate Tempering Machine: While not necessary, a chocolate tempering machine can help you achieve a glossy, professional finish if you want to take your chocolate-making skills to the next level.
- Cooling Rack: If you want to avoid excess chocolate pooling underneath the chips, a cooling rack will allow the chocolate to drip off evenly.
Alternative Equipment:
- Oven (for melting chocolate): If you don’t have a microwave or double boiler, you can use your oven. Simply place the chocolate in an oven-safe dish and melt it on low heat.
Ingredients for Chocolate-Covered Chips
Once you’ve got all the equipment you need now is the time to collect the necessary ingredients. You’ll need just a few simple items, most of which you probably already have in your kitchen. Here’s what you’ll need:
| Ingredients | Amount |
|---|---|
| Potato Chips (plain, non-salty) | 1 bag (about 150g) |
| Chocolate (dark, milk, or white) | 200g (depending on preference) |
| Sea Salt (optional) | Pinch |
| Sprinkles or Toppings (optional) | As desired |
- Potato Chips: Choose plain, unsalted potato chips for the best results. The goal is to balance the saltiness of the chips with the sweetness of the chocolate.
- Chocolate: Dark chocolate is often the preferred option for its rich, deep flavor. However, milk or white chocolate is equally delicious and offers a sweeter, creamier profile.
- Sea Salt: If you love the sweet and salty combination, a pinch of sea salt can elevate the flavor of your chocolate-covered chips.
- Sprinkles or Toppings: Feel free to add some creativity here. You can use colorful sprinkles, crushed nuts, or even a drizzle of white chocolate for added texture and flavor.
Step-by-Step Guide to Making Chocolate-Covered Chips
It’s time to get to the fun part—making your chocolate-covered chips! Follow these simple steps to create a snack that’s as delicious as it is easy to prepare.
- Prepare the Chips:
- Begin by laying out your potato chips in a single layer on a baking sheet. Line the tray with parchment paper to make cleanup easy and to prevent the chips from sticking.
- Be sure to leave some space between each chip to allow for even coating.
- Melt the Chocolate:
- You can melt the chocolate either in the microwave or using a double boiler.
- Microwave: Break the chocolate into small chunks and place it in a microwave-safe bowl. Heat in 30-second intervals, stirring each time until the chocolate is smooth and fully melted.
- Double Boiler: Fill the bottom pot with water, bring it to a simmer, and place the chocolate in the top pot. Stir until it’s completely melted.
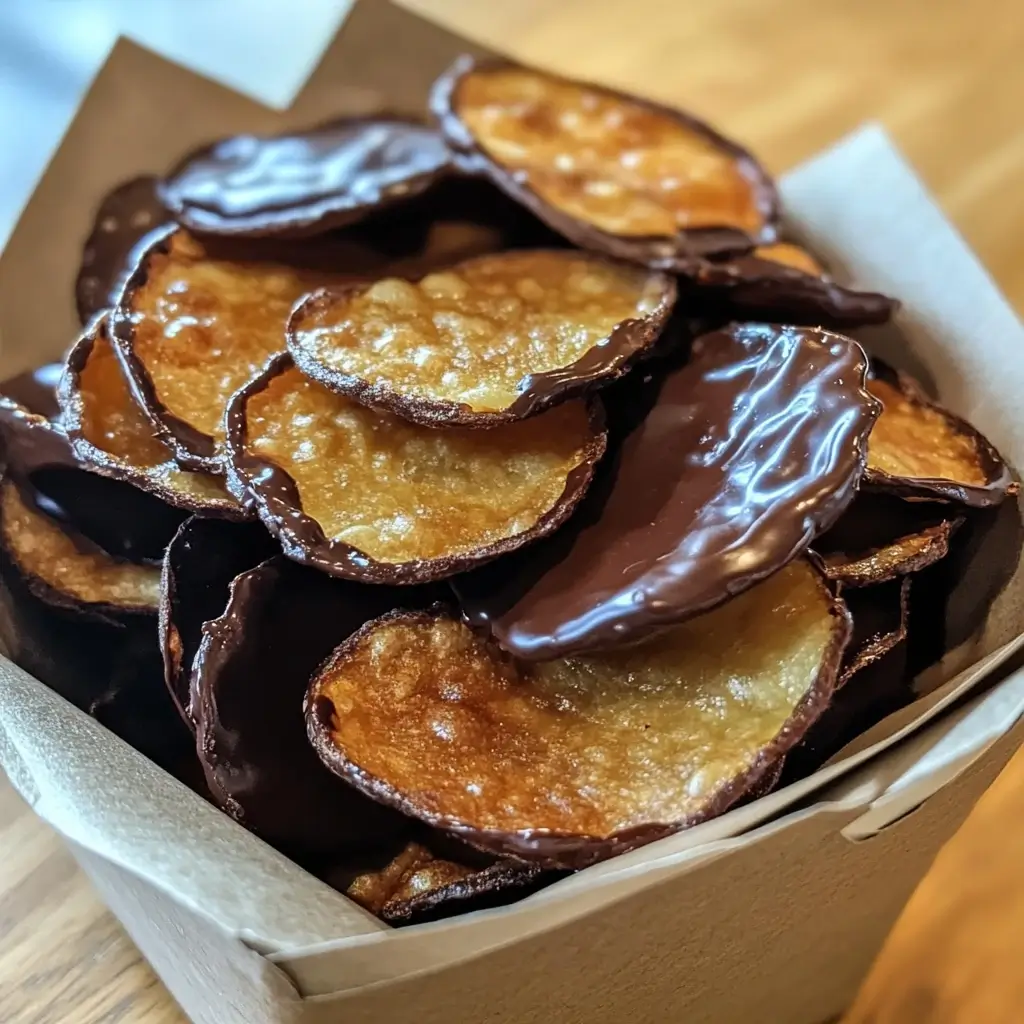
- Coat the Chips:
- Once the chocolate is melted, it’s time to coat the chips. Using a spoon or spatula, drizzle the melted chocolate over each chip. Make sure you coat them evenly. If you want a thicker layer of chocolate, you can dip the chips completely into the chocolate.
- If you’re using tongs or forks, simply dip each chip into the chocolate and let any excess drip off.
- Add Finishing Touches:
- If you like the sweet-salty contrast, sprinkle a small amount of sea salt over the chocolate-covered chips.
- You can also get creative by adding toppings like colorful sprinkles, chopped nuts, or a drizzle of white chocolate for extra flair.
- Let the Chocolate Set:
- Allow the chocolate to cool and harden. You can leave the tray at room temperature for about 30 minutes or refrigerate it for 10-15 minutes for quicker results.
- Once the chocolate is set, the chips are ready to enjoy!
Why Chocolate-Covered Chips Are Perfect for Any Occasion
Chocolate-covered chips are an ideal snack for almost any occasion. Whether you’re treating yourself after a long day, preparing a party snack, or bringing something sweet to a gathering, these treats are perfect for every situation. Here’s why:
- Quick and Easy to Make: This recipe is incredibly simple, and it takes less than 30 minutes to prepare and enjoy.
- Customizable: You can adjust the sweetness, toppings, and even the type of chocolate to match your personal preferences.
- Great for Sharing: Whether you’re hosting a movie night or attending a party, these chocolate-covered chips are sure to be a hit with everyone.
- Perfect Balance of Sweet and Salty: The combination of the salty chips and the sweetness of the chocolate creates a snack that’s hard to resist.
Tips for the Best Chocolate-Covered Chips
Here are a few tips that will help ensure your chocolate-covered chips are a success:
- Use High-Quality Chocolate: The better the chocolate, the better your chocolate-covered chips will taste. Opt for premium chocolate that melts smoothly and has a rich flavor.
- Be Patient with Melting: Always melt the chocolate slowly. If you heat it too quickly, it could seize up or burn. Stir regularly to maintain a smooth consistency.
- Get Creative with Toppings: Don’t be afraid to experiment with different toppings. Crushed pretzels, candy pieces, or even a dash of chili flakes can take your chocolate-covered chips to the next level.
- Storage Tips: To keep your chocolate-covered chips fresh, store them in an airtight container at room temperature. If you prefer, you can refrigerate them, but be aware that the chocolate may become a little firmer.
Frequently Asked Questions (FAQ)
Q: Can I use any type of chocolate for this recipe?
A: Yes! You can use dark, milk, or white chocolate depending on your taste preference. Dark chocolate provides a rich, slightly bitter flavor, while milk chocolate is smoother and sweeter. White chocolate gives a creamy, sweet finish.
Q: How can I avoid cracking the chocolate as it cools?
A: To prevent the chocolate from cracking, ensure that it is melted slowly and stirred continuously. If you want a professional finish, you can temper the chocolate, though it’s not essential for beginners.
Q: How long do chocolate-covered chips last?
A: If stored in an airtight container at room temperature, your chocolate-covered chips can last up to a week. You can refrigerate them to extend their freshness for a few more days.
Q: Can I make chocolate-covered chips with flavored potato chips?
A: While plain chips are the best option for a balanced flavor, you can certainly experiment with flavored chips like barbecue or sour cream and onion for a unique twist. Just be mindful that the flavors might clash with the chocolate.
Enjoy Your Homemade Chocolate Covered Chips
Making chocolate-covered chips at home is an easy, fun, and rewarding experience. With just a few ingredients and some creativity, you can create a treat that’s perfect for any occasion. Whether you’re craving a sweet snack or need something to impress at a party, these chocolate-covered chips are sure to hit the spot. The best part? You can customize them to suit your preferences, making each batch uniquely yours.
So why not give this recipe a try? With the right tools and a little bit of patience, you can create a delicious treat that will satisfy both your sweet and salty cravings. Ready to start? Grab your ingredients, and enjoy the process of making this irresistible snack!
Chocolate Covered Potato Chips Recipe
Ingredients
- 1 bag of plain, unsalted potato chips (about 150g)
- 200 g of chocolate (dark, milk, or white, depending on preference)
- Pinch of sea salt (optional)
- Sprinkles or toppings of choice (optional, such as chopped nuts, colorful sprinkles, or crushed pretzels) For added flavor and texture
Instructions
Prepare the Chips
- Lay the potato chips out on a baking sheet lined with parchment paper. Ensure the chips don’t overlap for an even chocolate coating.
Melt the Chocolate
- Microwave Method: Break the chocolate into pieces and place it in a microwave-safe bowl. Microwave in 30-second intervals, stirring each time until fully melted and smooth.
- Double Boiler Method: Heat a pot of water to simmer, place a heatproof bowl over the pot (without touching the water), and add the chopped chocolate. Stir constantly until melted.
Coat the Chips
- Once the chocolate is fully melted, use a spoon or spatula to drizzle or spread the melted chocolate over the chips, ensuring an even coating. You can also dip each chip fully into the chocolate for a thicker coating.
Add Finishing Touches
- Sprinkle a pinch of sea salt on top of the chocolate-covered chips for an enhanced sweet-salty flavor contrast. You can also add your choice of toppings like colorful sprinkles, chopped nuts, or crushed pretzels for extra texture and flavor.
- Let the Chocolate Set
- Allow the chocolate to cool and harden at room temperature for about 30 minutes or speed up the process by placing the baking sheet in the fridge for 10-15 minutes.
Serve and Enjoy
- Once the chocolate is fully set, your chocolate-covered chips are ready to enjoy! Serve them immediately, or store them in an airtight container for later.
Notes
- Storage: Store chocolate-covered chips in an airtight container at room temperature or in the fridge for up to a week.
- Customizations: Feel free to experiment with different types of chocolate or add creative toppings like crushed candy, marshmallows, or flavored salts.
- Note: Nutrition values will vary depending on the type of chocolate and toppings you use. Use an online calculator or plugin like WP Recipe Maker to generate the precise values.
Now that you know how to make chocolate-covered chips, it’s time to get in the kitchen and start creating your own batch! Don’t forget to experiment with different toppings and share your creations with friends and family. Enjoy every bite, and happy snacking! For more Quick and Easy desserts check HERE.
2 thoughts on “How to make chocolate covered chips at home”