

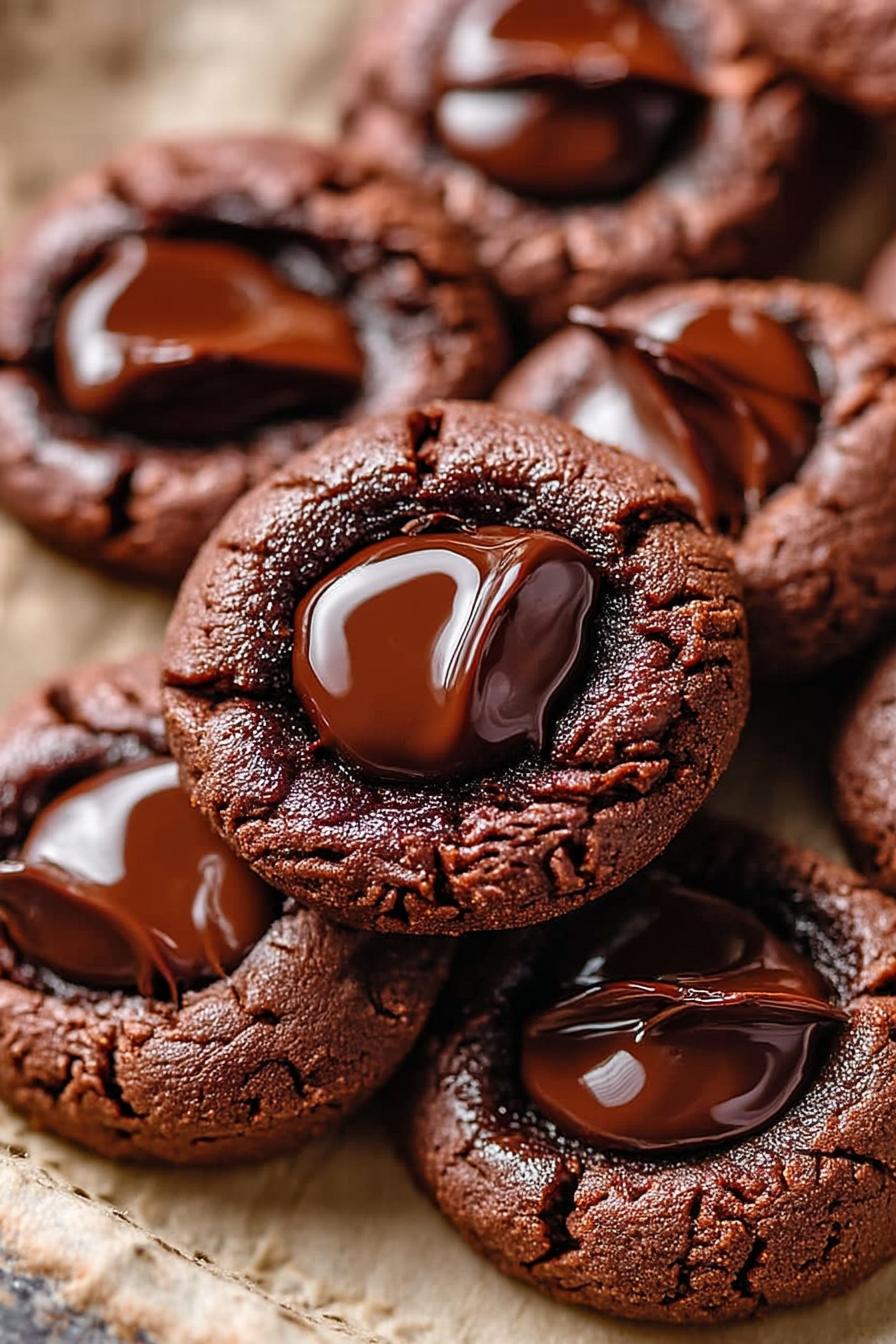
Every bite of these Chocolate Thumbprint Cookies sends you straight to a cozy café moment at home. On my third trial, I noticed the dough spread less when chilled for exactly 30 minutes, locking in a deep, rich center and crisp edge. The scent of vanilla and warm sugar filling had me buzzing before they even came out of the oven. If you love playing with fillings, check out my take on Strawberry Cheesecake Cookies for another fruity twist.
Prep Time: 20 minutes | Cook Time: 10 minutes | Total Time: 30 minutes | Yield: 24 cookies
About Chocolate Thumbprint Cookies
These little gems combine a tender, buttery base with a caramelized sugar pocket in the center—reminiscent of crème brûlée but in cookie form. I first tested them at holiday baking parties, then refined the chilling time after spotting too much spread. The final version works year-round, whether you need a simple lunchbox treat or a thoughtful hostess gift.
- Quick assembly—ready to bake in under an hour.
- Budget-friendly pantry ingredients.
- Universally loved, from kids to grandparents.
- Inspired by classic French custard, reimagined as a cookie.
Key Ingredients & Their Roles
- Unsalted Butter (1 cup): provides richness. Tip: room temperature ensures easy creaming.
- Powdered Sugar (2/3 cup): keeps texture tender. Sift to avoid lumps.
- Vanilla Extract (1 tsp): deepens aroma. Use pure for best flavor.
- All-Purpose Flour (2 cups): forms structure. Spoon-and-level for accuracy.
- Heavy Cream (1/4 cup): enriches topping. Cold cream helps sugar dissolve evenly.
- Egg Yolks (2): add silkiness to brûlée layer. Separate while cold for cleaner divide.
How to Make Chocolate Thumbprint Cookies
- Preheat the oven to 350°F (175°C). Line two baking sheets with parchment paper.
- In a medium bowl, cream together 1 cup butter and 2/3 cup powdered sugar until light and fluffy, about 2–3 minutes.
- Add 1 teaspoon vanilla extract and 1/8 teaspoon salt; mix until just incorporated.
- Gradually add 2 cups all-purpose flour, stirring until a soft dough forms.
- Form dough into tablespoon-sized balls and place on prepared sheets, spacing 2 inches apart.
- Use your thumb or the back of a teaspoon to create an indentation in each ball.
- Bake for 10–12 minutes, or until edges begin to turn golden.
- Let cookies rest on the baking sheet for 5 minutes, then transfer to a wire rack.
- While cookies cool, combine 1/4 cup heavy cream and 2 tablespoons granulated sugar in a small saucepan; warm gently until sugar dissolves.
- Remove from heat and whisk in 2 egg yolks and 1/2 teaspoon vanilla extract until smooth.
- Spoon a teaspoon of the cream mixture into each indentation.
- Place cookies under the broiler for 1–2 minutes until the topping bubbles and lightly browns—watch closely.
- Allow to cool completely before serving.


Pro Tips & Troubleshooting
- I found chilling the shaped dough 30 minutes ahead prevents over-spreading and yields a better thumbprint.
- If your centers collapse, the oven temperature may be too hot—reduce by 10°F next time.
- Swap granulated sugar with a light brown sugar topping for a deeper caramel flavor.
- Doubling the batch? Keep dough chilled in two batches to maintain consistency.
Storage & Make-Ahead Guide
Store cookies in an airtight container at room temperature for up to 4 days. Freeze unbaked dough balls for up to 2 months, then bake straight from frozen, adding 1–2 minutes to cook time. Reheat finished cookies in a 300°F oven for 3–4 minutes to revive crisp edges—I tried this and they tasted freshly baked.
Serving Suggestions
These Chocolate Thumbprint Cookies pair beautifully with a frothy latte or a scoop of vanilla ice cream. For a lighter snack board, serve alongside Simple Avocado Toast with Egg or a fresh fruit platter.

Frequently Asked Questions
- How do I keep the cookie center from sinking? Chill the shaped dough for at least 30 minutes and bake at the correct temperature to set the edges first.
- Can I use salted butter instead? Yes—just reduce added salt in the dough by half.
- What if my brûlée topping doesn’t brown? Move the rack closer to the broiler and watch constantly; you may need an extra minute.
- Can I freeze finished cookies? Yes, freeze baked cookies in a single layer in an airtight container for up to 2 weeks.
- Is there a dairy-free option? Substitute butter with vegan stick butter and use coconut cream for the topping.
- Why is my dough crumbly? It likely needs more moisture—add a teaspoon of heavy cream at a time until it holds together.
Final Thoughts
These Chocolate Thumbprint Cookies have quickly become my go-to treat for any gathering—especially when I need a show-stopping dessert with minimal effort. I love tapping the cool sugar top to listen for that satisfying crack before diving in. Let me know how your batch turns out!
More Recipes You’ll Love
- Strawberry Cheesecake Cookies – like thumbprints, these feature a creamy cheesecake center for a delightful twist
- Pineapple Upside Sugar Cookies – fruit-topped sugar cookies that mirror the thumbprint style with tropical jam filling
- Quick Pecan Pie Cookies – nutty and sweet, adding a crunchy texture that complements soft thumbprints
- Easy Peanut Butter Cookies – classic peanut butter cookies perfect alongside chocolate thumbprints for a varied cookie tray

Chocolate Thumbprint Cookies
Ingredients
Cookie Dough
- 1 cup unsalted butter room temperature
- 0.67 cup powdered sugar sifted
- 1 teaspoon vanilla extract
- 0.125 teaspoon salt
- 2 cups all-purpose flour
Brûlée Topping
- 0.25 cup heavy cream cold
- 2 tablespoons granulated sugar
- 2 egg yolks
- 0.5 teaspoon vanilla extract
Instructions
Cookie Dough
- Preheat the oven to 350°F (175°C). Line two baking sheets with parchment paper.
- In a medium bowl, cream together 1 cup butter and 2/3 cup powdered sugar until light and fluffy, about 2–3 minutes.
- Add 1 teaspoon vanilla extract and 1/8 teaspoon salt; mix until just incorporated.
- Gradually add 2 cups all-purpose flour, stirring until a soft dough forms.
- Form dough into tablespoon-sized balls and place on prepared sheets, spacing 2 inches apart.
- Use your thumb or the back of a teaspoon to create an indentation in each ball.
- Bake for 10–12 minutes, or until edges begin to turn golden.
- Let cookies rest on the baking sheet for 5 minutes, then transfer to a wire rack.
Brûlée Topping
- While cookies cool, combine 1/4 cup heavy cream and 2 tablespoons granulated sugar in a small saucepan; warm gently until sugar dissolves.
- Remove from heat and whisk in 2 egg yolks and 1/2 teaspoon vanilla extract until smooth.
- Spoon a teaspoon of the cream mixture into each indentation.
- Place cookies under the broiler for 1–2 minutes until the topping bubbles and lightly browns—watch closely.
- Allow to cool completely before serving.