
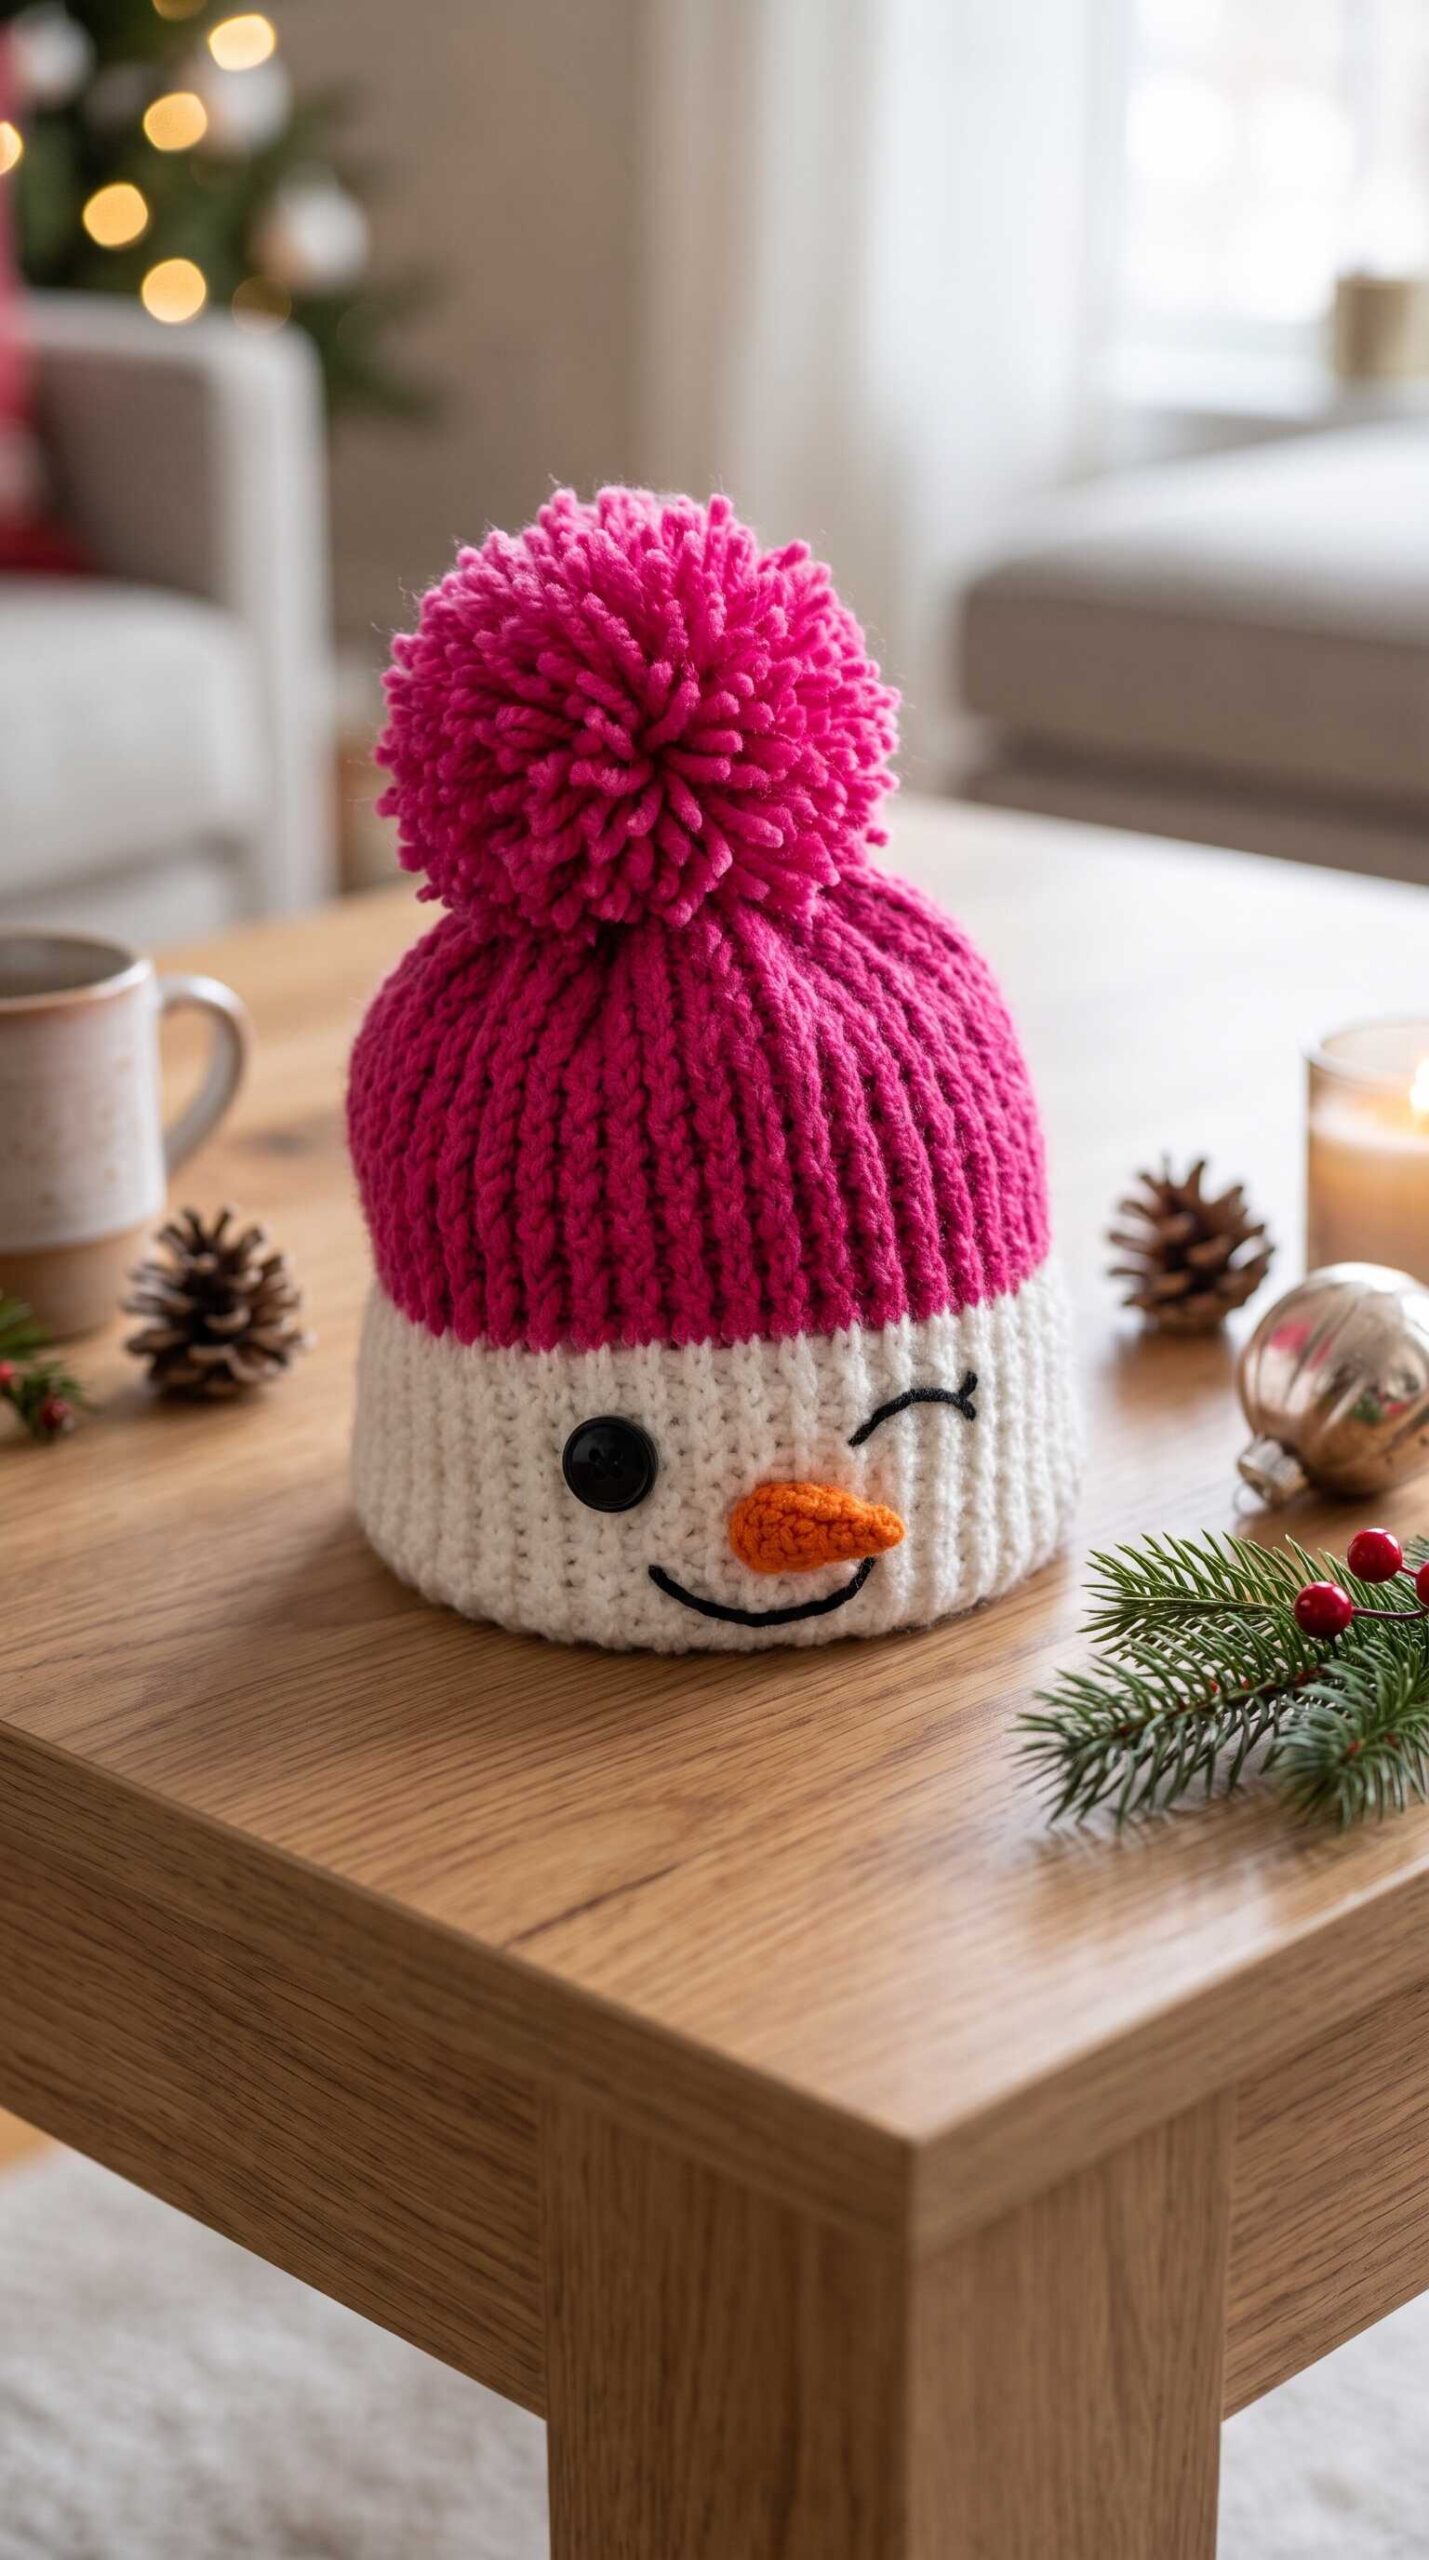
Looking for a cheerful winter hat project? This ribbed snowman beanie pattern is designed for advanced beginners who enjoy combining basic knitting and simple amigurumi crochet. Sized for an Adult Medium head (55–57 cm / 21.5–22.5 in), the beanie features a stretchy knitted 1×1 rib body topped with a fluffy berry-magenta pom-pom and a 3D crocheted carrot nose. Below, you will find the full mixed-construction instructions, complete stitch counts, assembly placement details, sizing formulas, and care tips so you can make your own snowman hat from start to finish.
Pattern status: draft. This pattern has not been fully physically tested yet. Please make the small test piece first, and tell us how it goes.
Quick Facts
- Craft Type: Mixed Construction (Knitting + Crochet)
- Skill Level: Advanced Beginner
- Finished Size (Adult Medium): 48 cm (18.9 in) unstretched circumference × 21.5 cm (8.5 in) height; fits 55–57 cm (21.5–22.5 in) head
- Yarn Weight: Worsted (#4 Medium)
- Needles & Hook: 4.5 mm (US 7) circular needle & DPNs; 3.5 mm (US E-4) crochet hook
- Gauge: Knitting: 20 sts × 26 rnds = 10 × 10 cm (1×1 rib, unstretched); Crochet: 20 sc × 22 rows = 10 × 10 cm
- Estimated Yardage: 132–168 m (145–185 yds) / 73–95 g total across 4 colors (estimate)
- Estimated Time: Not specified in the pattern guide.
About This Design
This winter beanie pairs a stretchy knitted 1×1 ribbed hat body and brim with a crocheted amigurumi carrot nose, a glossy button eye, and embroidered facial features. The hat is knitted seamlessly in the round from the cream brim up into the berry-magenta crown, then finished with a large yarn pom-pom. Compared with the reference inspiration, the cast-on edge is simplified to a standard stretchy long-tail cast-on rather than a tubular or folded brim, and the crown uses regular eight-section decreases.
Construction Overview
The project is built in three main components before final assembly:
- Hat Body & Brim (Knitting): Cast on 96 stitches and knit seamlessly in the round in 1×1 ribbing from the cream brim upward into the berry-magenta straight body, then shape the crown over 16 rounds using eight-section decreases.
- Carrot Nose (Crochet): Work a small 7-round amigurumi cone in continuous spiral rounds of single crochet, then stuff lightly.
- Fluffy Pom-Pom & Face Assembly: Make a 9 cm (3.5 in) berry-magenta yarn pom-pom, whipstitch the carrot nose to the front center, sew on the button eye, embroider the winking eye and smile, and attach the pom-pom to the crown peak.
Materials
Yarn quantities below are estimates based on Worsted (#4 Medium) acrylic or wool-acrylic blend yarn (~180 m / 197 yds per 100 g). Make a gauge swatch first to confirm your yardage.
Yarn (4 Colors Total)
- Berry Magenta (upper hat body, crown & 9 cm pom-pom): 90–115 m (100–125 yds) / 50–65 g (estimate)
- Cream / Off-White (ribbed snowman face brim): 37–45 m (40–50 yds) / 20–25 g (estimate)
- Carrot Orange (crocheted 3D carrot nose): 3–5 m (3–6 yds) / 2–3 g scrap (estimate)
- Black (embroidered winking eye & smile): 2–3 m (2–4 yds) / 1–2 g scrap (estimate)
- Total (1 Beanie): 132–168 m (145–185 yds) / 73–95 g (estimate)
Knitting & Crochet Tools
- Knitting Needles: 4.5 mm (US 7) 40 cm (16 in) circular needle, plus a set of 4.5 mm (US 7) double-pointed needles (DPNs) for closing the crown.
- Crochet Hook: 3.5 mm (US E-4) hook (for a firm, gap-free carrot nose).
Notions
- 1 glossy black 4-hole button (approx. 22 mm / 7/8 in)
- Small pinch of polyester fiberfill
- 8 stitch markers (1 distinct color for beginning of round)
- Tapestry needle
- Black sewing thread and sewing needle
- Scissors
- Optional: 9 cm (3.5 in) pom-pom maker
Gauge
Check your gauge for the knitted hat first. Gauge adjustments help match width and height, though yarn elasticity also affects how snugly a ribbed hat fits.
Knitting Gauge (Hat Body & Brim)
- Swatch Pattern: Cast on 28 stitches with 4.5 mm (US 7) needles. Work in 1×1 rib (k1, p1) for 32 rows to make an approx. 14 × 12 cm (5.5 × 4.75 in) swatch.
- Target Gauge (Unstretched): 20 stitches × 26 rounds = 10 × 10 cm (4 × 4 in) measured flat without stretching.
- Needle Adjustment Rule: If your swatch has more than 20 stitches per 10 cm, switch to a larger needle (e.g., 5.0 mm / US 8). If your swatch has fewer than 20 stitches per 10 cm, switch to a smaller needle (e.g., 4.0 mm / US 6). If your row gauge differs, add or subtract rounds in the straight body section and recalculate finished height.
Crochet Gauge (Carrot Nose)
- Swatch Pattern: With a 3.5 mm (US E-4) hook and orange yarn, chain 21, then work 22 rows of 20 single crochet (sc) for an approx. 10 × 10 cm (4 × 4 in) swatch.
- Target Gauge: 20 sc × 22 rows = 10 × 10 cm (4 × 4 in).
- Hook Adjustment Rule: If your swatch has more than 20 stitches per 10 cm, use a larger hook. If your swatch has fewer than 20 stitches per 10 cm, use a smaller hook.
Abbreviations (US Terminology)
Knitting and crochet instructions are separated below so you never mix the two abbreviation sets.
Knitting Abbreviations (Hat Body & Brim)
| Abbreviation | Meaning |
|---|---|
| BOR | Beginning of round (marked with a distinct stitch marker). |
| CO | Cast on stitches onto the needle. |
| DPN | Double-pointed needle (used when crown circumference becomes too small for a circular needle). |
| k | Knit stitch. |
| k2tog | Knit 2 stitches together as one (right-leaning decrease; reduces count by 1 stitch). |
| p | Purl stitch. |
| p2tog | Purl 2 stitches together as one (reduces count by 1 stitch). |
| pm | Place stitch marker onto the right-hand needle. |
| rep | Repeat the instructions between asterisks (*). |
| rnd(s) | Round(s) worked continuously in a circle. |
| st(s) | Stitch(es). |
Crochet Abbreviations (Carrot Nose)
| Abbreviation | Meaning |
|---|---|
| ch | Chain stitch. |
| inc | Increase by working 2 single crochet stitches into the same stitch. |
| MR | Magic ring (adjustable starting loop for working in the round). |
| rep | Repeat the instructions between parentheses. |
| rnd(s) | Round(s) worked in a continuous spiral without joining. |
| sc | Single crochet stitch (insert hook, yarn over, pull up loop, yarn over, pull through 2 loops). |
| sl st | Slip stitch (insert hook, yarn over, pull through stitch and loop on hook). |
| st(s) | Stitch(es). |
Ribbed Snowman Beanie Pattern
Component 1: Hat Body & Brim (Knitting — Make 1)
Construction Method: Worked seamlessly from the bottom up in the round on a 4.5 mm (US 7) circular needle, switching to DPNs during crown decreases.
Stage 1: Cream Ribbed Brim
- Setup: With Cream yarn and circular needle, CO 96 sts using a stretchy long-tail cast-on. Place BOR marker and join to work in the round, taking care not to twist stitches. [96 sts]
- Rounds 1–22: *k1, p1; rep from * around. [96 sts]
Check: Your unstretched brim should measure approx. 48 cm (18.9 in) in circumference (24 cm / 9.5 in flat width) and 8.5 cm (3.3 in) tall.
Stage 2: Berry Magenta Straight Body
- Color Change: Join Berry Magenta yarn (leave a 15 cm / 6 in Cream tail to weave in; do not cut Cream until after Round 23 if you prefer to secure it, then cut Cream).
- Rounds 23–40 (18 rnds): *k1, p1; rep from * around, keeping knit columns aligned over knit columns and purl columns over purl columns. [96 sts]
Check: Your hat should now measure approx. 15.4 cm (6.1 in) tall from the cast-on edge (8.5 cm Cream + 6.9 cm Berry Magenta).
Stage 3: Berry Magenta Crown Shaping
Switch to 4.5 mm (US 7) DPNs whenever the stitches feel tight on the circular needle (typically around Round 48). To keep track of the 8 decrease sections, you may place 7 additional markers every 12 stitches on Round 41.
- Round 41 (Crown Rnd 1 — Dec): *(k1, p1) 5 times, k2tog; rep from * 8 times around. [88 sts]
- Round 42 (Crown Rnd 2): *(k1, p1) 5 times, k1; rep from * 8 times around. [88 sts]
- Round 43 (Crown Rnd 3 — Dec): *(k1, p1) 4 times, k1, p2tog; rep from * 8 times around. [80 sts]
- Round 44 (Crown Rnd 4): *(k1, p1) 5 times; rep from * 8 times around. [80 sts]
Check: Count 80 stitches evenly divided into 8 sections of 10 stitches.
- Round 45 (Crown Rnd 5 — Dec): *(k1, p1) 4 times, k2tog; rep from * 8 times around. [72 sts]
- Round 46 (Crown Rnd 6): *(k1, p1) 4 times, k1; rep from * 8 times around. [72 sts]
- Round 47 (Crown Rnd 7 — Dec): *(k1, p1) 3 times, k1, p2tog; rep from * 8 times around. [64 sts]
- Round 48 (Crown Rnd 8): *(k1, p1) 4 times; rep from * 8 times around. [64 sts]
Check: Count 64 stitches (8 sections of 8 stitches). Transfer to DPNs if needed.
- Round 49 (Crown Rnd 9 — Dec): *(k1, p1) 3 times, k2tog; rep from * 8 times around. [56 sts]
- Round 50 (Crown Rnd 10): *(k1, p1) 3 times, k1; rep from * 8 times around. [56 sts]
- Round 51 (Crown Rnd 11 — Dec): *(k1, p1) 2 times, k1, p2tog; rep from * 8 times around. [48 sts]
- Round 52 (Crown Rnd 12 — Dec): *(k1, p1) 2 times, k2tog; rep from * 8 times around. [40 sts]
Check: Count 40 stitches (8 sections of 5 stitches).
- Round 53 (Crown Rnd 13 — Dec): *k1, p1, k1, p2tog; rep from * 8 times around. [32 sts]
- Round 54 (Crown Rnd 14 — Dec): *k1, p1, k2tog; rep from * 8 times around. [24 sts]
- Round 55 (Crown Rnd 15 — Dec): *k1, p2tog; rep from * 8 times around. [16 sts]
- Round 56 (Crown Rnd 16 — Dec): *k2tog; rep from * 8 times around. [8 sts]
- Fasten Off: Cut Berry Magenta yarn leaving a 20 cm (8 in) tail. Thread tail onto a tapestry needle, pass through the remaining 8 stitches twice, pull tight to close the crown hole, and secure on the inside.
Check: Total hat height from cast-on edge to crown peak should measure approx. 21.5 cm (8.5 in).
Component 2: Carrot Nose (Crochet — Make 1)
Construction Method: Worked in continuous amigurumi spiral rounds with a 3.5 mm (US E-4) hook and Carrot Orange yarn. Use a stitch marker to mark the first stitch of each round.
- Round 1: Work 4 sc into a MR. Pull ring snug. [4 sts]
- Round 2: (sc in next st, inc in next st) 2 times. [6 sts]
- Round 3: sc in each st around. [6 sts]
- Round 4: (sc in next st, inc in next st) 3 times. [9 sts]
- Round 5: sc in each st around. [9 sts]
- Round 6: (sc in next 2 sts, inc in next st) 3 times. [12 sts]
- Round 7: sc in each st around. Sl st into next st to smooth the edge. [12 sts]
- Fasten Off: Cut yarn leaving a 20 cm (8 in) sewing tail. Stuff the cone lightly with polyester fiberfill so it holds its carrot shape without stretching the stitches.
Check: Your carrot nose should measure approx. 3.2 cm (1.25 in) long with a 1.9 cm (0.75 in) base diameter.
Component 3: Fluffy Pom-Pom (Yarn Craft — Make 1)
- Wrap Berry Magenta yarn generously around a 9 cm (3.5 in) pom-pom maker (or a 9 cm cardboard template) about 120–150 times for a dense, round pom-pom.
- Tie tightly around the center with a 30 cm (12 in) double strand of Berry Magenta yarn, leaving both tie ends long for attaching to the hat.
- Cut the loops all the way around and trim evenly into a smooth 9 cm (3.5 in) sphere.
Check: Pom-pom is firmly tied, trimmed round to approx. 9 cm (3.5 in), and has two long attachment tails.
Assembly
Position the hat with the color-change join (BOR) at the back center so the front 48 stitches face forward cleanly.
- Mark the Front Center: Lay the hat flat with the BOR marker at the back center. Place a removable marker at the exact front center (between stitches 24 and 25 of the 48 front stitches).
- Attach the Carrot Nose: Center the 12-stitch base of the stuffed orange nose over the middle 6 stitches of the front, spanning Rounds 7 to 13 of the Cream brim. Angle the tip slightly to the right (viewer’s right). Whipstitch all 12 base stitches securely to the brim using the 20 cm orange tail, then weave the end inside.
- Sew the Button Eye: Position the 22 mm black 4-hole button 6 stitches to the left of the nose center, aligned with Rounds 14–16. Sew firmly through all four holes using doubled black sewing thread (or a split strand of black yarn) and knot securely on the inside.
- Embroider the Winking Eye: Thread a tapestry needle with 60 cm (24 in) of black yarn. Starting 6 stitches to the right of the nose center at Round 14, embroider an upward-curving arch across 7 stitches (reaching Round 16 at the peak, then dipping slightly), and add a 1 cm (0.4 in) diagonal eyelash tick at the outer right corner. Use small backstitches so the embroidery flexes with the ribbing.
- Embroider the Smile: Using black yarn, stitch a gentle curved smile spanning 12 stitches centered beneath the nose. Start 6 stitches left of center at Round 8, curve down to Round 4–5 directly under the nose, and rise to 6 stitches right of center at Round 8.
- Attach the Pom-Pom: Thread the two long Berry Magenta tie ends through the crown peak on opposite sides of the closed center ring. Pull the pom-pom snugly against the crown, tie a secure double knot inside the hat, and weave the tails in.
Changing the Size
Use your measured unstretched 1×1 rib gauge to calculate a custom cast-on count. Because 1×1 ribbing is very stretchy, aim for an unstretched hat circumference that is 12–15% smaller than the wearer’s actual head circumference.
Knitting Size Formula:
- Target Unstretched Circumference: Head Circumference (cm) × 0.85.
- Cast-On Stitches: Target Unstretched Circumference (cm) × Your Stitches per cm, then round to the nearest multiple of 8 (required for both the 2-stitch 1×1 rib and the 8-section crown).
- Height Adjustment: Multiply your desired brim and body height (cm) by your Rounds per cm. Keep the 16 crown decrease rounds proportional by adding or removing 1 plain round between decrease rounds if needed.
Scaling the Crochet Carrot Nose: For a child or baby size, stop after Round 5 (9 sts, ~2.3 cm long) instead of working Rounds 6–7. For a larger adult hat, add one extra plain round after Round 6 for a slightly longer carrot.
Troubleshooting
| Problem | Practical Fix |
|---|---|
| Cast-on edge is too tight | Re-cast on using a needle one size larger (5.0 mm / US 8), or hold two needles together while casting on, then switch back to 4.5 mm (US 7) for Round 1. |
| Jog at the White-to-Magenta transition | To avoid a visible step in the round, slip the first stitch of Round 24 (the second Magenta round) purlwise instead of knitting it, then continue in pattern. |
| Ribbing gaps or looks uneven | Keep your yarn tension consistent when switching between knit and purl stitches; gently tug the first purl stitch after each knit stitch to tighten the transition. |
| Embroidery pulls the brim tight | Stretch the brim slightly over a bowl or rolled towel while stitching the smile and wink, and use short backstitches rather than long floating strands. |
| Carrot nose flops downward | Add a pinch more fiberfill at the wide base before finishing the whipstitch seam, and catch both the front and back loops of the base round into the brim. |
| Pom-pom wobbles on top | Pass the attachment tails through two different stitches on opposite sides of the crown opening and knot tightly on the inside before weaving in. |
Finishing and Care
- Weaving in Ends: Use a tapestry needle to weave all yarn tails vertically along the inside of a knit column for at least 4 cm (1.5 in), then reverse direction for 2 cm before trimming.
- Blocking: Lightly mist with cool water or gently steam-block the hat to relax the stitches. Never pin or stretch 1×1 ribbing flat while wet, or it will lose its natural elasticity.
- Washing: Spot-clean the face if needed, or hand wash gently in cool water with mild wool/delicate detergent. Squeeze excess water in a clean towel without wringing, reshape, and dry flat away from direct heat.
- Storage: Store folded flat in a dry drawer or cedar box. Keep away from moths if using a wool blend.
Frequently Asked Questions
Is this snowman beanie knitted or crocheted?
It uses mixed construction: the hat body and brim are knitted in the round in 1×1 ribbing, while the 3D carrot nose is crocheted in continuous single crochet rounds.
Why does the pattern use two different sizes for needles and hook?
The hat body uses 4.5 mm (US 7) knitting needles for a soft, stretchy ribbed fabric, while the carrot nose uses a smaller 3.5 mm (US E-4) crochet hook so the single crochet stitches stay tight enough to hold polyester fiberfill without gaps.
Can I make this hat without double-pointed needles (DPNs)?
The pattern guide specifies switching to 4.5 mm (US 7) DPNs when the crown stitches become too tight for a 40 cm circular needle. Other methods like magic loop are not detailed in the guide.
Can I adjust the size for a child?
Yes. Use the Knitting Size Formula in the Changing the Size section to calculate a smaller cast-on multiple of 8, and stop the crocheted carrot nose after Round 5 (9 sts, ~2.3 cm long).
Save or Print the Pattern
If you make this beanie, we would love to see your finished photos! Share your results
(c) 2026 Abby Marlow / Abby’s Stitches. Personal use only. Please do not copy or republish this pattern.