
Introduction
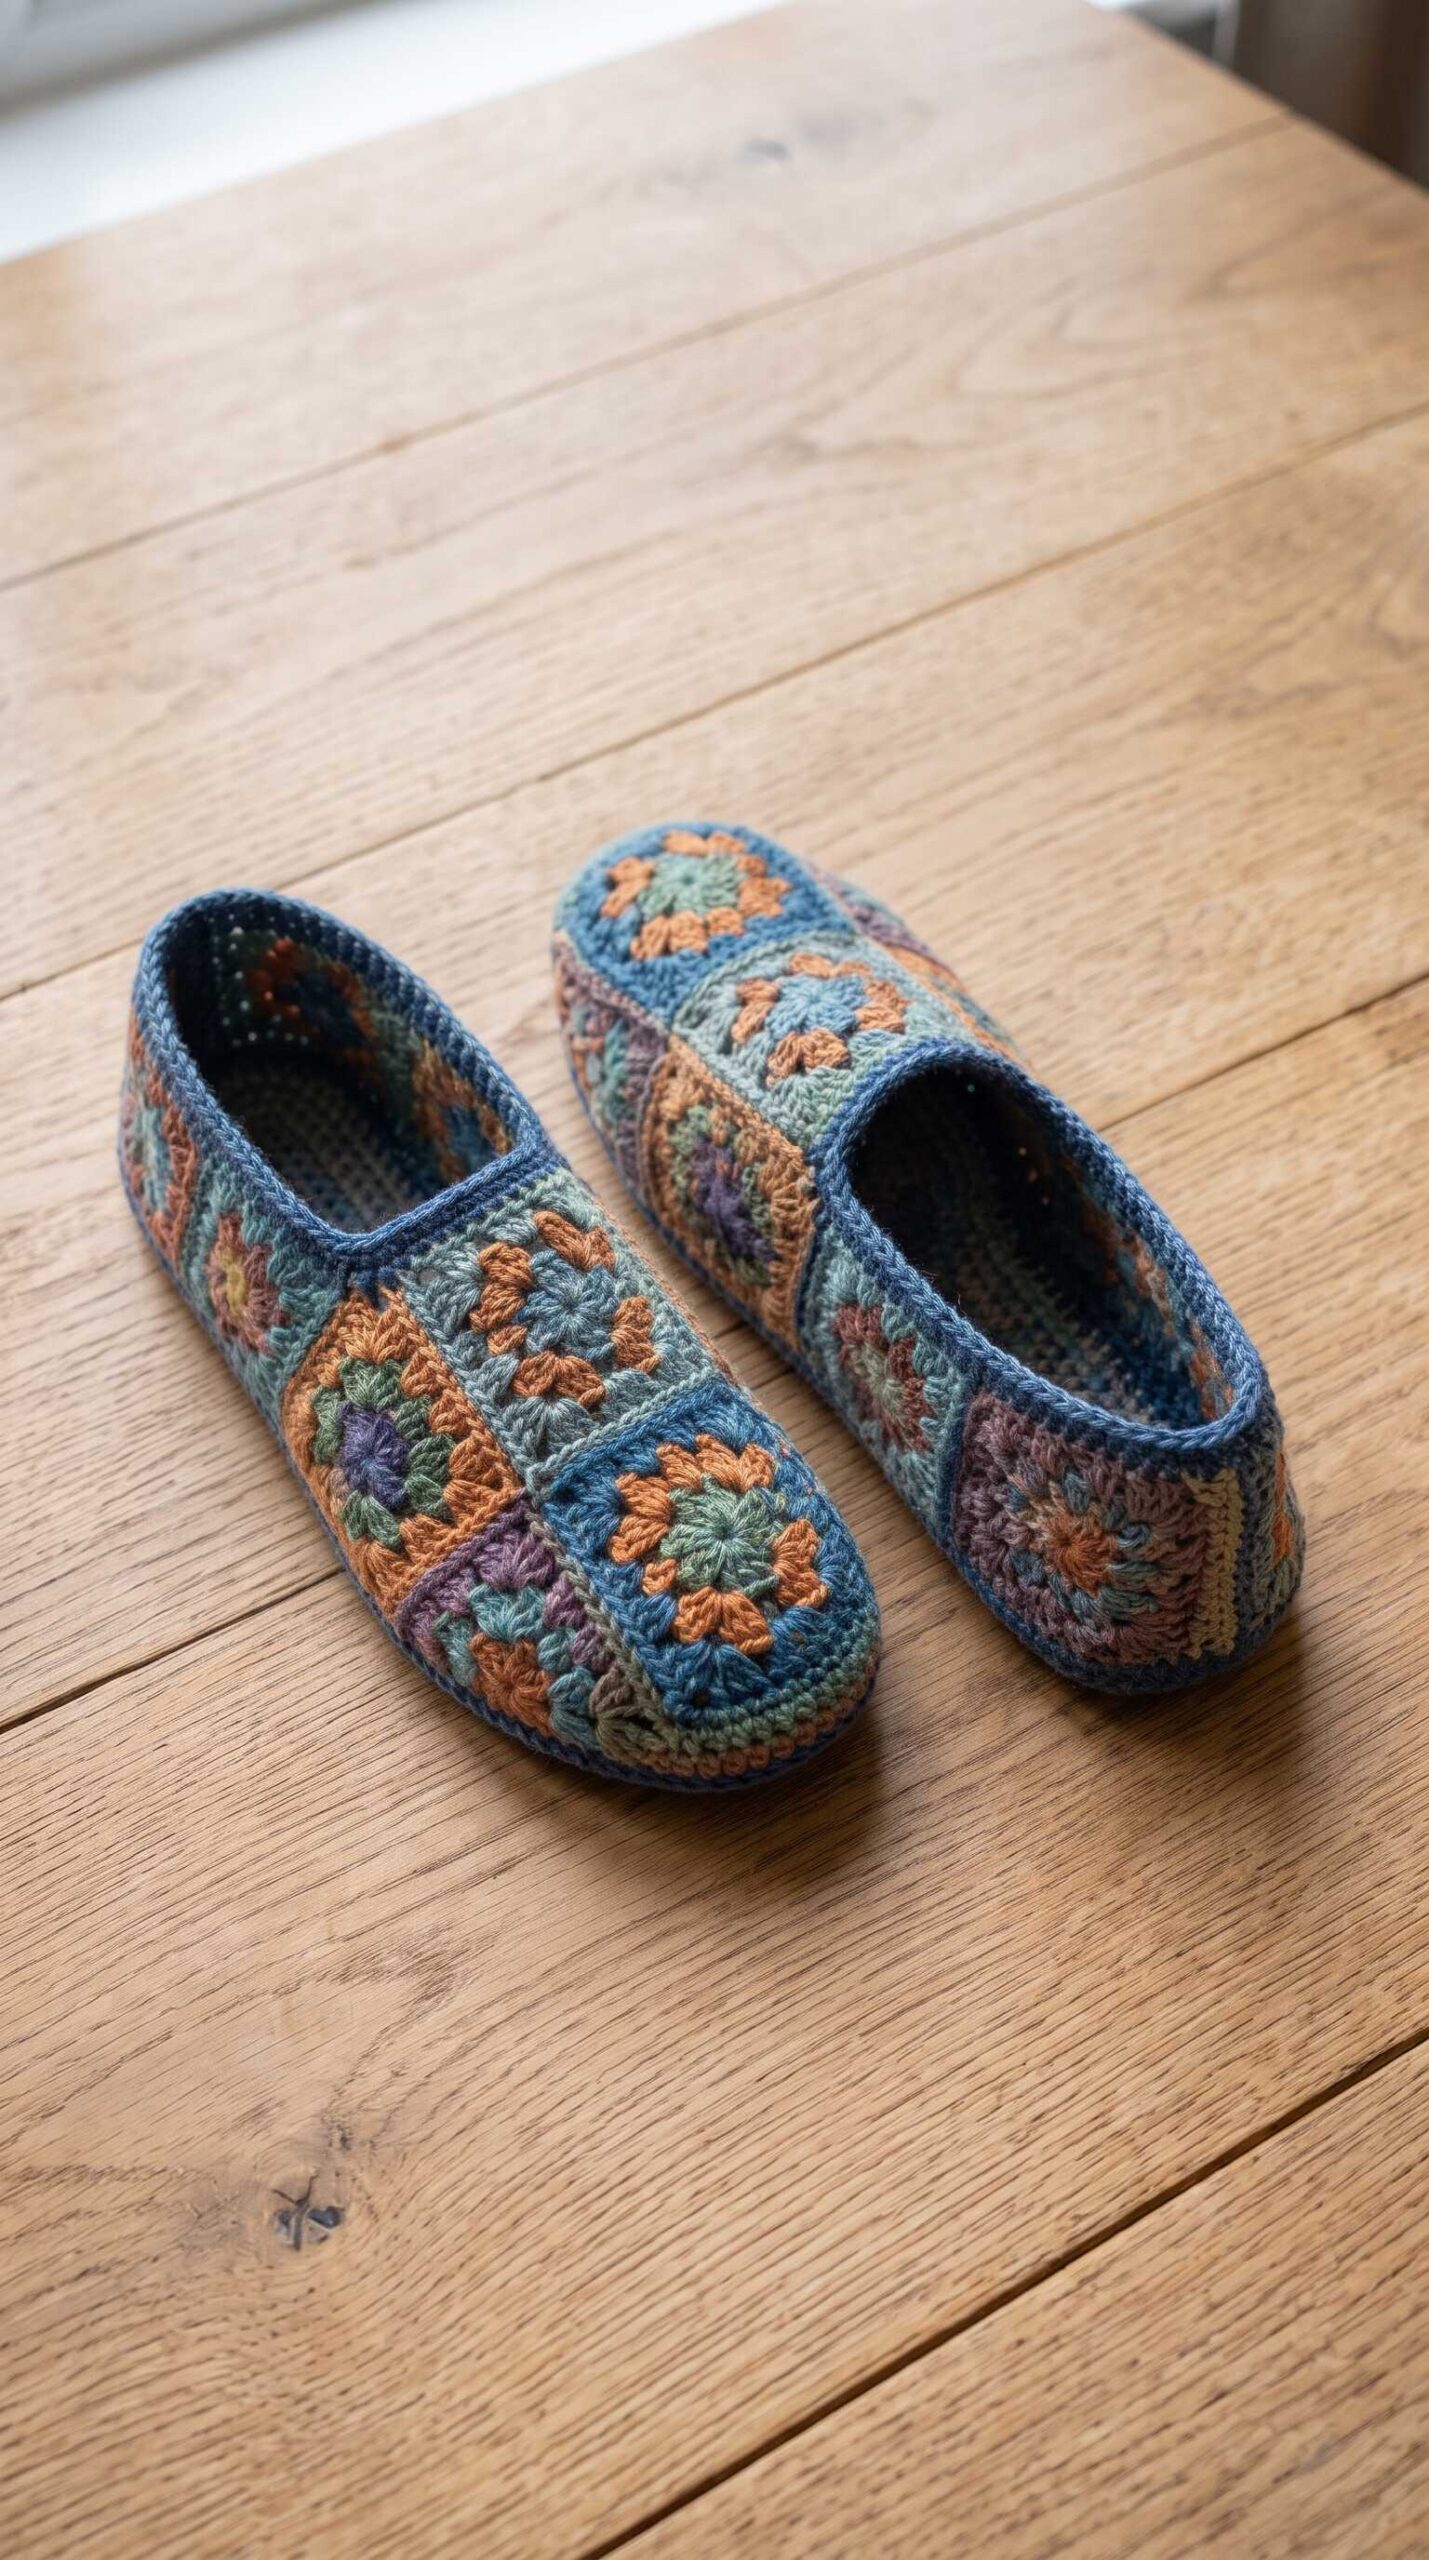
If you love classic patchwork motifs and practical handmade footwear, this free crochet granny square slippers pattern walks you through making a cozy, vintage-inspired pair of loafer-style house slippers. Designed for Adult Medium feet (approx. US Women’s 7–8 / EU 38–39), this intermediate crochet project combines classic 3-round granny squares with a firm single-crochet oval sole and a neatly shaped ribbed ankle cuff. In this guide, you will find the complete materials list, gauge checks, US crochet abbreviations, full round-by-round crochet instructions for every component, exact marker-based assembly steps, resizing formulas, and practical care tips.
Pattern status: draft. This pattern has not been fully physically tested yet. Please make the small test piece first, and tell us how it goes.
Quick Facts
- Craft type: Crochet (US crochet terminology)
- Skill level: Intermediate
- Finished size: Adult Medium — sole 24.0 × 9.0 cm (9.5 × 3.5 in); total wall and cuff height 8.0 cm (3.1 in); finished ankle opening circumference 27.8 cm (10.9 in)
- Yarn weight: DK / Light (#3) acrylic or wool-acrylic blend (~250 m / 273 yds per 100 g)
- Hook size: 3.5 mm (US E-4), or size needed to obtain gauge
- Gauge: 18 sc × 20 rows = 10 × 10 cm (4 × 4 in); one 3-round granny square = 6.5 × 6.5 cm (2.5 × 2.5 in)
- Estimated yardage: Approx. 88–100 m (96–110 yds) / 35–40 g per slipper; approx. 175–200 m (190–220 yds) / 70–80 g per pair (estimate including 15% allowance for joining and finishing)
- Estimated time: Not specified in the pattern guide. [MY TEST NOTES: how long it took]
About This Design
These loafer-style house slippers are crocheted in US terminology using 10 classic 3-round granny squares per slipper joined into a structured upper, sewn onto a flat single-crochet oval sole, and finished with a ribbed denim-blue ankle cuff. Designed for Adult Medium feet (approx. US Women’s 7–8 / EU 38–39; target foot length 24.0 cm / 9.5 in), the slipper sits neatly below the ankle bone with relaxed room for socks. To keep the construction practical and repeatable, this pattern simplifies the inspiration design by using one sturdy single-layer oval sole instead of a thicker layered sole edge and joining the two heel-side squares directly at a clean center-back seam rather than adding a narrow contrasting heel strip.
Construction Overview
Each slipper is built in three main crocheted components worked in joined rounds and assembled in a clear sequence:
- Granny Squares (10 per slipper / 20 per pair): Classic 3-round crochet squares worked from the center outward, changing color after each round.
- Oval Slipper Sole (1 per slipper / 2 per pair): A sturdy flat oval worked in 9 joined rounds of single crochet around a 30-chain foundation, ending with 108 stitches.
- Upper Assembly & Sole Join: The 10 squares are whipstitched on the wrong side into a 3D slipper shell (2 top vamp squares, 4 left-side squares, and 4 right-side squares joined at the center-back heel). The 9 bottom edges of the shell (12 stitches per edge = 108 stitches) are then joined 1-to-1 to the 108-stitch sole with single crochet.
- Ankle Cuff Edging: Worked directly onto the 5 opening edges of the assembled upper in 3 joined rounds of single crochet, shaping the opening with decreases and finishing with a back-loop-only ribbed round.
Materials
All yarn quantities below are estimates based on standard DK-weight (#3) yarn at approximately 250 m (273 yds) per 100 g, including a 15% allowance for joining and finishing.
- Yarn type & weight: DK / Light (#3) weight acrylic or wool-acrylic blend yarn (~250 m / 273 yds per 100 g).
- Total per slipper (estimate): Approx. 88–100 m (96–110 yds) / 35–40 g.
- Total per pair (2 slippers, estimate): Approx. 175–200 m (190–220 yds) / 70–80 g across 5 colors:
- Color A (Denim Blue — soles, cuffs, joins, accents): ~95 m (105 yds / 38 g)
- Color B (Terracotta Orange — squares): ~25 m (28 yds / 10 g)
- Color C (Sage Green — squares): ~25 m (28 yds / 10 g)
- Color D (Dusty Plum — squares): ~25 m (28 yds / 10 g)
- Color E (Soft Slate Teal — squares): ~25 m (28 yds / 10 g)
- Crochet hook: 3.5 mm (US E-4), or size needed to obtain gauge.
- Notions: 9 locking stitch markers, blunt tapestry needle for seaming and weaving in ends, scissors, measuring tape, optional non-slip sock paint or suede sole patches.
Gauge
Accurate gauge ensures your sole matches the 9 bottom edges of the granny square upper and fits comfortably. Make both quick checks below before crocheting the full pair:
- Sole Gauge Swatch (Single Crochet): Chain 23 with Color A and a 3.5 mm hook. Work 24 rows of sc (ch 1 and turn at the end of each row; ch 1 does not count as a stitch) to make a 22-stitch × 24-row swatch. Measure a 10 × 10 cm (4 × 4 in) square in the center: you should have 18 sc × 20 rows = 10 × 10 cm (4 × 4 in) (1.8 sts/cm, 2.0 rows/cm).
- Granny Square Gauge Check: Work one complete 3-round Granny Square (Component 1). Lying flat without stretching, it should measure 6.5 × 6.5 cm (2.5 × 2.5 in).
Hook Adjustment Rule: If your swatch has too many stitches per 10 cm (or your square is smaller than 6.5 cm), switch to a larger hook (4.0 mm / US G-6). If your swatch has too few stitches per 10 cm (or your square is larger than 6.5 cm), switch to a smaller hook (3.0 mm). If your row gauge differs, adjust the number of sole rounds or hook size and recalculate your finished dimensions using the Changing the Size section.
Abbreviations (US Crochet Terms)
| Abbreviation | Meaning & Explanation |
|---|---|
| beg | Beginning — the first stitch or chain of a round. |
| BLO | Back loop only — insert hook only under the back loop of the stitch top to create a ridge. |
| ch | Chain — yarn over and pull through the loop on the hook. |
| ch-sp | Chain space — the open gap underneath a chain or chain group (e.g., ch-1 sp, ch-2 sp). |
| dc | Double crochet — yarn over, insert hook, pull up loop, [yarn over, pull through 2 loops] twice. |
| inc | Increase — work 2 single crochet stitches into the same stitch. |
| MR | Magic ring — an adjustable starting loop pulled tight after Round 1 (alternative: ch 4, join with sl st). |
| RS / WS | Right side (public outer face) / Wrong side (inner face of the slipper). |
| sc | Single crochet — insert hook, pull up loop, yarn over, pull through both loops on hook. |
| sc2tog | Single crochet 2 together (decrease) — insert hook in next st, pull up loop, insert in following st, pull up loop, yarn over, pull through all 3 loops. |
| sk | Skip — pass over the indicated stitch without working into it. |
| sl st | Slip stitch — insert hook, pull up loop and pull it directly through the loop on the hook. |
| st(s) | Stitch(es). |
| [ … ] | Work the instructions inside the square brackets the indicated number of times. |
Crochet Granny Square Slippers Pattern Instructions
Component 1: Granny Squares
Quantity: Make 10 squares per slipper (20 squares per pair).
Construction: Worked in joined rounds from the center outward, changing color after each round. Rotate through Colors A–E for a patchwork look, using a contrasting color for Round 3 on adjacent squares. Note: The starting ch 3 in every round counts as 1 dc.
Round 1: With your chosen center color, make a MR. Ch 3 (counts as 1 dc), 2 dc into ring, [ch 2, 3 dc into ring] 3 times, ch 2. Join with sl st to top of beg ch-3. Pull ring tight and fasten off. [12 dc, 4 ch-2 corner sps; 4 clusters]
Check: Your Round 1 motif should measure approx. 2.2 × 2.2 cm (0.9 × 0.9 in) with 4 clear corner spaces.
Round 2: Join a new color in any ch-2 corner sp. Ch 3 (counts as 1 dc), (2 dc, ch 2, 3 dc) in same corner sp, [ch 1, (3 dc, ch 2, 3 dc) in next ch-2 corner sp] 3 times, ch 1. Join with sl st to top of beg ch-3 and fasten off. [24 dc, 4 ch-2 sps, 4 ch-1 sps; 8 clusters]
Check: Your Round 2 square should measure approx. 4.3 × 4.3 cm (1.7 × 1.7 in) and lie flat without cupping.
Round 3: Join a new color in any ch-2 corner sp. Ch 3 (counts as 1 dc), (2 dc, ch 2, 3 dc) in same corner sp, [ch 1, 3 dc in next ch-1 sp, ch 1, (3 dc, ch 2, 3 dc) in next ch-2 corner sp] 3 times, ch 1, 3 dc in last ch-1 sp, ch 1. Join with sl st to top of beg ch-3 and fasten off, leaving a 15 cm tail. [36 dc, 4 ch-2 sps, 8 ch-1 sps; 12 clusters; 12 usable sts per side including 1 corner st]
Check: Each finished square should measure 6.5 × 6.5 cm (2.5 × 2.5 in). Check all 10 squares for one slipper before assembly so they match in size.
Component 2: Oval Slipper Sole
Quantity: Make 1 sole per slipper (2 soles per pair).
Construction: Worked in joined rounds of sc around both sides of a foundation chain using Color A (Denim Blue). Note: The starting ch 1 at the beginning of each round does NOT count as a stitch. Work the first stitch of every round into the same stitch as the joining sl st.
Foundation: With Color A, ch 30.
Round 1: Sk 1st ch from hook, work 3 sc in 2nd ch from hook (Toe End), 1 sc in each of next 27 ch, work 3 sc in last ch (Heel End); rotate to work along the opposite side of the foundation chain: 1 sc in each of next 27 ch. Join with sl st to 1st sc. [60 sts]
Check: Count 60 sc total (3 at Toe, 27 along Side 1, 3 at Heel, 27 along Side 2). Piece measures approx. 16.0 × 1.0 cm.
Round 2: Ch 1, [inc] 3 times, 27 sc, [inc] 3 times, 27 sc. Join with sl st to 1st sc. [66 sts]
Round 3: Ch 1, [1 sc, inc] 3 times, 27 sc, [1 sc, inc] 3 times, 27 sc. Join with sl st to 1st sc. [72 sts]
Round 4: Ch 1, [2 sc, inc] 3 times, 27 sc, [2 sc, inc] 3 times, 27 sc. Join with sl st to 1st sc. [78 sts]
Round 5: Ch 1, [3 sc, inc] 3 times, 27 sc, [3 sc, inc] 3 times, 27 sc. Join with sl st to 1st sc. [84 sts]
Check: After Round 5, your sole should lie completely flat and measure approx. 20.0 × 5.0 cm (7.9 × 2.0 in) with 84 sts.
Round 6: Ch 1, [4 sc, inc] 3 times, 27 sc, [4 sc, inc] 3 times, 27 sc. Join with sl st to 1st sc. [90 sts]
Round 7: Ch 1, [5 sc, inc] 3 times, 27 sc, [5 sc, inc] 3 times, 27 sc. Join with sl st to 1st sc. [96 sts]
Round 8: Ch 1, [6 sc, inc] 3 times, 27 sc, [6 sc, inc] 3 times, 27 sc. Join with sl st to 1st sc. [102 sts]
Round 9: Ch 1, [7 sc, inc] 3 times, 27 sc, [7 sc, inc] 3 times, 27 sc. Join with sl st to 1st sc. Fasten off and weave in end. [108 sts]
Check: Finished sole should measure 24.0 × 9.0 cm (9.5 × 3.5 in) with exactly 108 sts around the edge (27 at Toe, 27 on Side 1, 27 at Heel, 27 on Side 2).
Component 3: Ankle Cuff Edging (Worked After Assembly)
Quantity: 1 cuff per slipper, built directly onto the 5 opening edges of the assembled slipper upper.
Construction: Worked in joined rounds of sc in Color A (Denim Blue). Complete Assembly Steps 1–6 first, then work the cuff below. Ch 1 at start of each round does NOT count as a stitch.
Round 1 (Pickup): With RS facing, join Color A with a sl st at the center-back heel seam of the foot opening. Ch 1, work exactly 12 sc along each of the 5 opening edges (1 sc in each of the 9 dc, 1 sc in each of the 2 ch-1 sps, and 1 sc in the corner seam between squares): Heel-Right (12), Back-Right (12), Instep-Top back edge (12), Back-Left (12), and Heel-Left (12). Join with sl st to 1st sc. [60 sts]
Check: Count exactly 60 sc evenly distributed (12 per opening edge). Opening measures approx. 32.5–33.3 cm before shaping.
Round 2 (Shaping): Ch 1, [4 sc, sc2tog] 10 times around. Join with sl st to 1st sc. [50 sts]
Round 3 (Ribbed Edge): Ch 1, work 1 sc in BLO of each st around. Join with sl st to 1st sc. Fasten off and weave in end securely. [50 sts]
Check: Finished opening circumference should measure approx. 27.8 cm (10.9 in) and cuff height 1.5 cm (total side wall height 8.0 cm / 3.1 in). Try slipper on before weaving in the final tail.
Test Point — Fit & Opening Check: Because crochet yarn stretch varies by fiber, try on your first slipper right after Round 3 of the cuff. If the opening feels too loose around your heel, work 1 extra round of sc in BLO with 4 evenly spaced sc2tog decreases (46 sts / ~25.5 cm). If the opening feels tight going over your instep, replace Round 2 with [8 sc, sc2tog] 6 times (54 sts / ~30.0 cm).
Assembly
Assemble one slipper at a time. All square-to-square seams are sewn on the wrong side (WS) using Color A and a tapestry needle with whipstitch (working through the back loops only so the front seam lies flat). Each square edge has 12 joining stitches (9 dc + 2 ch-1 sps + 1 corner stitch).
- Join the Top Vamp (1 seam, 12 sts): Place Sq 1 (Toe-Top) and Sq 2 (Instep-Top) right sides together and whipstitch along one 12-stitch edge.
- Join the Side Wall Strips (6 seams, 12 sts each): Sew Sq 3–6 into a 4-square Left Strip (Front-L, Mid-L, Back-L, Heel-L) and Sq 7–10 into a 4-square Right Strip (Front-R, Mid-R, Back-R, Heel-R).
- Attach Side Strips to Top Vamp (4 seams, 12 sts each): With RS together, whipstitch the top edge of Front-L and Mid-L to the left side of Toe-Top and Instep-Top (24 sts total). Repeat on the right side, joining Front-R and Mid-R to the right side of Toe-Top and Instep-Top (24 sts total).
- Close the Center-Back Heel Seam (1 seam, 12 sts): Fold the Left and Right Strips around the back so the outer back edge of Heel-L meets the outer back edge of Heel-R, RS together. Whipstitch those 12 stitches closed. Turn the upper RS out. You now have a 3D slipper shell with 9 bottom edges (108 sts) and 5 top opening edges (60 sts).
- Mark the Sole (9 markers): Lay the Oval Sole flat with RS facing down (outer bottom of slipper). Locate the exact center-back heel stitch between Stitch 67 and Stitch 68 of Round 9 and place Marker 1 (M1). Counting forward around the sole, place a marker every 12 stitches (at St 79/80, 91/92, 103/104, 7/8, 19/20, 31/32, 43/44, and 55/56). This divides the 108-stitch sole into 9 exact 12-stitch segments.
- Join Upper to Sole (108 sc): Hold the slipper upper (RS out) against the sole (WS facing inside the slipper, RS facing the floor). Align the Center-Back Heel Seam with M1, and align each square corner around the bottom with the next marker (so the front edge of Toe-Top spans St 8–19). Join Color A at M1 and work 108 sc through both layers (12 sc per square edge into the 12 marked sole stitches). Join with sl st to 1st sc and fasten off.
- Work the Ankle Cuff: Return to Component 3 (Ankle Cuff Edging) and work Rounds 1–3 directly onto the 5 opening edges. Repeat Steps 1–7 for the second slipper.
Changing the Size
Because the upper is built from 10 identical squares whose 9 bottom edges must match the sole perimeter 1-to-1, resize both the square size and the sole together using your gauge (1.8 sts/cm and 2.0 rows/cm):
- Small adjustments (±1 to 1.5 cm / 1 shoe size): Change hook size by 0.5 mm (3.0 mm for Adult Small, ~22.5 cm sole; 4.0 mm for Adult Large, ~25.5 cm sole) while keeping the exact stitch counts in this pattern. Measure 1 test square first: new sole perimeter = 9 × square width (cm).
- Custom sole length formula: Target finished sole length L (cm) = foot length in cm (0 cm ease, as crochet stretches ~0.5–1 cm in wear). Target sole width W (cm) = foot ball width. Calculate required sole rounds R = round(W × rows_per_cm / 2). Calculate straight center stitches S = round((L − W) × sts_per_cm). Start with ch (S + 3) and work R oval rounds. Final sole stitch count = 2S + 6R.
- Matching the upper to a custom sole: Divide your final sole stitch count by 9 to find the stitches per square edge (e.g., 108 ÷ 9 = 12 sts/edge; 99 ÷ 9 = 11 sts/edge; 117 ÷ 9 = 13 sts/edge). Adjust the stitches picked up per square edge when joining to the sole so the total matches your sole stitch count exactly.
Troubleshooting
| Problem | Practical Fix |
|---|---|
| Granny squares turn out different sizes | Check that you used the same yarn weight and hook for all 5 colors. Lightly steam-block or wet-block all 20 squares to 6.5 × 6.5 cm before seaming. |
| Oval sole curls upward like a bowl | Your tension is tight or an increase was missed at the toe/heel curve. Verify each round increases by exactly 6 sts (60, 66, 72 … 108) and go up 0.5 mm in hook size if needed. |
| Oval sole ripples or waves | Extra stitches were added in the straight 27-st sides or corners. Recount Round 9 to ensure exactly 27 sts on each straight side and 27 sts at each curved end. |
| Upper does not align with the sole | Do not stretch one side to make it fit. Use all 9 stitch markers spaced exactly 12 stitches apart on the sole, and work exactly 12 sc per square edge. |
| Slipper slips off the heel when walking | Work 1 additional round of sc in BLO around the ankle cuff with 4 evenly spaced sc2tog decreases (reducing from 50 to 46 sts) to gently hug the ankle. |
| Slippers feel slippery on wood or tile floors | Apply dots of non-slip latex sock paint to the bottom of the finished soles (let cure 24 hours) or hand-stitch suede slipper soles onto the underside. |
Finishing and Care
- Weaving in ends: Because granny squares have multiple color changes, weave every yarn tail at least 4 cm through the back of matching-color clusters in two directions before trimming.
- Blocking: Pin the 20 granny squares to 6.5 × 6.5 cm and mist lightly with water (or gently steam acrylic without touching the iron to the yarn) before assembly for crisp, even seams.
- Seaming & reinforcement: Secure the start and end of the sole-to-upper join with a double knot tucked inside the seam, then weave the tail into the sole edge.
- Washing (DK acrylic / wool-acrylic blend): Hand wash or machine wash cold (30°C / 86°F) on a gentle cycle inside a mesh laundry bag. Reshape while damp and dry flat away from direct heat. Do not tumble dry or iron.
- Storage: Store flat or stuffed lightly with tissue paper in a dry drawer to preserve the toe shape.
Frequently Asked Questions
Can a beginner make these crochet granny square slippers?
This pattern is rated Intermediate because it involves 3-dc clusters, frequent color changes, motif joining, and 3D assembly around a curved oval sole. Confident beginners who already know how to crochet a basic granny square and single crochet in the round can still tackle it by making the small gauge checks first and using all 9 stitch markers during assembly.
Can I use worsted-weight (#4) yarn instead of DK (#3) yarn?
The pattern is calculated for DK / Light (#3) yarn with a 3.5 mm (US E-4) hook to produce 6.5 × 6.5 cm squares and a 24.0 × 9.0 cm sole. Using thicker worsted-weight yarn will make both your squares and your sole larger unless you recalculate the stitch counts using the Changing the Size formula.
Are the left and right slippers shaped differently?
No. Both slippers use the same symmetrical 10-square upper layout and the same symmetrical 108-stitch oval sole, so you repeat the exact same crochet and assembly instructions for the second slipper.
How can I make the slipper soles thicker or less slippery?
The pattern uses one sturdy single-layer single-crochet sole per slipper for simplicity. To add grip on wood or tile floors, apply dots of non-slip latex sock paint to the underside (letting it cure for 24 hours) or hand-stitch suede slipper soles onto the bottom. The guide does not include separate instructions for a double-layer sole.
What if the ankle opening feels too loose or too tight?
Try on your first slipper right after Round 3 of the ankle cuff. If it feels loose around your heel, add 1 extra round of sc in BLO with 4 evenly spaced sc2tog decreases (46 sts / ~25.5 cm). If it feels tight going over your instep, replace Round 2 with [8 sc, sc2tog] 6 times (54 sts / ~30.0 cm).
Share Your Finished Slippers
If you try out this draft pattern, we would love to hear how your test square and finished slippers turn out! Share your color combinations, fit notes, and finished photos with us at [email protected].
(c) 2026 Abby Marlow / Abby’s Stitches. Personal use only. Please do not copy or republish this pattern.