
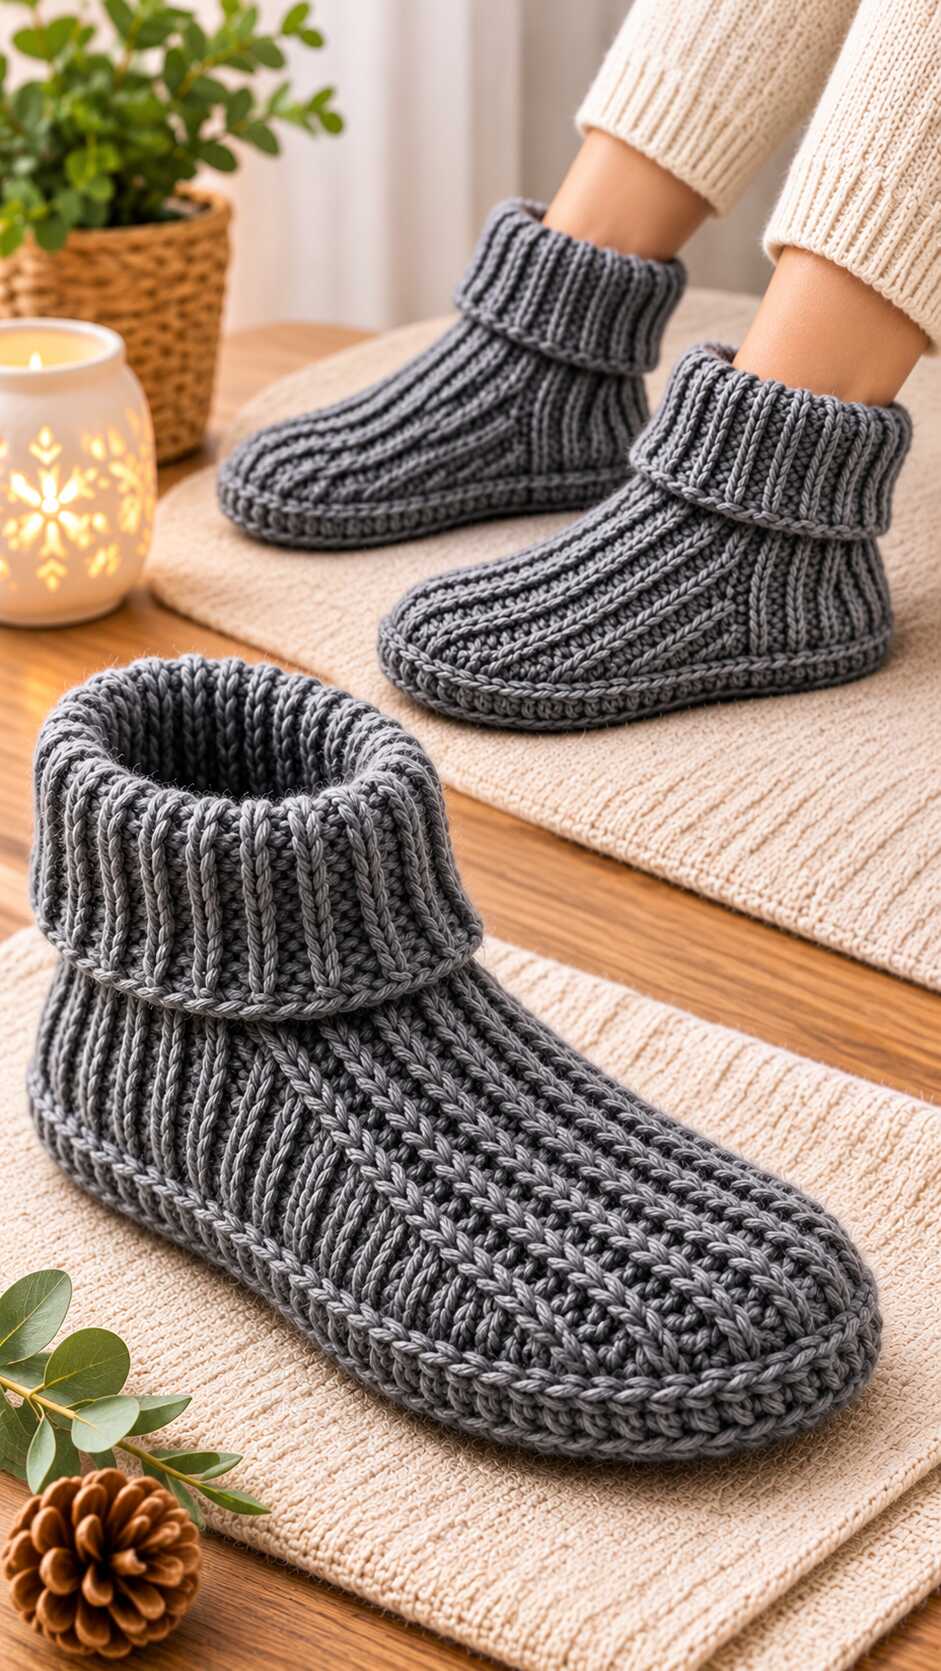
Warm up cold floors with this free crochet ribbed slipper boots pattern designed for an Adult Medium foot (US Women’s 7–8 / EU 38–39). Rated Advanced Beginner, this US crochet pattern uses Category 5 bulky yarn and a 6.0 mm (US J-10) hook to build a cushioned double sole, a structured post-ribbed upper, and a built-in fold-over cuff with no seaming on the upper or ankle. Below, you will find the full materials list, gauge instructions, stitch abbreviations, complete round-by-round crochet instructions, sizing formulas, troubleshooting tips, and care guidance.
Pattern status: draft. This pattern has not been fully physically tested yet. Please make the small test piece first, and tell us how it goes.
Quick Facts
- Craft Type: Crochet (US crochet terminology)
- Skill Level: Advanced Beginner
- Finished Size: Adult Medium — 25.0 × 10.0 cm (9.8 × 3.9 in) sole; 16.1 cm (6.3 in) total height folded
- Yarn Weight: Category 5 — Bulky (Chunky)
- Hook Size: 6.0 mm (US J-10)
- Gauge: Single crochet (sc): 12 sts × 14 rows = 10 × 10 cm (4 × 4 in); 1×1 Post Ribbing (FPdc, BPdc): 12 sts × 8 rounds = 10 × 10 cm (4 × 4 in)
- Estimated Yardage: 190–215 m (208–235 yds), approx. 155–175 g per slipper; 380–430 m (415–470 yds), approx. 305–345 g per pair (estimates)
- Estimated Time: Not specified in the pattern guide.
About This Design
These indoor crochet slipper boots are designed to fit an Adult Medium foot (24.0–24.5 cm / 9.5–9.6 in foot length; US Women’s 7–8 / EU 38–39) with a warm, structured feel. Each boot is worked bottom-up in US crochet terminology: two flat oval soles are joined with a braided slip-stitch edge, and the ribbed upper and fold-over cuff are worked directly onto the sole in joined rounds. To keep the construction practical and single-craft, the hybrid knit-like ribbing and angled vamp ridges seen in the inspiration photo are simplified into continuous 1×1 front- and back-post double crochet ribbing with centered toe decreases, so your finished slipper boots will reflect this simplified crochet interpretation rather than an exact replica of the photo.
Construction Overview
Each slipper boot is built from the bottom up in three connected stages so you avoid sewing flat ribbed panels onto a curved toe:
- Double-Layer Oval Sole: Crochet four identical flat oval soles (two per slipper) in joined rounds around a 21-chain foundation, then hold each pair wrong sides together and join them with 72 slip stitches to create a cushioned base and braided perimeter welt.
- Built-In Ribbed Upper: Working directly into the back (inner) loops of the 72 joining slip stitches from Center Heel, crochet a single-crochet turn wall, a double-crochet setup round, and six rounds of 1×1 post-stitch ribbing with centered front-post decreases to shape the toe and instep down to 32 stitches at the ankle.
- Built-In Fold-Over Ribbed Cuff: Continue directly from the 32-stitch ankle round for 10 rounds of 1×1 post ribbing and 1 loose single-crochet edging round, then fold the cuff outward halfway down.
Materials
- Yarn Weight & Type: Category 5 — Bulky (Chunky) weight smooth-plied acrylic or wool-acrylic blend (reference density: approx. 125 m / 137 yds per 100 g skein).
- Colors: 1 color: Charcoal Grey.
- Estimated Yarn per Slipper: 190–215 m (208–235 yds), approx. 155–175 g (estimate; includes 12% finishing allowance).
- Estimated Yarn per Pair: 380–430 m (415–470 yds), approx. 305–345 g — plan for 4 × 100 g skeins from the same dye lot.
- Crochet Hook: 6.0 mm (US J-10) crochet hook, or size needed to obtain gauge.
- Notions: 4 locking stitch markers, yarn (tapestry) needle, scissors, measuring tape, and optional non-slip sock paint or suede soles for hard floors.
Note: Yarn yardage and weight are calculated estimates, not measured physical test results.
Gauge
Measure both swatches flat without stretching before making the full pair so your soles match your foot length and the ribbed ankle stretches cleanly over your heel:
- Single Crochet (sc) — Sole & Lower Wall: 12 sts × 14 rows = 10 × 10 cm (4 × 4 in) (1.20 sts/cm; 1.40 rows/cm). How to swatch: Ch 17. Work 16 sc across for 18 rows (approx. 13.3 × 12.9 cm) and measure the center 10 × 10 cm.
- 1×1 Post Ribbing (FPdc, BPdc) — Upper & Cuff: 12 sts × 8 rounds = 10 × 10 cm (4 × 4 in) (1.20 sts/cm; 0.80 rnds/cm). How to swatch: Ch 18, join or work flat: Row 1 dc across (16 sts); Rows 2–10 alternate FPdc and BPdc. Measure the center 10 cm width and 8-row height.
Hook Adjustment Rule: If your swatch has too many stitches per 10 cm (swatch is too small), switch to a larger hook (e.g., 6.5 mm / US K-10.5). If your swatch has too few stitches per 10 cm (swatch is too large), switch to a smaller hook (e.g., 5.5 mm / US I-9). If your row or round height still differs after matching stitch gauge, adjust the cuff round count and recalculate finished height; gauge adjustments alone may not resolve every individual foot-shape difference.
Abbreviations (US Crochet Terminology)
| Abbreviation | Term | One-Line Explanation |
|---|---|---|
| BLO | Back Loop Only | Insert hook under only the rear loop of the top V of the stitch. |
| BPdc | Back Post Double Crochet | Yo, insert hook from back to front to back around the vertical post of the next stitch, complete a dc. |
| ch | Chain | Yo and pull yarn through the active loop on the hook. |
| dc | Double Crochet | Yo, insert hook in stitch, yo and pull up a loop, (yo and pull through 2 loops) twice. |
| FPdc | Front Post Double Crochet | Yo, insert hook from front to back to front around the vertical post of the next stitch, complete a dc. |
| FPdc2tog | Front Post dc 2 Together | Work two incomplete FPdc around the next two posts (3 loops on hook), then yo and pull through all 3 loops (decreases 1 st). |
| hdc | Half Double Crochet | Yo, insert hook in stitch, yo and pull up a loop, yo and pull through all 3 loops. |
| rnd(s) | Round(s) | One complete circuit worked in the round and closed with a slip stitch. |
| sc | Single Crochet | Insert hook in stitch, yo and pull up a loop, yo and pull through both loops. |
| sl st | Slip Stitch | Insert hook in stitch, yo and pull yarn through both the stitch and the loop on hook. |
| st(s) | Stitch(es) | A single completed crochet stitch; turning chains do not count as stitches. |
| yo | Yarn Over | Wrap working yarn over the hook from back to front. |
Crochet Ribbed Slipper Boots Pattern Instructions
Important Rule for All Rounds: Starting chains (ch 1 for sc/hdc rounds and ch 2 for dc/post-rib rounds) do not count as stitches. Join every round with a slip stitch to the first stitch of that round.
Component 1: Double-Layer Oval Sole
Quantity: Make 4 identical soles (2 per slipper). Construction: Joined oval rounds worked around a foundation chain.
Foundation: Ch 21 (20 working chains + 1 turning chain).
Round 1 (sc): Work 2 sc in 2nd ch from hook, sc in next 18 ch, 3 sc in last ch (toe end). Rotating to work along the opposite side of the foundation chain: sc in next 18 ch, 1 sc in the same ch as the first 2 sc (heel end). Join with sl st to first sc. [42 sts]
Round 2 (sc): Ch 1, 2 sc in each of first 2 sts, sc in next 18 sts, 2 sc in each of next 3 sts, sc in next 18 sts, 2 sc in last st. Join with sl st to first sc. [48 sts]
Round 3 (hdc): Ch 1, (hdc in next st, 2 hdc in next st) 2 times, hdc in next 18 sts, (hdc in next st, 2 hdc in next st) 3 times, hdc in next 18 sts, hdc in next st, 2 hdc in last st. Join with sl st to first hdc. [54 sts]
Check (After Sole Round 3): Sole lies flat without cupping or ruffling and measures approx. 19.7 × 4.7 cm (7.8 × 1.9 in) with 54 sts.
Round 4 (hdc): Ch 1, (hdc in next 2 sts, 2 hdc in next st) 2 times, hdc in next 18 sts, (hdc in next 2 sts, 2 hdc in next st) 3 times, hdc in next 18 sts, hdc in next 2 sts, 2 hdc in last st. Join with sl st to first hdc. [60 sts]
Round 5 (hdc): Ch 1, (hdc in next 3 sts, 2 hdc in next st) 2 times, hdc in next 18 sts, (hdc in next 3 sts, 2 hdc in next st) 3 times, hdc in next 18 sts, hdc in next 3 sts, 2 hdc in last st. Join with sl st to first hdc. [66 sts]
Round 6 (sc): Ch 1, (sc in next 4 sts, 2 sc in next st) 2 times, sc in next 18 sts, (sc in next 4 sts, 2 sc in next st) 3 times, sc in next 18 sts, sc in next 4 sts, 2 sc in last st. Join with sl st to first sc. Fasten off, leaving a 15 cm tail to weave in. [72 sts]
Check (After Sole Round 6): Each finished sole measures approx. 24.7–25.0 cm long × 9.7–10.0 cm wide (9.7–9.8 × 3.8–3.9 in) with 72 sts around (60.0 cm perimeter). Join two soles together using Assembly Steps 1–2 before starting the Upper.
Component 2: Built-In Ribbed Upper
Quantity: Make 2 (1 per slipper). Construction: Worked directly onto the joined Double-Layer Sole in joined rounds from Center Heel.
Setup Markers: After joining two soles with 72 sl sts (see Assembly Steps 1–2), fold the double sole lengthwise in half along the foundation chain to locate the exact Center Heel (st 4 of Sole Round 6) and Center Toe (st 40 of Sole Round 6). Place Marker A at Center Heel and Marker B at Center Toe (36 sts apart on each side). Join yarn at Marker A (Center Heel) with right side facing up.
Round 1 (Base Turn Wall — sc BLO): Ch 1, work 1 sc in the back loop only (the inner loop facing the footbed) of each of the 72 joining sl sts around, leaving the outer sl st braid exposed as the sole welt. Join with sl st to first sc. [72 sts]
Round 2 (Post-Rib Setup — dc): Ch 2, dc in each of the 72 sts around. Join with sl st to first dc. [72 sts]
Check (After Upper Round 2): Lower side wall stands upright approx. 2.0 cm (0.8 in) above the sole with 72 dc. Center Toe sits cleanly between st 36 and st 37.
Round 3 (Toe Shaping — -8 sts): Ch 2, (FPdc around next st, BPdc around next st) 14 times, FPdc2tog 8 times across the center 16 toe sts (sts 29–44), (FPdc around next st, BPdc around next st) 14 times. Join with sl st to first FPdc. [64 sts]
Round 4 (Toe Shaping — -8 sts): Ch 2, (FPdc, BPdc) 12 times, FPdc2tog 8 times across the center 16 sts (sts 25–40), (FPdc, BPdc) 12 times. Join with sl st to first FPdc. [56 sts]
Check (After Upper Round 4): Upper height is approx. 4.5 cm (1.8 in) with 56 sts. Side ribs stack vertically (FPdc over FPdc, BPdc over BPdc), and toe closes smoothly over the front of the foot.
Round 5 (Toe Shaping — -8 sts): Ch 2, (FPdc, BPdc) 10 times, FPdc2tog 8 times across the center 16 sts (sts 21–36), (FPdc, BPdc) 10 times. Join with sl st to first FPdc. [48 sts]
Round 6 (Toe Shaping — -8 sts): Ch 2, (FPdc, BPdc) 8 times, FPdc2tog 8 times across the center 16 sts (sts 17–32), (FPdc, BPdc) 8 times. Join with sl st to first FPdc. [40 sts]
Check (After Upper Round 6): Upper height is approx. 7.0 cm (2.8 in) with 40 sts (approx. 33.3 cm unstretched opening). Try the slipper on to confirm toe-box length feels comfortable.
Round 7 (Instep Shaping — -4 sts): Ch 2, (FPdc, BPdc) 8 times, FPdc2tog 4 times across the center 8 sts (sts 17–24), (FPdc, BPdc) 8 times. Join with sl st to first FPdc. [36 sts]
Round 8 (Ankle Shaping — -4 sts): Ch 2, (FPdc, BPdc) 7 times, FPdc2tog 4 times across the center 8 sts (sts 15–22), (FPdc, BPdc) 7 times. Join with sl st to first FPdc. Do not fasten off; continue directly to Component 3. [32 sts]
Check (After Upper Round 8): Upper height reaches approx. 9.5 cm (3.7 in) with 32 sts at the ankle (approx. 24.5–26.7 cm unstretched; stretches to approx. 32.5 cm).
Test Point — Ankle & Heel Pass-Through Check: Before crocheting the cuff, slip the unfinished bootie onto your foot. Because yarn elasticity varies by fiber, confirm that the 32-stitch ankle opening stretches comfortably over your heel diagonal (approx. 30–32 cm). If it feels tight, rip back Upper Round 8 and work the cuff on 36 sts ((FPdc, BPdc) 18 times) instead of 32 sts.
Component 3: Built-In Fold-Over Ribbed Cuff
Quantity: Make 2 (1 per slipper). Construction: Worked directly from Upper Round 8 in joined rounds of 1×1 post ribbing (no seaming).
Cuff Round 1: Ch 2, (FPdc around next st, BPdc around next st) 16 times around (working FPdc, BPdc, FPdc, BPdc smoothly across the 4 center instep posts from Upper Round 8). Join with sl st to first FPdc. [32 sts]
Cuff Rounds 2–10 (9 rounds): Ch 2, (FPdc around next FPdc, BPdc around next BPdc) 16 times around. Join with sl st to first FPdc. [32 sts per round]
Cuff Round 11 (Edging): Ch 1, work 1 sc loosely in each of the 32 sts around to create a neat, non-flaring folded cuff rim. Join with sl st to first sc. Fasten off, leaving a 15 cm tail to weave in. [32 sts]
Check (Finished Cuff): Cuff measures approx. 13.2 cm (5.2 in) unfolded and 6.6 cm (2.6 in) when folded down halfway. Total finished slipper height (folded) is approx. 16.1 cm (6.3 in).
Assembly
Because both the Ribbed Upper and the Fold-Over Cuff are built directly onto the joined sole, only the double-layer sole requires joining.
- Pair the 4 Soles: Divide your 4 finished soles into 2 pairs (2 soles per slipper). Hold 2 soles wrong sides together (so the neat right sides face both the footbed and the floor) with their Round 6 edges aligned stitch-for-stitch (72 sts on each sole).
- Join Sole Layers with Braided Edge: Place 4 locking stitch markers through both soles at st 4 (Center Heel), st 22 (Right Side), st 40 (Center Toe), and st 58 (Left Side) — spaced exactly 18 sts apart. Join yarn at st 4 (Center Heel) and work 1 sl st through both layers in every stitch around (72 sl sts total). Keep tension relaxed so the sole stays flat. Join with sl st to first sl st and fasten off, or continue directly into Upper Round 1 from st 4.
- Build the Upper & Cuff Directly: Keep Marker A at st 4 (Center Heel) and Marker B at st 40 (Center Toe). Work Component 2 (Upper Rounds 1–8) directly into the back (inner) loop of the 72 joining sl sts, then continue directly into Component 3 (Cuff Rounds 1–11) with no sewing.
- Fold the Cuff & Finish: Turn the completed cuff outward and fold it down halfway (approx. 6.6 cm) so Cuff Round 11 rests cleanly against the top of the ribbed upper. Repeat Steps 1–4 for the second slipper.
Changing the Size
Use your measured swatch gauges (default: 1.20 sts/cm in sc and 1×1 ribbing; 0.80 rnds/cm in post ribbing) to adjust the slipper to any adult foot length or ankle circumference:
- Adjusting Foot Length (Sole Foundation Chain): Multiply your target finished sole length (foot length + 0.5–1.0 cm ease) minus 10.0 cm (the two curved ends) by your sc stitch gauge (1.20 sts/cm), then add 3 chains (2 end chains + 1 turning chain). Formula:
Foundation Ch = round((Target Length in cm - 10.0) × 1.20) + 3. Keep the straight-side count an even number (e.g., 16 for Small ~23.3 cm; 18 for Medium ~25.0 cm; 20 for Large ~26.7 cm; 22 for XL ~28.3 cm) so the total Round 6 sole stitch count stays divisible by 4 (68, 72, 76, or 80 sts). - Adjusting Upper & Ankle Circumference: Every +4 sts added to the sole adds +2 sts to each side of the upper (1 extra (FPdc, BPdc) repeat per side on Upper Rounds 3–8). Keep the ankle stitch count an even multiple of 2 for 1×1 post ribbing: e.g., 30 sts (~25.0 cm raw) for narrow ankles, 32 sts (~26.7 cm raw) for Medium, or 36 sts (~30.0 cm raw) for wider ankles/high insteps (stop decreasing after Upper Round 7 if you want 36 sts).
- Adjusting Cuff Height: Multiply desired folded cuff height by 2, subtract 0.7 cm for Cuff Round 11, and multiply by your post-rib round gauge (0.80 rnds/cm). Add or subtract pairs of cuff rounds freely without affecting fit.
Troubleshooting
| Problem | Practical Fix |
|---|---|
| 1. Sole curls or cups upward | Your joining slip stitches or sole rounds are too tight. Go up 0.5 mm (to 6.5 mm / US K-10.5) for the joining sl st round and keep loops relaxed. |
| 2. Toe shaping looks off-center | Upper Round 1 was started at the Sole Round 6 join instead of st 4 (physical Center Heel). Fold the sole lengthwise to mark st 4 (Heel) and st 40 (Toe) before starting the upper. |
| 3. Side ribbing columns shift sideways | Check that turning ch-2 is not counted as a stitch and that each round starts with FPdc around the first post. Always verify stitch totals at the end of every round. |
| 4. Ankle opening is too tight over the heel | Post ribbing pulls in firmly. Rip back Upper Round 8 and work the cuff on 36 sts instead of 32 sts, or use a 6.5 mm hook for Upper Round 8 and the cuff. |
| 5. Small gaps appear at the toe decreases | Keep yarn tension slightly snug when closing each FPdc2tog, and insert the hook cleanly around both vertical posts without skipping a post between decreases. |
| 6. Cuff edge flares outward when folded | Work Cuff Round 11 (sc edging) at normal relaxed tension — not overly loose — or substitute a 5.5 mm (US I-9) hook for Cuff Round 11 only. |
Finishing and Care
- Weaving in Ends: Thread each 15 cm yarn tail onto a tapestry needle and weave back and forth for at least 5 cm through the thick double sole or inner cuff ribs before trimming flush.
- Blocking: Bulky acrylic and wool-acrylic blends rarely need aggressive wet blocking. Lightly steam-hover (without touching the iron to acrylic yarn) or hand-shape the toe and fold-over cuff while damp, then dry flat.
- Optional Non-Slip Soles: Crocheted yarn soles can be slippery on wood or tile floors. Apply dots of non-slip sock puff paint to the bottom sole and let cure 24 hours, or whipstitch pre-punched suede slipper soles to the bottom layer.
- Washing: Hand wash or machine wash cold (30°C / 85°F) on a gentle cycle inside a mesh laundry bag using mild detergent. Press excess water out in a towel — never wring — and reshape to dry flat away from direct heat.
- Storage: Store clean, completely dry slippers folded neatly or stuffed lightly with tissue paper in a breathable cotton bag or drawer to keep the ribbed cuff from flattening.
Frequently Asked Questions
Is this slipper boot pattern crocheted or knitted?
This pattern is 100% crochet using standard US crochet terminology and a 6.0 mm (US J-10) crochet hook. The ribbed texture is created with front- and back-post double crochet stitches (FPdc and BPdc) rather than knitting needles.
Are the left and right slipper boots shaped differently?
No. Both slippers use the same symmetrical 6-round oval sole and centered toe shaping, so you make four identical soles and two identical uppers.
Why do I start Upper Round 1 at stitch 4 instead of the Sole Round 6 join?
Because the oval sole increases slightly shift the round join off the center line by Round 6, physical Center Heel sits at stitch 4 and Center Toe sits at stitch 40. Starting Upper Round 1 at stitch 4 keeps your toe decreases centered over the front of your foot.
What if the 32-stitch ankle opening feels too snug over my heel?
Try the bootie on right after Upper Round 8 before crocheting the cuff. If it feels tight passing over your heel, undo Upper Round 8 and work the cuff on 36 stitches instead of 32 stitches, or switch to a 6.5 mm hook for Upper Round 8 and the cuff.
Closing
If you try this draft crochet ribbed slipper boots pattern, please start with the small gauge and sole test piece first and share how your fit and stitch counts turn out. We would love to see photos of your finished slippers and hear any feedback from your test make..
(c) 2026 Abby Marlow / Abby’s Stitches. Personal use only. Please do not copy or republish this pattern.