
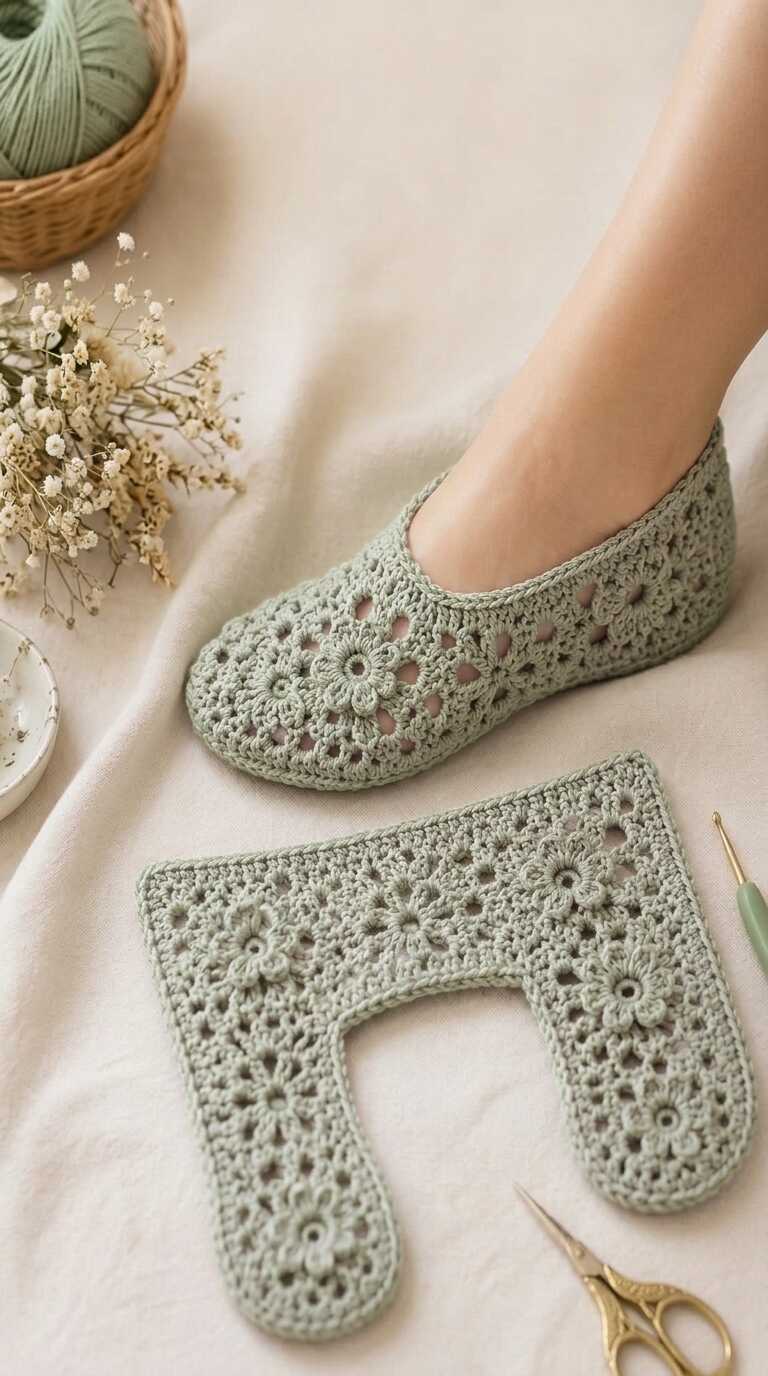
Looking for a delicate, breathable house shoe that hugs your foot without feeling stiff? This crochet lace slippers pattern delivers graceful ballet-flat styling paired with everyday practicality. Designed for adult medium feet, these slippers feature a dense, cushioned oval sole, airy two-stitch mesh side walls, and an eye-catching eight-petal floral puff-stitch medallion centered over the instep. Rated for intermediate makers due to dimensional puff stitches and precise stitch-for-stitch motif joining, this complete free pattern includes exact round ledgers, millimeter checkpoints, and sizing adjustment formulas so you can craft a custom pair with confidence.
Pattern status: draft. This pattern has not been fully test-crocheted yet. Please make the small test piece first, and tell us how it goes.
Quick Pattern Facts
- Skill Level: Intermediate
- Finished Size (Adult Medium): 23.6 cm × 8.6 cm (9.3 in × 3.4 in) sole; 4.3 cm (1.7 in) side wall height; 42.5 cm (16.7 in) collar circumference
- Target Foot Size: US Women’s 7.5–8.5 / EU 38–39 (24.0 cm foot length; 21.5 cm ball circumference)
- Yarn Weight: Worsted (Category 4 Medium), cotton or cotton-acrylic blend (1.80 yds/g)
- Hook Size: 4.0 mm (US G-6), or size needed to obtain gauge
- Gauge: 16 sts and 14 rows/rounds = 10 cm (4 in)
- Estimated Yardage: 60 g to 70 g (108 yds to 126 yds / 99 m to 116 m) per slipper; 120 g to 140 g (216 yds to 252 yds / 198 m to 231 m) per pair (estimates)
- Estimated Making Time: [MY TEST NOTES: how long it took] (estimate)
About This Design
These low-profile ballet slippers combine a sturdy oval sole with airy mesh side walls and a dimensional eight-petal floral centerpiece over the toe box. To make the pattern reliable to count and assemble without sewing a flat U-shaped panel onto a curved sole, the upper side walls are worked directly up in rounds from the sole edge and topped with a single round puff-stitch flower medallion joined across the front vamp. Multi-motif freeform side lace from the inspiration sample has been simplified into a uniform two-stitch chain-space mesh that keeps the open floral look.
Construction Overview
This design is worked in two separate pieces per slipper and joined without curved flat-panel seams:
- Piece 1 (Oval Sole & Built-In Lace Upper): Started with a central foundation chain worked in continuous joined rounds of half double crochet to create a dense, flat oval base (Rounds 1–6). Round 7 works into the back loops only (BLO) to turn the work upward at a right angle, followed by three rounds of open chain-1 lace mesh (Rounds 8–10) and two rounds of toe and heel decreases (Rounds 11–12) that form the side walls and collar rim. Both slippers use identical left and right construction.
- Piece 2 (8-Petal Vamp Medallion): Worked in the round from a center ring, featuring eight dimensional puff-stitch petals surrounded by an outer single-crochet rim (24 stitches total).
- Joining: The medallion is whipstitched stitch-for-stitch across the center 16 stitches of the front toe opening, leaving its remaining 8 stitches open to complete the foot collar.
Materials & Specifications
- Yarn: Worsted-weight (Category 4 Medium) cotton or cotton-acrylic blend yarn in Sage Green (standard put-up: 100 g = 180 yds / 165 m, or 1.80 yds per gram).
- Estimated quantity per slipper (1 item): 60 g to 70 g (108 yds to 126 yds / 99 m to 116 m).
- Estimated quantity per pair (2 items): 120 g to 140 g (216 yds to 252 yds / 198 m to 231 m), or 2 full skeins.
- Hook: 4.0 mm (US G-6) crochet hook, or size required to match gauge.
- Notions: 4 locking stitch markers, blunt tapestry needle, sharp scissors, and a flexible tape measure.
Gauge & Swatching
Standard Gauge: 16 sts and 14 rows/rounds = 10 cm (4 in) worked in pattern with a 4.0 mm hook. This calculates to 1.60 sts per cm horizontally (0.625 cm per stitch) and 1.40 rounds per cm vertically (0.714 cm per round).
- How to swatch: Chain 21. Work Row 1 in half double crochet (hdc) starting in the 2nd chain from the hook (20 sts). Work Rows 2 to 9 in hdc (ch 1, turn, 1 hdc in each st across). Then work Rows 10 to 16 in lace mesh (ch 1, turn, *1 sc in next st, ch 1, skip next st; repeat from * across). Fasten off without stretching.
- What your swatch should measure: The unblocked 20-stitch by 16-row swatch should measure 12.5 cm wide by 11.4 cm tall (4.9 in × 4.5 in). The inner 16 sts by 14 rows must equal exactly 10 cm × 10 cm.
- Exact hook change rule: If you count more than 16 sts or 14 rows in 10 cm, your stitches are too tight and your slippers will come out too small — switch to a 4.5 mm (US 7) hook. If you count fewer than 16 sts or 14 rows in 10 cm, your stitches are too loose — switch to a 3.5 mm (US E-4) hook.
Crochet Abbreviations
All instructions use standard US crochet terminology. Beginning chain-1 spaces do not count as a stitch.
| Term | Full Name | One-Line How-To |
|---|---|---|
| BLO | Back loop only | Insert hook under only the back loop (farthest from you) of the stitch top V. |
| ch | Chain | Yarn over, pull loop through the active loop on your hook. |
| ch-1 sp | Chain-1 space | Work directly into the open hole beneath the chain stitch from the previous round. |
| hdc | Half double crochet | Yarn over, insert hook in st, yarn over, pull up loop (3 loops on hook), yarn over, pull through all 3 loops. |
| puff st | 3-loop puff stitch | [Yarn over, insert hook in st, yarn over, pull up loop to hdc height] 3 times in same st (7 loops on hook), yarn over, pull through all 7 loops. |
| rnd(s) | Round(s) | One complete circular circuit joined with a slip stitch. |
| sc | Single crochet | Insert hook in st, yarn over, pull up loop (2 loops on hook), yarn over, pull through both loops. |
| sc2tog | Single crochet 2 together | Insert hook in st, pull up loop, insert hook in next st, pull up loop (3 loops on hook), yarn over, pull through all 3 loops. |
| sl st | Slip stitch | Insert hook in st, yarn over, pull loop through stitch and loop on hook in one motion. |
| st(s) | Stitch(es) | Any worked stitch (sc, hdc, sc2tog, puff st) or chain-1 space counted in the round total. |
| [ … ] N times | Bracketed repeat | Work the sequence inside brackets the exact number of times indicated immediately after. |
Pattern Instructions
Piece 1: Oval Sole & Built-In Lace Upper (Make 2 — Left and Right are identical)
Work in continuous joined rounds around both sides of a central foundation chain (Stage 1A), then continue seamlessly upward in Round 7 (built-in join) to form the lace mesh side walls (Stage 1B). Do not turn at the end of any round.
Foundation Chain (Sole Spine): Ch 25. You will work into 24 chains (skipping the first chain from the hook): the 1st working chain forms the heel curve, the middle 22 chains form the straight foot arch, and the 24th working chain forms the toe curve. [25 ch made; 24 working chs]
□ Check: your piece should measure 15.0 cm (5.9 in) along the 24 working chains before starting Round 1 (calculated as 24 sts ÷ 1.60 sts per cm = 15.0 cm).
Rnd 1 (Sole Base): Work 3 hdc in 2nd ch from hook (heel end), [1 hdc in next ch] 22 times along Side A, 6 hdc in last ch (toe end); pivot to work along the opposite side of the foundation chain, [1 hdc in next ch] 22 times along Side B, 3 hdc in first working ch (completing the 6-hdc heel curve), sl st to first hdc to join. [56 sts]
Rnd 2 (Sole Increase): Ch 1, [2 hdc in next st] 3 times, [1 hdc in next st] 22 times, [2 hdc in next st] 6 times, [1 hdc in next st] 22 times, [2 hdc in next st] 3 times, sl st to first hdc. [68 sts]
Rnd 3 (Sole Midpoint): Ch 1, [1 hdc in next st, 2 hdc in next st] 3 times, [1 hdc in next st] 22 times, [1 hdc in next st, 2 hdc in next st] 6 times, [1 hdc in next st] 22 times, [1 hdc in next st, 2 hdc in next st] 3 times, sl st to first hdc. [80 sts]
□ Check: your piece should measure 50.0 cm in outer perimeter circumference (80 sts ÷ 1.60 sts per cm = 50.0 cm; equivalent circular diameter = 50.0 ÷ 3.14 = 15.9 cm), with a flat oval length of 19.3 cm (15.0 cm spine + 4.3 cm from 6 round-heights) and width of 4.3 cm (6 round-heights ÷ 1.40 rnds per cm).
Rnd 4 (Sole Widening): Ch 1, [1 hdc in next 2 sts, 2 hdc in next st] 2 times, [1 hdc in next st] 28 times, [1 hdc in next 2 sts, 2 hdc in next st] 4 times, [1 hdc in next st] 28 times, [1 hdc in next 2 sts, 2 hdc in next st] 2 times, sl st to first hdc. [88 sts]
Rnd 5 (Sole Outer Curve): Ch 1, [1 hdc in next 3 sts, 2 hdc in next st] 1 time, [1 hdc in next st] 36 times, [1 hdc in next 3 sts, 2 hdc in next st] 2 times, [1 hdc in next st] 36 times, [1 hdc in next 3 sts, 2 hdc in next st] 1 time, sl st to first hdc. [92 sts]
Rnd 6 (Sole Firm Edge): Ch 1, [1 sc in next st] 92 times around, sl st to first sc. Place a stitch marker between Stitch 46 and Stitch 47 at the exact center-front toe tip. [92 sts]
□ Check: your piece should measure 57.5 cm in outer perimeter circumference (92 sts ÷ 1.60 sts per cm = 57.5 cm; equivalent circular diameter = 57.5 ÷ 3.14 = 18.3 cm), with a finished flat oval sole length of 23.6 cm (9.3 in) and width of 8.6 cm (3.4 in) (12 round-heights ÷ 1.40 rnds per cm = 8.6 cm).
Rnd 7 (Built-In Upper Turning Ridge — BLO): Ch 1, working in BLO around the outer edge of the sole so the fabric turns upward at a 90-degree angle, [1 sc in next st] 92 times, sl st to first sc. [92 sts]
Rnd 8 (Lace Mesh Wall 1): Ch 1, working under both loops again, [1 sc in next st, ch 1, skip next st] 46 times around, sl st to first sc. Count each sc and each ch-1 sp as 1 stitch. [92 sts: 46 sc and 46 ch-1 sps]
Rnd 9 (Lace Mesh Wall 2): Ch 1, [1 sc in next ch-1 sp, ch 1, skip next sc] 46 times around, sl st to first sc. [92 sts: 46 sc and 46 ch-1 sps]
Rnd 10 (Lace Mesh Wall 3): Ch 1, [1 sc in next ch-1 sp, ch 1, skip next sc] 46 times around, sl st to first sc. [92 sts: 46 sc and 46 ch-1 sps]
□ Check: your piece should measure 57.5 cm in upper wall circumference (92 sts ÷ 1.60 sts per cm = 57.5 cm; equivalent circular diameter = 57.5 ÷ 3.14 = 18.3 cm) and 2.9 cm in vertical wall height above the sole edge (4 rounds ÷ 1.40 rnds per cm = 2.9 cm).
Rnd 11 (Heel & Toe Shaping Decrease): Ch 1, working into each sc and each ch-1 sp around: [sc2tog over next 2 sts] 2 times (heel left), [1 sc in next st] 34 times (Side A), [sc2tog over next 2 sts] 8 times (toe box curve), [1 sc in next st] 34 times (Side B), [sc2tog over next 2 sts] 2 times (heel right), sl st to first st. [80 sts]
Rnd 12 (Upper Rim Edging): Ch 1, [1 sc in next st] 36 times (heel left and Side A), [sc2tog over next 2 sts] 4 times (front toe center), [1 sc in next st] 36 times (Side B and heel right), sl st to first sc. Fasten off and weave in the tail. [76 sts]
□ Check: your piece should measure 47.5 cm around the top rim circumference before medallion assembly (76 sts ÷ 1.60 sts per cm = 47.5 cm; equivalent circular diameter = 47.5 ÷ 3.14 = 15.1 cm), with a vertical side wall height of 4.3 cm (6 rounds ÷ 1.40 rnds per cm = 4.3 cm).
Test point: Sole-to-upper stretch and heel grip. Cotton yarns vary in elasticity. Slip your foot into the completed Piece 1 base before sewing on Piece 2: the 23.6 cm sole should stretch gently to hug a 24.0 cm foot, and the Rnd 11–12 heel curve should cup your heel without slipping off. If the top rim feels loose around your heel, work Rnd 12 with a 3.5 mm hook.
Piece 1 Stitch Ledger (Oval Sole & Built-In Lace Upper)
| Round | Start Sts | Sts Used | Sts Made | End Sts | Repeat Formula Verification ((Per Repeat × N) + Outside = Start) |
|---|---|---|---|---|---|
| Foundation | 0 | 0 | 25 ch | 24 ch | 24 working chs + 1 turning ch = 25 ch (15.0 cm spine) |
| Rnd 1 | 24 ch | 24 ch | 56 | 56 | (1 ch × 22) + 1 heel ch + 1 toe ch = 24 ch used on both sides → 56 sts |
| Rnd 2 | 56 | 56 | 68 | 68 | (1 × 3) + (1 × 22) + (1 × 6) + (1 × 22) + (1 × 3) + 0 = 56 sts used |
| Rnd 3 | 68 | 68 | 80 | 80 | (2 × 3) + (1 × 22) + (2 × 6) + (1 × 22) + (2 × 3) + 0 = 68 sts used |
| Rnd 4 | 80 | 80 | 88 | 88 | (3 × 2) + (1 × 28) + (3 × 4) + (1 × 28) + (3 × 2) + 0 = 80 sts used |
| Rnd 5 | 88 | 88 | 92 | 92 | (4 × 1) + (1 × 36) + (4 × 2) + (1 × 36) + (4 × 1) + 0 = 88 sts used |
| Rnd 6 | 92 | 92 | 92 | 92 | (1 × 92) + 0 = 92 sts used |
| Rnd 7 (BLO) | 92 | 92 | 92 | 92 | (1 × 92) + 0 = 92 sts used (built-in upper wall transition) |
| Rnd 8 | 92 | 92 | 92 | 92 | (2 × 46) + 0 = 92 sts used (makes 46 sc + 46 ch-1 sps) |
| Rnd 9 | 92 | 92 | 92 | 92 | (2 × 46) + 0 = 92 sts used (makes 46 sc + 46 ch-1 sps) |
| Rnd 10 | 92 | 92 | 92 | 92 | (2 × 46) + 0 = 92 sts used (makes 46 sc + 46 ch-1 sps) |
| Rnd 11 | 92 | 92 | 80 | 80 | (2 × 2) + (1 × 34) + (2 × 8) + (1 × 34) + (2 × 2) + 0 = 92 sts used |
| Rnd 12 | 80 | 80 | 76 | 76 | (1 × 36) + (2 × 4) + (1 × 36) + 0 = 80 sts used |
Piece 2: 8-Petal Puff-Stitch Vamp Medallion (Make 2 — 1 per slipper)
Work in joined rounds from the center outward. Leave a 40 cm (16 in) yarn tail at the end of Round 3 for seaming the medallion to the front toe rim of Piece 1.
Foundation Ring: Ch 4, sl st in first ch to form a center ring. [4 ch ring]
Rnd 1 (Flower Center): Ch 1, work 8 sc directly into the center of the ring, sl st to first sc. [8 sts]
□ Check: your piece should measure 5.0 cm in circumference (8 sts ÷ 1.60 sts per cm = 5.0 cm) and 1.6 cm in diameter (5.0 cm ÷ 3.14 = 1.6 cm).
Rnd 2 (8 Puff Petals): Ch 1, [1 puff st in next sc, ch 1] 8 times around, sl st to top of first puff st. Count each puff st and each ch-1 sp as 1 stitch. [16 sts: 8 puff sts and 8 ch-1 sps]
Rnd 3 (Medallion Joining Rim): Ch 1, [1 sc in top of next puff st, 2 sc in next ch-1 sp] 8 times around, sl st to first sc. Fasten off, leaving a 40 cm (16 in) tail for seaming. [24 sts]
□ Check: your piece should measure 15.0 cm in outer circumference (24 sts ÷ 1.60 sts per cm = 15.0 cm) and 4.8 cm in flat circular diameter (15.0 cm ÷ 3.14 = 4.8 cm).
Test point: Puff-stitch height and medallion diameter. Pull each loop of your puff stitch up to a full 0.7 cm height (matching your hdc height) before closing the stitch. If your puffs are pulled too short, the medallion diameter will measure less than 4.8 cm and pull the toe box tight across the top of your toes.
Piece 2 Stitch Ledger (8-Petal Puff-Stitch Vamp Medallion)
| Round | Start Sts | Sts Used | Sts Made | End Sts | Repeat Formula Verification ((Per Repeat × N) + Outside = Start) |
|---|---|---|---|---|---|
| Foundation | 0 | 0 | 4 ch | 4 ch | Ch 4 joined with sl st into 1 center ring |
| Rnd 1 | 4 ch | 4 ch | 8 | 8 | 8 sc worked into center ring = 8 sts made |
| Rnd 2 | 8 | 8 | 16 | 16 | (1 × 8) + 0 = 8 sts used (makes 8 puff sts + 8 ch-1 sps = 16 sts) |
| Rnd 3 | 16 | 16 | 24 | 24 | (2 × 8) + 0 = 16 sts used (1 puff + 1 ch-1 sp per repeat → 24 sc made) |
Assembly Instructions
The upper side wall is already built in to the oval sole during Round 7. Follow these numbered steps for each slipper to attach Piece 2 (the 8-Petal Vamp Medallion) over the front toe box with exact stitch-for-stitch alignment:
- Locate the front toe center on Piece 1: Lay Piece 1 flat with the sole facing down. Count along Round 12 (76 sts total) starting from Stitch 1 at the center-back heel. The 4 toe decreases from Round 12 sit at Stitches 37, 38, 39, and 40, so the exact center-front toe point is between Stitch 38 and Stitch 39.
- Mark the 16-stitch toe join zone on Piece 1 (10.0 cm arc): Count 8 stitches back from Stitch 38 along Side A and clip Marker A in Stitch 31. Count 8 stitches forward from Stitch 39 along Side B and clip Marker B in Stitch 46. You now have exactly 16 stitches from Stitch 31 to Stitch 46 inclusive (16 sts ÷ 1.60 sts per cm = 10.0 cm curved toe arc).
- Mark the 16-stitch seaming edge on Piece 2 (10.0 cm arc): On Piece 2 (24 sts total around Round 3), clip Marker C in Stitch 1 (where you fastened off) and count clockwise around the edge to clip Marker D in Stitch 16. Stitches 1 to 16 form the 16-stitch front seaming arc (10.0 cm), while Stitches 17 to 24 (8 sts = 5.0 cm) remain unsewn to form the front instep edge.
- Pin and align center-to-center: Place Piece 2 right-side up over the front toe opening of Piece 1. Match Stitch 1 of Piece 2 to Stitch 31 of Piece 1 (Markers A and C), match the midpoint between Stitches 8 and 9 of Piece 2 to the center point between Stitches 38 and 39 of Piece 1, and match Stitch 16 of Piece 2 to Stitch 46 of Piece 1 (Markers B and D).
- Whipstitch stitch-for-stitch (16 joins total): Thread the 40 cm yarn tail from Piece 2 onto your tapestry needle. Working from Stitch 1 to Stitch 16 of Piece 2 and from Stitch 31 to Stitch 46 of Piece 1, whipstitch through both top loops of each matching stitch pair (16 exact stitch pairs joined over 10.0 cm).
- Verify the finished foot opening (68 sts): Remove all markers. Check that 60 stitches of Round 12 on Piece 1 (Stitches 47 to 76 and Stitches 1 to 30) plus the 8 unsewn rear stitches of Piece 2 (Stitches 17 to 24) form a continuous 68-stitch foot opening measuring 42.5 cm (16.7 in) in circumference around the collar. Repeat Steps 1 to 6 for the second slipper.
Changing the Size
To adjust the pattern for any adult or youth foot size without altering the Round 1–6 corner increases or the 16-stitch medallion join, measure the wearer’s bare foot length and ball circumference in centimeters and apply these three formulas:
- Step 1 — Target Sole Length & Width: Subtract 0.4 cm from the wearer’s foot length for negative ease so the slipper hugs the heel:
Target Sole Length (cm) = Foot Length (cm) − 0.4 cm. For width, each sole round adds 2 rows across the width (12 rows ÷ 1.40 rows/cm = 8.6 cmfor 6 rounds). To make the sole 1.4 cm wider (10.0 cm), work 1 additional plain sc round after Round 6 (+2 rows); to make it 1.4 cm narrower (7.2 cm), omit Round 6 (−2 rows). - Step 2 — Foundation Chain Formula (Adjusting Length): Calculate your required central spine length as
Spine Length (cm) = Target Sole Length (cm) − Sole Width (cm). Multiply by the stitch gauge (1.60 sts/cm), round to the nearest even integer so the lace mesh in Rounds 8–10 stays divisible by 2, and add 1 turning chain:Foundation Chain Count = [Even_Round(Spine Length in cm × 1.60)] + 1.
Note: Every +2 chains added to the foundation chain increases the straight side sections (Side A and Side B) by 2 stitches each (+4 stitches total per round) and lengthens the finished slipper by +1.25 cm (0.5 in). Every −2 chains shortens the slipper by −1.25 cm (0.5 in). - Step 3 — Upper Mesh & Medallion Join Formula: In Rounds 8–10, work the 2-stitch lace repeat
(Total Sole Stitches ÷ 2)times. Regardless of foot length, always keep the 4 toe-tip decreases centered at the front of Round 12 and join Stitches 1–16 of Piece 2 across the center 16 toe stitches (8 stitches on each side of the center-front toe marker).
Troubleshooting Guide
| Common Problem | Likely Cause | Exact Fix |
|---|---|---|
| 1. Oval sole cups upward like a bowl before Round 7 | Stitch tension is tighter than 16 sts per 10 cm, or an increase was missed at the heel or toe curve. | Count Round 6 to confirm you have 92 sts. If the count is 92 and the sole still curls, switch to a 4.5 mm hook for Rounds 1–6. |
| 2. Oval sole ruffles or waves along the outer edge | Extra increases were worked along the straight side stitches, or row height is too short relative to width. | Check that increases only occur in the heel and toe brackets and that the two straight sides have exactly 22 sts in Rnds 1–3. |
| 3. Lace mesh stitch count drifts in Rounds 8–10 | A chain-1 space was skipped without chaining 1, or two sc were worked side-by-side without skipping a stitch. | Count 46 sc and 46 ch-1 spaces (92 sts total) at the end of Round 8. Clip a marker every 23 sts to catch miscounts early. |
| 4. Puff-stitch flower medallion sits crooked on the toe | The 16-stitch join zone on Round 12 was shifted off-center from the middle of the 4 toe decreases. | Unpick the whipstitch seam, find Stitches 38 and 39 at the exact middle of the 4 toe decreases, and re-mark Stitches 31 and 46. |
| 5. Slipper slips off the heel when walking | Finished sole is longer than your bare foot (zero or positive ease instead of 0.4 cm negative ease). | Work one additional round of single crochet around the 68-stitch foot collar opening using a 3.5 mm hook to snug the rim. |
| 6. Toe box feels tight across the top of the toes | Whipstitch seam was pulled too tightly when joining Piece 2, or puff stitches were worked too short. | Re-sew the 16-stitch seam using looser whipstitches so the seam stretches cleanly to the full 10.0 cm arc length. |
Finishing & Care
- Weaving in ends: Turn each slipper inside out. Thread each yarn tail onto your blunt tapestry needle and weave it horizontally through 3.0 cm of sturdy single crochet stitches along the inside of the sole rim (Round 6 or Round 7), then reverse direction for 2.0 cm before trimming close to the fabric. Never place knots under the bottom of the sole where you step.
- Wet blocking for shape: Mist both slippers lightly with cool water until damp. Stuff the toe box firmly with clean washcloths or tissue paper to round out the puff-stitch flower medallion and shape the 23.6 cm × 8.6 cm foot bed. Let dry completely away from direct heat for 12 to 24 hours.
- Optional non-slip sole treatment: If wearing on smooth hardwood or tile floors, apply dots of liquid latex rug backing or sew a pair of suede slipper soles onto the bottom of Rounds 1–5 after blocking.
- Washing and care: Hand wash in cool water (30°C / 85°F) with mild wool or cotton wash. Press excess water out gently in a towel without wringing, reshape the toe box and collar opening by hand, and dry flat.
Frequently Asked Questions
Can I use acrylic yarn instead of cotton for these slippers?
Yes, as long as you match the gauge of 16 sts and 14 rounds per 10 cm. However, worsted cotton or a cotton-acrylic blend is recommended because cotton provides superior stitch definition for the puff-stitch medallion and offers the structural firmness needed for the sole.
How do I make a left and right slipper?
Piece 1 and Piece 2 are symmetrical, so both slippers are crocheted identically. When you put them on, the flexible cotton fabric naturally molds to your individual left and right foot contours during the first few wearings.
Why is the finished sole 0.4 cm shorter than my actual foot length?
Crocheted footwear naturally stretches with foot movement. Designing the sole with 0.4 cm of negative ease ensures the slipper hugs the back of your heel securely and prevents slipping off while walking.
What is the best way to prevent slipping on slick indoor floors?
Once blocked and dried, paint small dots or lines of non-toxic silicone caulk or liquid latex rug backing across the bottom sole surface, or sew pre-cut leather/suede slipper soles directly to the single crochet edge of Round 6.
We would love to see your finished slippers! Share your photos on Instagram and tag us, or pin this pattern for your next weekend project.
Prefer an ad-free, printable PDF format with checklist pages and formatted stitch charts? Download the printable PDF Customer Guide [PDF LINK].
© 2026 Abby Marlow / Abby’s Stitches. Personal use only. Please do not copy or republish this pattern.