
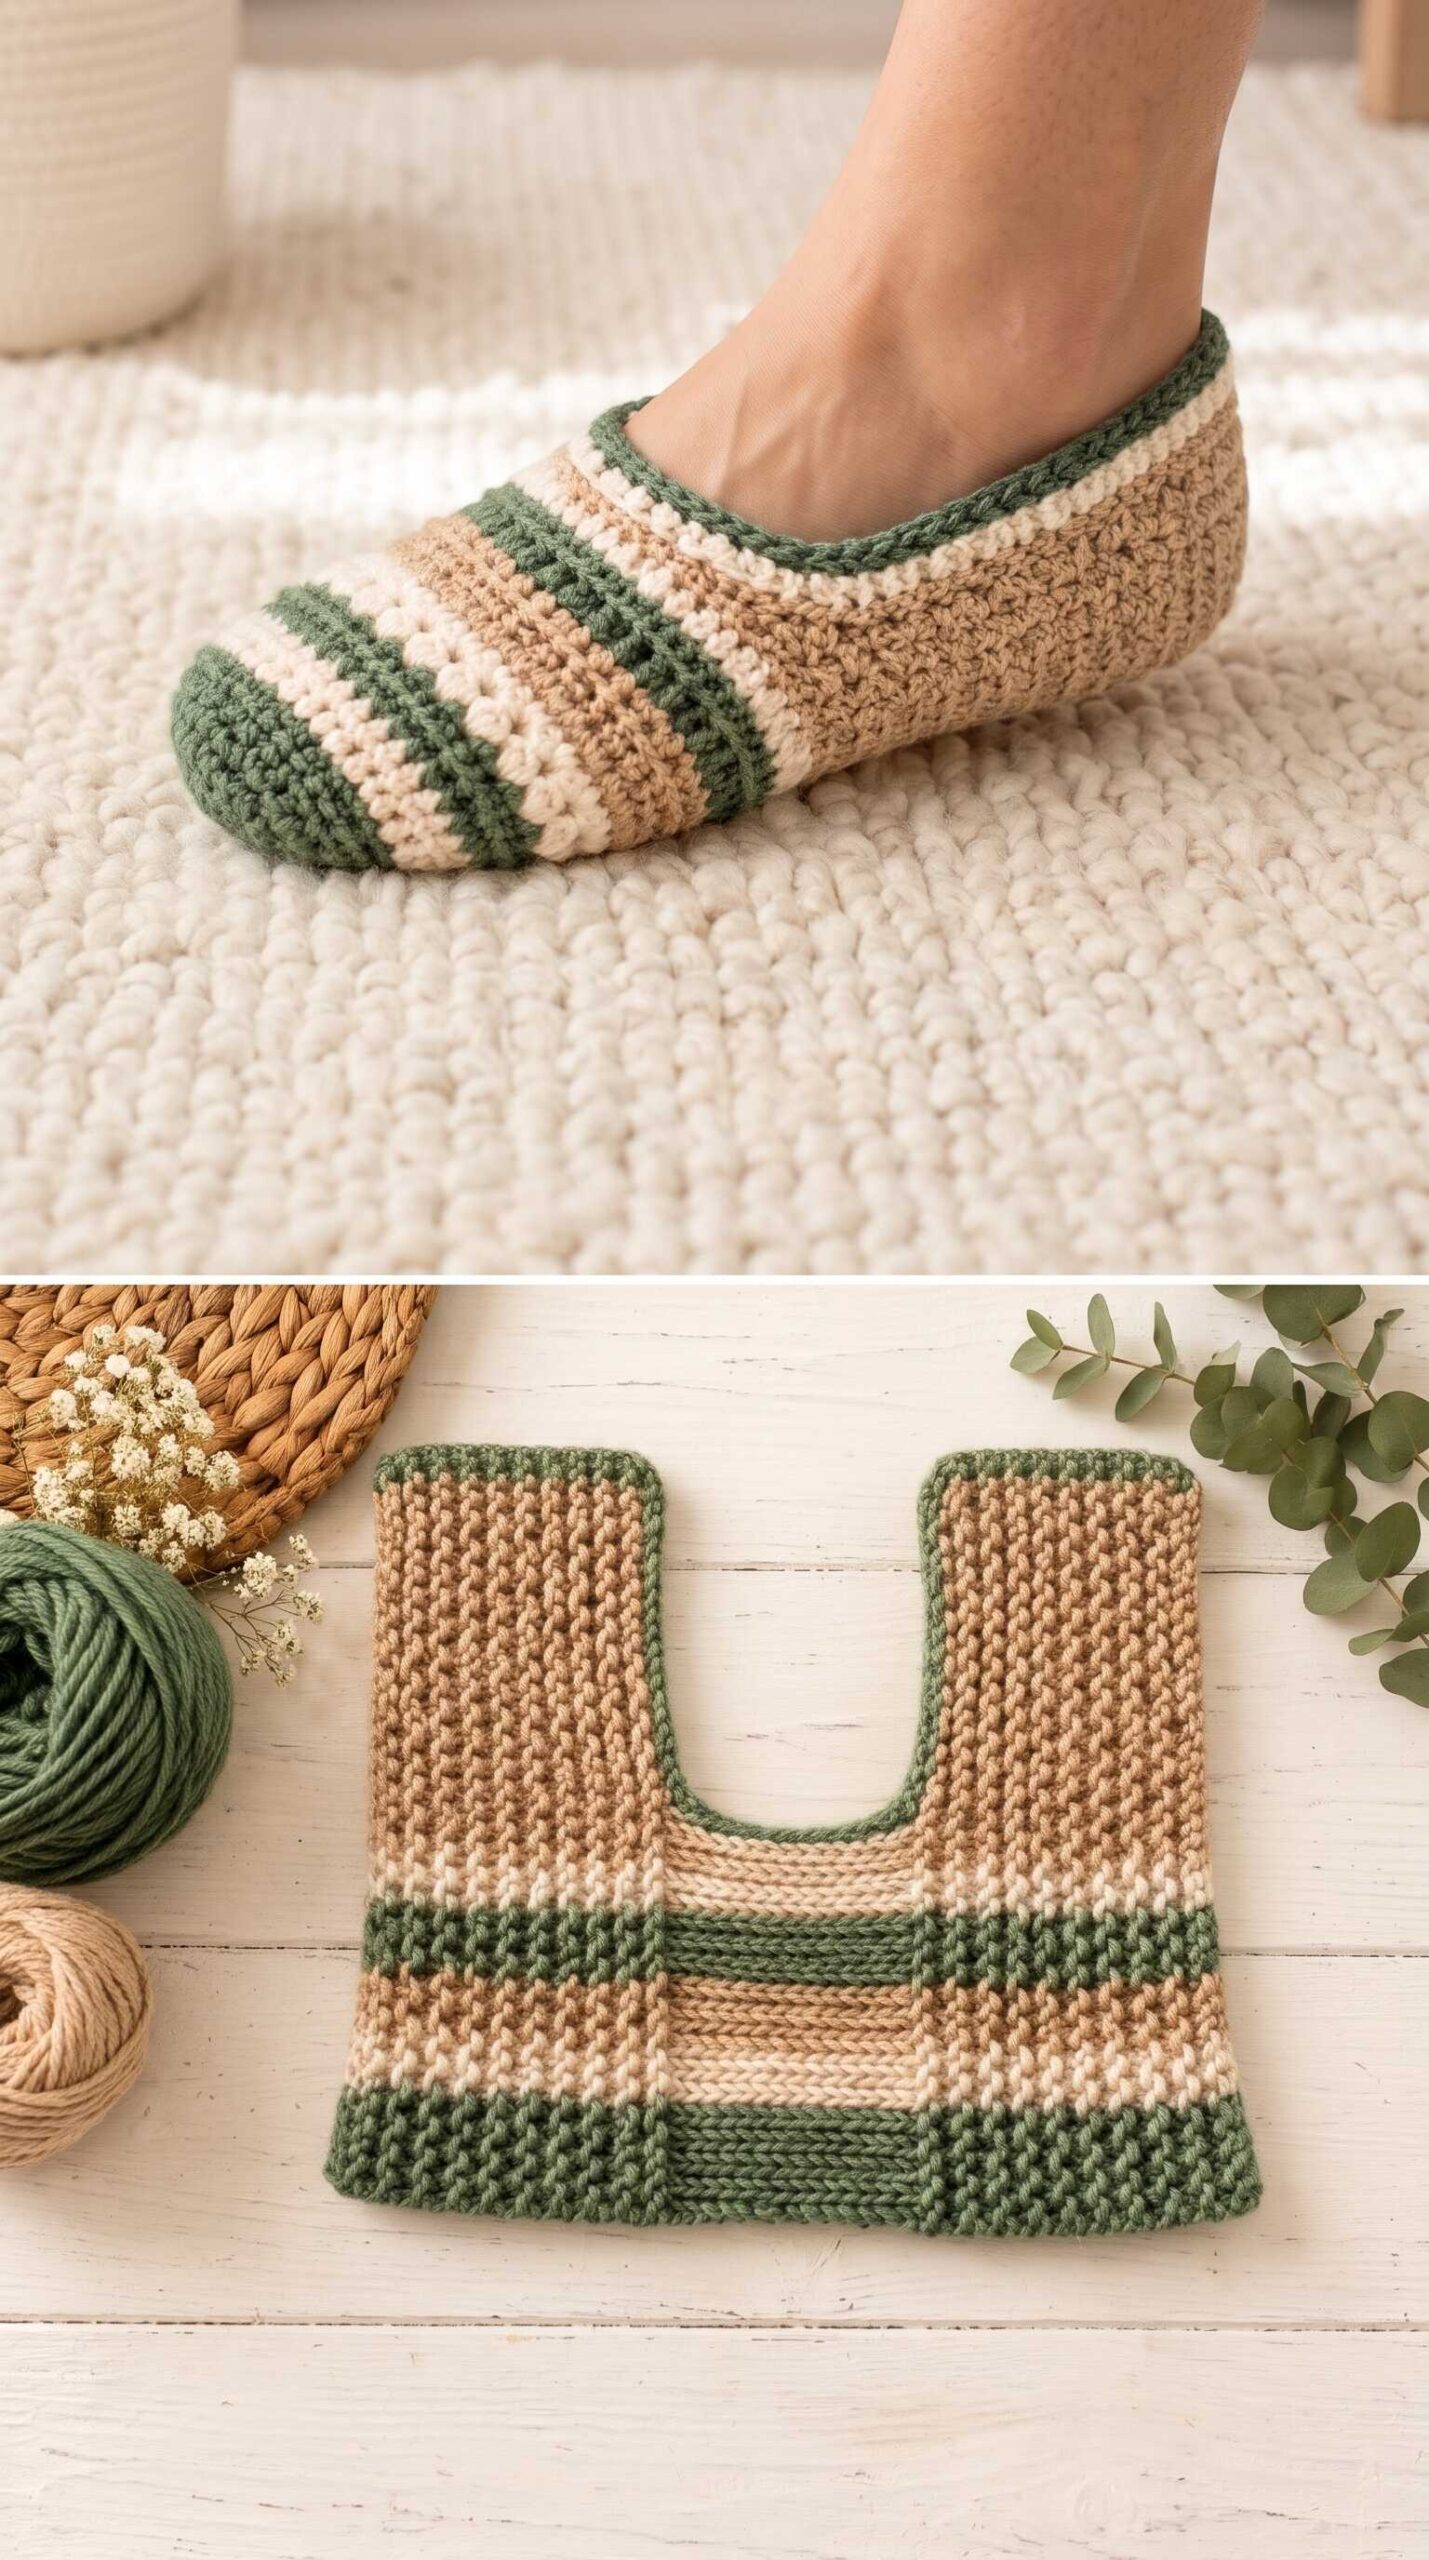
These striped crochet slipper socks combine a rounded sage-green toe, narrow cream and sage bands, a warm beige textured body, and a neat sage opening. The low-cut shape is designed for comfortable indoor wear and is worked as a pair using US crochet terminology.
The construction follows the pictured design: make two oval soles, then make one U-shaped upper for each slipper. The upper has a striped bridge across the toe and instep, with two long textured arms that extend back along the sides and meet at the heel. Sew the upper to the sole and finish the opening with sage edging.
Striped Crochet Slipper Socks Pattern Details
- Skill level: Intermediate beginner
- Size: Adult women’s medium
- Suggested foot length: Approximately 24.5 cm
- Finished sole target: 24–24.5 cm long and approximately 9 cm wide
- Construction: Two oval soles plus two U-shaped uppers
- Terminology: US crochet terms
Fit note: Crochet fabric and foot shapes vary. Measure the sole and compare the first upper against the foot before making the second slipper.
Materials
- Worsted-weight yarn (Category 4), smooth acrylic or acrylic/wool blend
- Color A: Sage green – approximately 90 g for the pair
- Color B: Cream – approximately 25 g for the pair
- Color C: Warm beige – approximately 110 g for the pair
- 4.0 mm crochet hook
- Stitch markers
- Yarn needle
- Scissors
- Measuring tape
Yarn quantities are estimates and may vary depending on yarn brand, gauge, and foot size.
Gauge
Work a 4 × 4 inch (10 × 10 cm) swatch in single crochet.
- Target gauge: 18 stitches and 18 rows = 4 inches (10 cm)
- The sole should be dense and firm.
- The upper should bend comfortably around the foot.
If your swatch is wider than 4 inches, try a smaller hook. If it is narrower, try a larger hook. Keep the same hook for all three colors.
Abbreviations
- ch: Chain
- sl st: Slip stitch
- sc: Single crochet
- BLO: Back loop only
- inc: Increase (2 sc in the same stitch)
- st(s): Stitch(es)
- RS: Right side
- WS: Wrong side
- FO: Fasten off
Special Stitch and Working Notes
Single crochet in back loop only (sc BLO): Insert the hook under the back loop only of the next stitch, yarn over and pull up a loop, yarn over and pull through both loops. This creates the raised ribbing on the beige arms.
Turning chain: Chain 1 at the beginning of a row. It does not count as a stitch.
Color changes: On the last stitch before a new color, work the final yarn-over with the new color. Carry unused yarn loosely up the side only across short stripe sections; otherwise fasten off and weave in the ends.
Pattern Construction
Each slipper is made in separate sections:
- An oval crochet sole.
- A striped toe-and-instep bridge.
- Two textured beige side arms.
- A joined U-shaped upper.
- A sage-green opening trim.
The upper is sewn to the oval sole after its side arms and heel have been joined.
Part 1 – Crochet the Oval Soles (Make 2)
Use Color A (sage green) and a 4.0 mm hook. The sole is worked in continuous rounds around a foundation chain. Place a stitch marker in the first stitch of each round and move it up as you work. Do not turn.
Foundation: Chain 25.
Round 1: Sc in the second chain from the hook and in the next 22 chains, 3 sc in the last chain. Working along the opposite side of the foundation chain, sc in the next 22 loops, 2 sc in the final loop. (50 sts)
Round 2: Sc in the next 22 sts, inc in each of the next 3 sts, sc in the next 22 sts, inc in each of the next 3 sts. (56 sts)
Round 3: Sc in the next 22 sts, [sc in the next st, inc in the next st] 3 times, sc in the next 22 sts, [sc in the next st, inc in the next st] 3 times. (62 sts)
Round 4: Sc in each st around. (62 sts)
Join with a sl st to the first sc and fasten off.
The sole should lie flat. The target measurement is approximately 24–24.5 cm long and 8.5–9 cm wide. If the sole is too short, remake it with a longer foundation chain rather than stretching it to reach the target.
Part 2 – Crochet the Striped Toe and Instep Bridge (Make 2)
The bridge is the wide lower section of the U-shaped upper. It crosses the top of the toes and continues over the instep. Use a 4.0 mm hook and work in rows.
Foundation: Ch 19. Sc in the second ch from the hook and across. (18 sts)
Ch 1 and turn at the end of each row. The turning chain does not count as a stitch.
- Rows 1–3: Color A, sc across. (18 sts each row)
- Rows 4–5: Color B, sc across. (18 sts each row)
- Rows 6–9: Color C, sc across. (18 sts each row)
- Rows 10–11: Color A, sc across. (18 sts each row)
- Rows 12–13: Color B, sc across. (18 sts each row)
- Rows 14–17: Color C, sc across. (18 sts each row)
Fasten off, leaving a long sewing tail. The panel should measure approximately 10 cm wide and 9.5 cm deep. The first sage rows form the toe end; the final beige rows point toward the instep.
Part 3 – Crochet the Ribbed Side Arms (Make 4)
Use Color C (warm beige). Each arm extends from one long side of the bridge toward the heel. Work the rows along the length of the foot so the raised ribs run from toe to heel.
Foundation: Ch 15.
Row 1: Sc in the second ch from the hook and across. (14 sts)
Row 2: Ch 1, turn, sc BLO across. (14 sts)
Rows 3–38: Ch 1, turn, sc BLO across. (14 sts each row)
Fasten off, leaving a long sewing tail. Each arm should measure approximately 20–21 cm long and 7.5–8 cm wide. Make four identical arms, two for each slipper.
Part 4 – Join the U-Shaped Upper
Lay the striped bridge flat with the sage toe end facing you. Place one arm along the left long edge of the bridge and the second arm along the right long edge.
- Match the front end of each arm to the bridge’s final beige edge.
- Keep the free arm ends pointing toward the heel.
- Sew each arm to the bridge using the long yarn tails, taking one small stitch at a time and keeping the seam flat.
- Bring the two free arm ends together behind the heel.
- With Color C, sew the ends together for 5 cm from the sole edge upward.
- Keep the seam centered at the back.
This forms the U-shaped upper while leaving the low-cut opening above the heel.
Part 5 – Add the Sage Opening Trim
With the right side facing, join Color A at the back seam of the opening.
Work 1 round of sc around the opening: place 1 sc in each row-end along the arm edges and 1 sc in each stitch across the bridge-side opening edge. At each corner, work 2 sc in the same point. Adjust the corner stitches so the edge lies flat.
Join with a sl st and fasten off. Work one loose round of sl st around the opening for a clean sage-green finish.
Part 6 – Attach the Upper to the Sole
- Mark the sole at the toe center, heel center, and both side midpoints.
- Mark the upper at the toe center, heel seam, and both bridge-to-arm junctions.
- Place the upper around the sole with the right side facing outward.
- Match the toe center first, then the heel, then both sides.
- Pin the spaces between the markers. Distribute small differences gradually; do not pull the upper tight enough to pucker the sole.
- Sew the upper edge to the sole with a firm whipstitch, catching one upper edge loop for each corresponding sole edge stitch. Keep the seam on the underside.
- Weave in all yarn ends securely.
Make the Second Slipper
Repeat all steps for the second slipper. Keep the stripe sequence, arm length, heel seam depth, and opening trim identical.
Before weaving in the final ends, try both slippers on and check that the toe is not compressed, the heel stays enclosed, and the opening sits comfortably below the ankle bone.
Fit Adjustments
- For a longer foot: Add foundation chains to the sole as needed, then add rows to both arms to provide the required length.
- For a shorter foot: Remove foundation chains until the sole is approximately 0–0.5 cm shorter than the foot. Shorten both arms equally.
- For a wider forefoot: Add stitches to the bridge foundation and widen the sole with balanced increases at both rounded ends.
- For a higher instep: Add 2 beige rows to the bridge at the instep end. Keep the toe stripe rows unchanged.
- If the opening is too loose: Work a second sc edging round with 2 decreases spaced evenly at the back half.
- If the opening is too tight: Remove the edging and rework it with a larger hook.
Care and Finishing
Follow the yarn label for washing and drying. Many acrylic blends can be gently hand-washed in cool water and dried flat. Do not use high heat unless the yarn label allows it.
For indoor use on smooth floors, add a fabric-safe non-slip product to the sole and follow the product instructions. Check the sole seam and heel seam periodically and secure any loose ends.
Project Checklist
- Two oval soles completed and measured to the intended foot length.
- Two striped toe-and-instep bridges completed with matching color sequences.
- Four beige ribbed side arms completed to equal lengths.
- Both U-shaped uppers joined with centered heel seams.
- Sage edging completed around both slipper openings.
- Both uppers securely sewn to their soles without puckering.
- All yarn tails woven in and seams checked.
- Both slippers tried on and fit checked before use.
A Note About the Pattern
This pattern is a suggested, customizable interpretation of the pictured crochet slipper design. Finished size and fit can vary with yarn, hook size, stitch tension, and individual foot shape. Measure your sole as you work and adjust the sole length or side-arm length to suit your foot. For a pair, keep both slippers’ stripe placement and measurements consistent.
Happy Crocheting!
Made with care • Make the colors your own.