
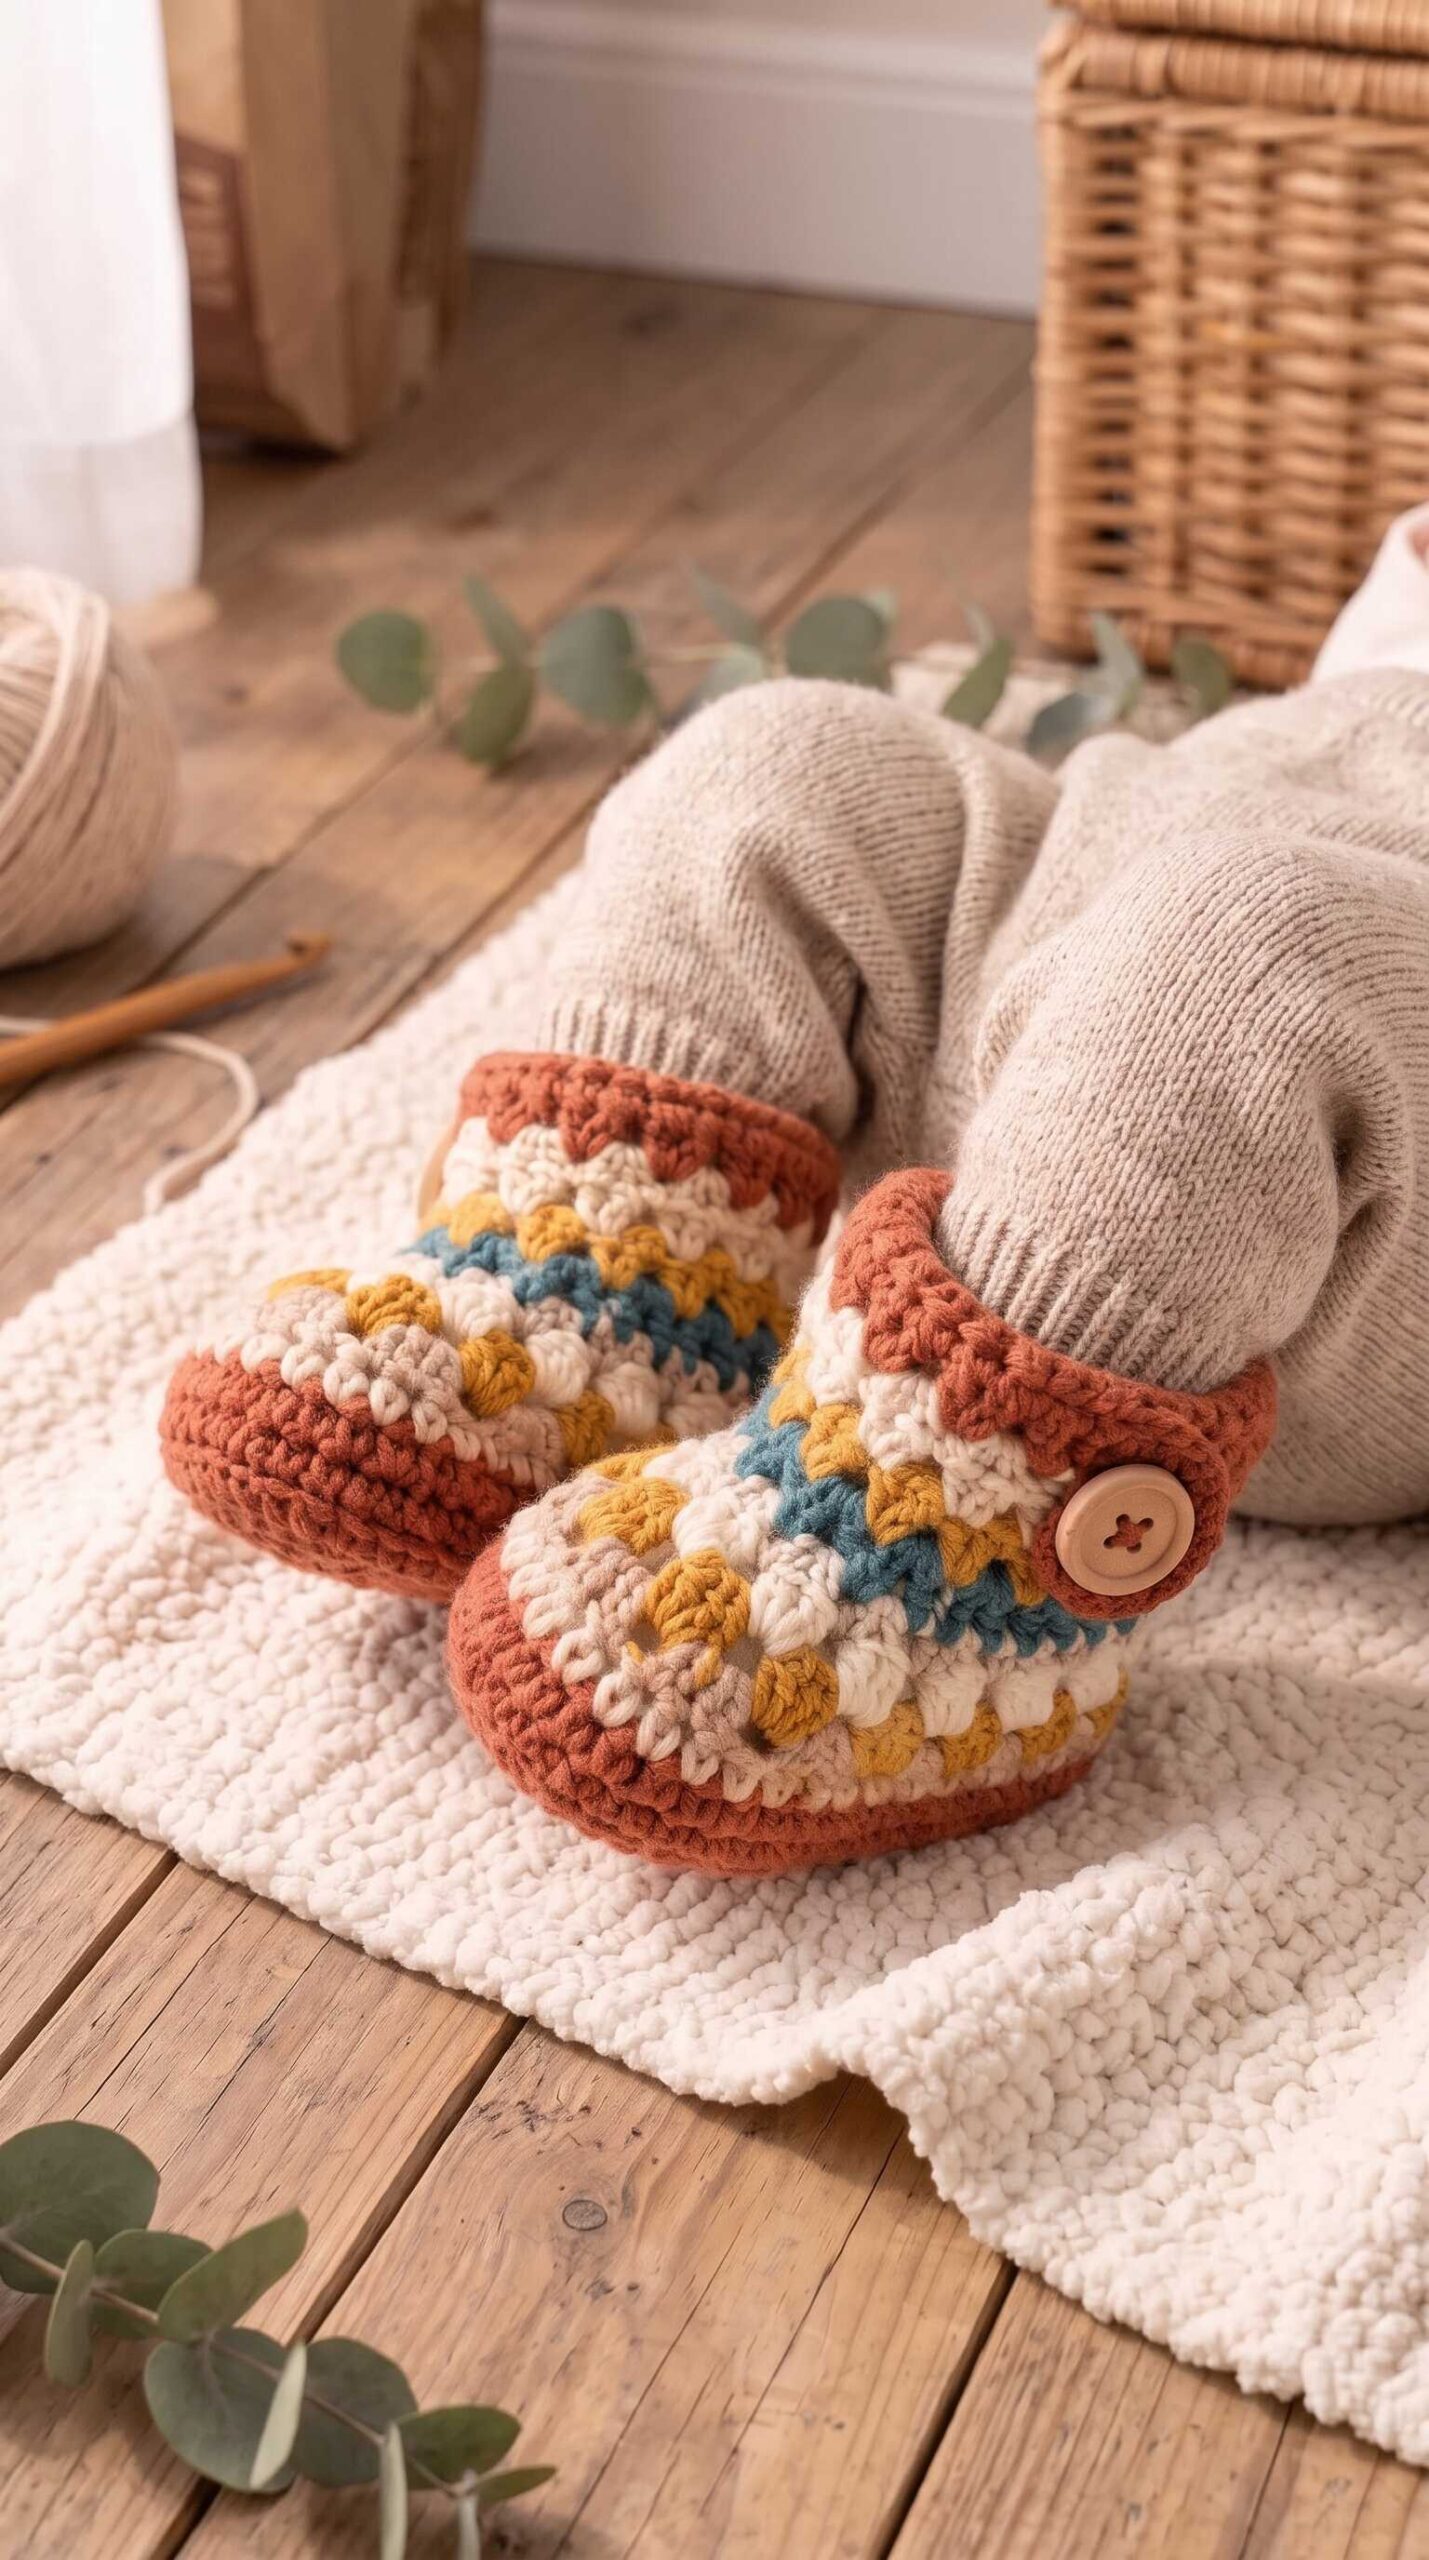
Cozy Five-Color Baby Booties Worked in the Round
Looking for a cozy granny stripe baby booties crochet pattern that stays on wiggly little feet without complicated seaming? The Hearthside Granny-Stripe Button Booties are soft, structured ankle booties designed for babies aged 6 to 12 months. Rated for intermediate crocheters, this project combines a sturdy single-crochet oval sole with five-color 3-dc granny clusters, shaped instep decreases, and a decorative wooden button tab on the outer cuff. In this complete guide, you will find the exact yarn weights and yardage per color, gauge and hook-adjustment rules, a full round-by-round stitch ledger, step-by-step pattern and assembly instructions, a custom sizing formula, and troubleshooting fixes.
Pattern status: draft. This pattern has not been fully test-crocheted yet. Please make the small test piece first, and tell us how it goes.
Quick Facts & Finished Specifications
- Pattern Name: Hearthside Granny-Stripe Button Booties
- Designer: Abby Marlow (Abby’s Stitches)
- Skill Level: Intermediate
- Size Written: Baby 6–12 Months (fits a target real baby foot length of 11.0 cm / 4.3 in, ball width of 6.0 cm / 2.4 in, foot ball circumference of 13.5 cm / 5.3 in, and ankle circumference of 14.0 cm / 5.5 in)
- Finished Sole Length: 12.5 cm (4.9 in) — includes +1.5 cm positive ease
- Finished Sole Width: 6.9 cm (2.7 in) — includes +0.9 cm positive ease
- Finished Lower Foot Circumference (36 sts): 22.5 cm / 8.9 in (equivalent cylindrical diameter: 7.2 cm / 2.8 in)
- Finished Ankle Cuff Circumference (30 sts): 18.8 cm / 7.4 in (equivalent cylindrical diameter: 6.0 cm / 2.4 in)
- Finished Total Bootie Height (Sole to Rim): 10.6 cm (4.2 in)
- Finished Side Button Strap (9 sts × 3 rows): 5.6 cm × 1.7 cm (2.2 in × 0.7 in)
- Yarn Weight: Worsted weight (#4 Medium / Aran), 100 g = 200 yds (183 m), or 2.0 yds per gram (1.83 m per gram)
- Recommended Hook: 4.0 mm (US G-6) crochet hook, or size needed to match the stated gauge
- Stated Gauge (10 cm × 10 cm / 4 in × 4 in): 16 sc sts and 18 sc rows/rounds in single crochet (1.60 sts/cm horizontally, 1.80 rows/rounds per cm vertically); 16 dc sts (5.33 clusters of 3 dc) and 9 cluster rounds in granny cluster stitch (1.60 sts/cm horizontally, 0.90 rounds/cm vertically)
- Estimated Yardage: 32–38 g (64–76 yds) per bootie; 64–76 g (128–152 yds) per pair (exact baseline estimate: 35 g / 70 yds per bootie; 70 g / 140 yds per pair)
- Estimated Making Time: Not specified in the pattern guide. [MY TEST NOTES: how long it took]
About This Design
This pattern creates a pair of baby ankle booties (sized for 6–12 months) featuring a structured single-crochet oval sole, multi-color 3-dc granny-cluster stripes, shaped instep decreases, and a decorative wooden button strap on the outer cuff. The reference collage displays a seamless 3D bootie in the upper frame alongside a flat U-shaped striped panel in the lower frame that would require bulky curved seams to assemble. To avoid sewing flat panels onto curved edges and ensure reliable beginner-friendly math, this interpretation works the entire bootie bottom-up in joined rounds directly from the oval sole and uses a simple 3-row rectangular strap for the side button tab, so your finished item may look different from the reference photo.
Construction Overview
Each bootie consists of two components: Piece 1 (Bootie, Make 2) and Piece 2 (Decorative Side Button Strap, Make 2). Left and right booties are crocheted identically through Round 14 and differ only in where the side button strap is positioned during assembly.
- Stage 1 — Oval Ribbed Sole (Rounds 1–5, Color A): You start with a foundation chain of 10 chains and work single crochet rounds around both sides of the chain to form an oval sole (increasing from 22 sts in Round 1 to 30 sts in Round 2 and 36 sts in Round 3). Round 4 is worked in the back loop only (BLO) to turn the sidewall ridge upward, followed by Round 5 worked through both loops. If you are new to oval bases, read our tutorial on how to work crochet ovals and joined rounds.
- Stage 2 — Striped Granny-Cluster Foot & Instep Shaping (Rounds 6–9, Colors B, C, D, E): Working directly into the 36 stitches of Round 5 (the join is built in), you establish 12 granny clusters of 3 dc each (`36 sts`). Rounds 8 and 9 work centered 2-cluster decreases (`cl2tog`) over the front toe and instep to reduce the circumference from 12 clusters (`36 sts`) down to 10 clusters (`30 sts`).
- Stage 3 — Striped Ankle Cuff & Textured Rim (Rounds 10–14, Colors C, D, B, A): Built directly onto the 10 inter-cluster spaces of Round 9, the ankle cuff works 4 straight rounds of 10 granny clusters (`30 sts`) followed by a firm finishing round of 30 half double crochet (`hdc`) stitches.
- Piece 2 & Assembly (Rows 1–3, Color A): Two small rectangular button straps (`9 sc sts × 3 rows`) are worked flat in rows, folded over the top cuff edge at exact stitch markers (`sts 22–24` for the left bootie; `sts 7–9` for the right bootie), whipstitched in place, and topped with a 20 mm wooden button anchored through Round 12.
Materials
Yarn: Worsted weight (#4 Medium / Aran) smooth 4-ply acrylic or cotton-acrylic blend yarn with a standard put-up of 100 g = 200 yds (183 m), or 2.0 yds per gram (1.83 m per gram). Total estimated yarn required is 32–38 g (64–76 yds) per bootie, or 64–76 g (128–152 yds) per pair.
| Color Code & Shade | Where Used | Per 1 Bootie (Estimate) | Per Pair / 2 Booties (Estimate) |
|---|---|---|---|
| Color A: Terracotta Rust | Sole (Rds 1–5), Cuff (Rds 13–14), Strap | 15 g / 30 yds | 30 g / 60 yds (Range: 56–64 yds) |
| Color B: Oatmeal Taupe | Foot Stripe (Rd 6), Cuff Stripe (Rd 12) | 6 g / 12 yds | 12 g / 24 yds (Range: 22–26 yds) |
| Color C: Mustard Gold | Foot Stripe (Rd 7), Cuff Stripe (Rd 10) | 5 g / 10 yds | 10 g / 20 yds (Range: 18–22 yds) |
| Color D: Warm Cream | Instep (Rd 8), Cuff Stripe (Rd 11) | 5 g / 10 yds | 10 g / 20 yds (Range: 18–22 yds) |
| Color E: Dusty Teal | Center Instep Stripe (Rd 9) | 4 g / 8 yds | 8 g / 16 yds (Range: 14–18 yds) |
| Total Estimated Yarn | All 5 Colors Combined | 35 g / 70 yds (32–38 g / 64–76 yds) | 70 g / 140 yds (64–76 g / 128–152 yds) |
- Hook: 4.0 mm (US G-6) crochet hook, or size needed to match the stated gauge.
- Notions: Two 20 mm (3/4 in) 4-hole wooden buttons (1 per bootie), 4 locking stitch markers, blunt tapestry needle, scissors, and a rigid cm/inch ruler.
Gauge
Checking your gauge before starting ensures the finished sole and ankle opening match the intended baby foot dimensions. For step-by-step tips on measuring crochet fabric without distortion, see our guide on how to measure crochet gauge accurately.
- Single Crochet (Sole & Strap): 16 sc sts and 18 sc rows/rounds = 10 cm × 10 cm (4 in × 4 in). This equals 1.60 sts per cm horizontally and 1.80 rows/rounds per cm vertically.
- Granny Cluster Stitch (Bootie Upper & Cuff): 16 dc sts (5.33 clusters of 3 dc) and 9 cluster rounds = 10 cm × 10 cm (4 in × 4 in). This equals 1.60 sts per cm horizontally and 0.90 rounds per cm vertically.
How to Swatch: With Color A and your 4.0 mm hook, ch 21. Work 1 sc in 2nd ch from hook and in each ch across (20 sts). Work 9 more rows of sc (10 rows total; 20 sts × 10 rows = 12.5 cm wide × 5.6 cm tall). Then switch to granny clusters: ch 2, work 2 dc in first st, *sk 2 sts, work 3 dc in next st* repeat 5 times, sk 1 st, 1 dc in last st. Work 5 more rows of 3-dc clusters in the spaces between clusters. Fasten off and lay flat without stretching. Measure the center 10 cm (4 in) width and height.
Exact Hook Change Rule: If you have fewer than 16 sts per 10 cm (your swatch is too wide/loose), switch to a smaller hook (3.5 mm / US E-4) and swatch again. If you have more than 16 sts per 10 cm (your swatch is too narrow/tight), switch to a larger hook (4.5 mm / US 7) and swatch again.
Abbreviations (US Crochet Terms)
| Abbrev. | Term | One-Line How-To |
|---|---|---|
| ch | Chain | Yarn over hook and pull through the loop on your hook. |
| sl st | Slip stitch | Insert hook into stitch, yarn over, and pull through both stitch and loop on hook in one motion. |
| sc | Single crochet | Insert hook into stitch, yarn over, pull up a loop (2 loops on hook), yarn over and pull through both loops. |
| hdc | Half double crochet | Yarn over, insert hook into stitch, yarn over, pull up a loop (3 loops on hook), yarn over and pull through all 3 loops. |
| dc | Double crochet | Yarn over, insert hook into stitch, pull up a loop (3 loops), [yarn over, pull through 2 loops] twice. |
| BLO | Back loop only | Insert your hook only under the back strand of the top V of the stitch, leaving the front strand unworked. |
| sk | Skip | Pass over the specified number of stitches without working into them. |
| cl | 3-dc granny cluster | Work 3 complete double crochet (dc) stitches all into the same stitch or space between clusters. |
| cl2tog | 2-cluster decrease | Work 2 dc in first space between clusters, then immediately work 1 dc in next space between clusters (joins 2 spaces into 1 cluster of 3 dc; reduces count by 3 sts). |
| st(s) | Stitch(es) | Individual crochet stitch unit(s) counted around the perimeter or across a row. |
| * … * | Repeat section | Repeat the instructions between the asterisks the exact number of times stated right after the second asterisk. |
Granny Stripe Baby Booties Crochet Pattern Instructions
Piece 1: Bootie (Make 2 — Left and Right Foot Are Identical)
Construction Note: Each bootie is worked continuously from the bottom oval sole up to the top ankle rim in joined rounds with the right side always facing you (do not turn at the end of rounds). Beginning ch 1 on sc/hdc rounds does not count as a stitch. Beginning ch 2 on granny-cluster rounds counts as the first dc of the initial 3-dc cluster (cl). For tips on joining new yarn shades between stripe rounds, see our tutorial on how to change colors cleanly in crochet.
Stage 1: Oval Ribbed Sole (Rounds 1–5, Color A — Terracotta Rust)
- Foundation (Color A): With Color A and 4.0 mm hook, ch 10. You will work around both sides of this chain to build an oval: the 2nd ch from hook is the heel end (1 ch), the next 7 ch form the upper side, the last ch is the toe end (1 ch), and the opposite underside loops of the middle 7 ch form the return side (16 usable chain positions total). [10 ch]
- Round 1 (Color A): Work 2 sc in 2nd ch from hook (heel end), *1 sc in next ch* repeat 7 times along side, work 4 sc in last ch (toe end); pivot piece to work along the opposite underside of the foundation chain, *1 sc in next underside ch loop* repeat 7 times, work 2 sc in same first ch at heel; join with sl st to first sc. [22 sts]
- Round 2 (Color A): Ch 1 (does not count as a st), *2 sc in next st* repeat 2 times (heel), *1 sc in next st* repeat 7 times (side), *2 sc in next st* repeat 4 times (toe), *1 sc in next st* repeat 7 times (side), *2 sc in next st* repeat 2 times (heel); join with sl st to first sc. [30 sts]
- Round 3 (Color A): Ch 1, *1 sc in next st, 2 sc in next st* repeat 1 time (2 sts used, 3 made), *1 sc in next st* repeat 9 times (9 sts used, 9 made), *1 sc in next st, 2 sc in next st* repeat 3 times across toe (6 sts used, 9 made), *1 sc in next st* repeat 9 times (9 sts used, 9 made), *1 sc in next st, 2 sc in next st* repeat 2 times at heel (4 sts used, 6 made); join with sl st to first sc. [36 sts]
- Round 4 (Color A — Sole Ridge): Ch 1, working in BLO all around, *1 sc in next st* repeat 36 times; join with sl st to first sc. [36 sts]
- Round 5 (Color A — Lower Sole Rim): Ch 1, working through both loops, *1 sc in next st* repeat 36 times; join with sl st to first sc. Fasten off Color A. [36 sts]
Check: Stage 1 (End of Round 5) — Your piece should measure 22.5 cm (8.9 in) in perimeter circumference (calculated as 36 sts ÷ 1.60 sts/cm = 22.5 cm; equivalent round diameter = 22.5 cm ÷ 3.14 = 7.2 cm / 2.8 in). Laid flat as an oval sole with the 2 sidewall rounds turned up, your sole should measure 12.5 cm (4.9 in) long by 6.9 cm (2.7 in) wide with a 1.1 cm (0.4 in) vertical rim height (2 rounds ÷ 1.80 rounds/cm).
Stage 2: Striped Granny-Cluster Foot & Instep Shaping (Rounds 6–9)
Built-In Join Note: Stage 2 is worked directly into the 36 stitches of Round 5 (join is built in). Each cl (3 dc) has 3 stitch tops, and in Rounds 7–13 you work into the wide spaces between clusters rather than into the top loops of individual stitches.
Test Point: Instep Cluster Decreases (Rounds 8 & 9) — In Rounds 8 and 9, a cl2tog decrease at the center-front toe bridges 2 adjacent inter-cluster spaces into a single 3-dc cluster (2 dc in first space + 1 dc in next space). Keep your tension firm on the transition stitch between the two spaces so no small gap appears at the center of the instep.
- Round 6 (Color B — Oatmeal Taupe): Join Color B with sl st in first st of Round 5 at center-back heel. Ch 2 (counts as first dc of initial cl), work 2 dc in same st (first cl complete), sk next 2 sts, *work cl (3 dc) in next st, sk next 2 sts* repeat 11 times around; join with sl st to top of beginning ch-2. Fasten off Color B. [36 sts / 12 clusters]
- Round 7 (Color C — Mustard Gold): Join Color C with sl st in the space directly before the first cluster at heel. Ch 2, work 2 dc in same space (first cl complete), *sk next 3 dc (1 cluster), work cl (3 dc) in next space between clusters* repeat 11 times, sk last 3 dc; join with sl st to top of beginning ch-2. Fasten off Color C. [36 sts / 12 clusters]
- Round 8 (Color D — Warm Cream, First Toe Decrease): Place Marker 1 in the 6th inter-cluster space from heel (after 15 dc / 5 clusters) and Marker 2 in the 7th inter-cluster space (after 18 dc / 6 clusters). Join Color D with sl st in first space at heel. Ch 2, 2 dc in same space (first cl), *sk next 3 dc, cl in next space* repeat 4 times (5 clusters made over first 15 sts), sk next 3 dc, work cl2tog across Marker 1 space and Marker 2 space (2 dc in Marker 1 space, sk next 3 dc, 1 dc in Marker 2 space; 6 sts used, 3 sts made), *sk next 3 dc, cl in next space* repeat 5 times to end, sk last 3 dc; join with sl st to top of ch-2. Fasten off Color D. [33 sts / 11 clusters]
- Round 9 (Color E — Dusty Teal, Second Instep Decrease): Join Color E with sl st in first space at heel. Ch 2, 2 dc in same space (first cl), *sk next 3 dc, cl in next space* repeat 3 times (4 clusters made over first 12 sts), sk next 3 dc, work cl2tog across the 2 center-front spaces flanking the previous decrease (2 dc in 5th space, sk next 3 dc, 1 dc in 6th space; 6 sts used, 3 sts made), *sk next 3 dc, cl in next space* repeat 5 times to end, sk last 3 dc; join with sl st to top of ch-2. Fasten off Color E. [30 sts / 10 clusters]
Check: Stage 2 (End of Round 9) — Your ankle opening should now have 30 sts (10 clusters) and measure 18.8 cm (7.4 in) in circumference (calculated as 30 sts ÷ 1.60 sts/cm = 18.75 cm; equivalent round diameter = 18.75 cm ÷ 3.14 = 6.0 cm / 2.4 in). Total height from the bottom of the sole should measure 5.6 cm (2.2 in) (1.1 cm sole rim + 4 cluster rounds ÷ 0.90 rounds/cm = 5.56 cm).
Stage 3: Striped Ankle Cuff & Textured Rim (Rounds 10–14)
Built-In Join Note: The ankle cuff is worked directly up from the 10 inter-cluster spaces (30 sts) of Round 9 (join is built in).
- Round 10 (Color C — Mustard Gold): Join Color C with sl st in first space at heel. Ch 2, 2 dc in same space (first cl), *sk next 3 dc, cl (3 dc) in next space* repeat 9 times around, sk last 3 dc; join with sl st to top of ch-2. Fasten off Color C. [30 sts / 10 clusters]
- Round 11 (Color D — Warm Cream): Join Color D with sl st in first space at heel. Ch 2, 2 dc in same space (first cl), *sk next 3 dc, cl (3 dc) in next space* repeat 9 times around, sk last 3 dc; join with sl st to top of ch-2. Fasten off Color D. [30 sts / 10 clusters]
- Round 12 (Color B — Oatmeal Taupe): Join Color B with sl st in first space at heel. Ch 2, 2 dc in same space (first cl), *sk next 3 dc, cl (3 dc) in next space* repeat 9 times around, sk last 3 dc; join with sl st to top of ch-2. Fasten off Color B. [30 sts / 10 clusters]
- Round 13 (Color A — Terracotta Rust): Join Color A with sl st in first space at heel. Ch 2, 2 dc in same space (first cl), *sk next 3 dc, cl (3 dc) in next space* repeat 9 times around, sk last 3 dc; join with sl st to top of ch-2. Do not fasten off Color A. [30 sts / 10 clusters]
- Round 14 (Color A — Terracotta Rust Cuff Rim): Ch 1 (does not count as a st), work *1 hdc in next dc st* repeat 30 times around the top of the cuff; join with sl st to first hdc. Fasten off Color A and weave in tail. [30 sts]
Check: Stage 3 (End of Round 14 — Completed Bootie Body) — Your top cuff edge should measure 18.8 cm (7.4 in) in circumference (30 sts ÷ 1.60 sts/cm = 18.75 cm; equivalent round diameter = 18.75 cm ÷ 3.14 = 6.0 cm / 2.4 in). Total finished bootie height from sole base to top rim should measure 10.6 cm (4.2 in) (5.56 cm lower bootie + 4 cluster rounds ÷ 0.90 rounds/cm + 1 hdc round ÷ 1.80 rounds/cm = 10.56 cm).
Piece 2: Decorative Side Button Strap (Make 2 — Color A, Terracotta Rust)
- Foundation (Color A): With Color A and 4.0 mm hook, ch 10 (leaves 9 working ch starting in 2nd ch from hook). [10 ch]
- Row 1 (Color A): Work 1 sc in 2nd ch from hook, *1 sc in next ch* repeat 8 times across; turn. [9 sts]
- Row 2 (Color A): Ch 1 (does not count as a st), *1 sc in next st* repeat 9 times across; turn. [9 sts]
- Row 3 (Color A): Ch 1, *1 sc in next st* repeat 9 times across. Fasten off Color A, leaving a 30 cm (12 in) tail for sewing. [9 sts]
Check: Piece 2 (Completed Button Strap) — Your flat rectangular strap should measure 5.6 cm (2.2 in) long (calculated as 9 sts ÷ 1.60 sts/cm = 5.625 cm; equivalent loop diameter = 5.625 cm ÷ 3.14 = 1.8 cm / 0.7 in) by 1.7 cm (0.7 in) wide (3 rows ÷ 1.80 rows/cm = 1.67 cm).
Complete Stitch Ledger (Piece 1 & Piece 2)
| Rd / Row | Color | Start Sts | Sts Used | Repeat & Stitch Verification | Sts Made | End Sts |
|---|---|---|---|---|---|---|
| P1: Found. | A | 0 | 0 | Ch 10 (9 working ch = 16 oval positions) | 10 ch | 16 pos |
| P1: Rd 1 | A | 16 | 16 | (1×7) + (1×7) + 2 ends = 16 used | 22 | 22 |
| P1: Rd 2 | A | 22 | 22 | (1×2) + (1×7) + (1×4) + (1×7) + (1×2) = 22 | 30 | 30 |
| P1: Rd 3 | A | 30 | 30 | (2×1) + (1×9) + (2×3) + (1×9) + (2×2) = 30 | 36 | 36 |
| P1: Rd 4 | A | 36 | 36 | BLO: (1 st × 36) + 0 = 36 used | 36 | 36 |
| P1: Rd 5 | A | 36 | 36 | (1 st × 36) + 0 = 36 used | 36 | 36 |
| P1: Rd 6 | B | 36 | 36 | (3 sts × 11) + 3 initial = 36 used (12 cl) | 36 | 36 |
| P1: Rd 7 | C | 36 | 36 | (3 sts × 11) + 3 initial = 36 used (12 cl) | 36 | 36 |
| P1: Rd 8 | D | 36 | 36 | (3×4) + 3 init + 6 (cl2tog) + (3×5) = 36 | 33 | 33 |
| P1: Rd 9 | E | 33 | 33 | (3×3) + 3 init + 6 (cl2tog) + (3×5) = 33 | 30 | 30 |
| P1: Rd 10 | C | 30 | 30 | (3 sts × 9) + 3 initial = 30 used (10 cl) | 30 | 30 |
| P1: Rd 11 | D | 30 | 30 | (3 sts × 9) + 3 initial = 30 used (10 cl) | 30 | 30 |
| P1: Rd 12 | B | 30 | 30 | (3 sts × 9) + 3 initial = 30 used (10 cl) | 30 | 30 |
| P1: Rd 13 | A | 30 | 30 | (3 sts × 9) + 3 initial = 30 used (10 cl) | 30 | 30 |
| P1: Rd 14 | A | 30 | 30 | (1 hdc × 30) + 0 = 30 used | 30 | 30 |
| P2: Found. | A | 0 | 0 | Ch 10 (9 working ch from 2nd ch) | 10 ch | 9 ch |
| P2: Row 1 | A | 9 | 9 | (1 sc × 8) + 1 first sc = 9 used | 9 | 9 |
| P2: Row 2 | A | 9 | 9 | (1 sc × 9) + 0 = 9 used | 9 | 9 |
| P2: Row 3 | A | 9 | 9 | (1 sc × 9) + 0 = 9 used | 9 | 9 |
Assembly & Exact Marker Positions
The Sole-to-Upper join (Round 5 to Round 6) and Upper-to-Cuff join (Round 9 to Round 10) are built in during crocheting. Only the two Side Button Straps (Piece 2) and the two 20 mm wooden buttons require sewing.
Test Point: Strap Overlap & Button Placement — Pin the strap and wooden button with locking stitch markers before sewing to confirm that the top rim stretches comfortably over the baby’s heel without pulling on the button stitches.
- Count and Mark Round 14 Cuff Stitches: Hold each bootie with the heel seam facing you. Count the 30 stitches of Round 14 counter-clockwise around the top rim from the heel join (st 1) to the last stitch (st 30). The center-front toe sits directly between st 15 and st 16.
- Mark Left Bootie Outer Cuff (sts 22–24): On Bootie 1 (Left Foot), place Locking Marker A in st 22 and Locking Marker B in st 24 of Round 14 (spanning exactly 3 stitches / 1.9 cm above Cluster 8 on the left outer ankle).
- Mark Right Bootie Outer Cuff (sts 7–9): On Bootie 2 (Right Foot), place Locking Marker C in st 7 and Locking Marker D in st 9 of Round 14 (spanning exactly 3 stitches / 1.9 cm above Cluster 3 on the right outer ankle).
- Sew Top Anchor of Strap (3 whipstitches): Align the 3-row short foundation edge (1.7 cm wide) of one Button Strap (Piece 2) inside the cuff rim across the 3 marked stitches (sts 22–24 on Left Bootie; sts 7–9 on Right Bootie). Thread the 30 cm tail onto your tapestry needle and work exactly 3 whipstitches (1 stitch per row end into each of the 3 marked cuff stitches) to anchor the inner top edge.
- Fold Strap Over Rim and Sew Lower Tab (8 whipstitches): Fold the strap up and over the top edge of Round 14 (1.7 cm fold consuming the first 3 stitches of the strap’s 9-stitch length) so the remaining 6 stitches (3.9 cm) lie vertically down the outside of the cuff across Rounds 14, 13, 12, and 11. Tack the sides and bottom edge of the strap to Cluster 8 (Left Bootie) or Cluster 3 (Right Bootie) of Round 11 using 2 whipstitches down the left edge, 3 whipstitches across the bottom 3 row-ends at Round 11, and 3 whipstitches up the right edge.
- Attach Wooden Button (6 passes): Center one 20 mm (3/4 in) 4-hole wooden button on the outer face of the strap directly over Round 12 (2.2 cm below the top cuff edge, centered on row 2 of the strap between the 5th and 7th stitches of the strap). Using a 25 cm strand of Color A (or Oatmeal Color B), sew through the 4 button holes and through both the strap and Round 12 cluster using 3 vertical passes per pair of holes (6 passes total). Tie a double surgeon’s knot on the inside of the cuff and weave the tail through 4 stitches.
Changing the Size (Mathematical Formula)
This pattern is written completely for one natural size (Baby 6–12 Months). Use the step-by-step formula below to adapt the pattern to any foot size from newborn to adult without a size table:
- Measure the Target Foot: Measure the wearer’s real foot length (Lfoot) and real foot/ankle circumference (Cfoot) in centimeters. Add 1.5 cm of positive ease to the length (Ltarget = Lfoot + 1.5 cm) and 3.5 cm of slip-on ease to the ankle circumference (Ccuff = Cfoot + 3.5 cm).
- Calculate Total Sole Perimeter Stitches (Ssole): Multiply Ltarget by 2.88 (1.80 oval perimeter ratio × 1.60 sts/cm), then round to the nearest multiple of 6 so the total stitch count divides evenly by 3 for granny clusters and stays symmetrical between heel and toe (Ssole = round_to_6(Ltarget × 2.88)).
- Calculate Foundation Chain (Nch): Calculate target sole width as Wtarget = Ltarget × 0.55. Work flat oval increase rounds (adding 6 sc per round after Round 1) until the flat width reaches Wtarget, and set your starting chain to: Foundation Chain (Nch) = ((Ltarget − Wtarget) × 1.60) + 3 (rounded to the nearest whole chain; for Baby 6–12 Months: ((12.5 − 6.9) × 1.60) + 1 = 10 ch).
- Calculate Instep Decreases & Cuff Height: Work cl2tog decreases centered at the front toe (1 decrease per round, reducing by 3 sts / 1 cluster per round) until your remaining stitches equal Scuff = round_to_3(Ccuff × 1.60). Then work straight cluster rounds at Scuff stitches until the total bootie height reaches 0.85 × Ltarget, finishing with 1 round of hdc.
Troubleshooting: Six Most Likely Problems & Fixes
| Problem Observed | Why It Happens | Exact Fix |
|---|---|---|
| 1. Sole curls into a bowl before Round 4 | Tight tension on the 6 end increases in Rounds 1–3 pulls the oval edge inward. | Go up 0.5 mm in hook size (to 4.5 mm) for Rounds 1–3, or relax tension on heel and toe increases. |
| 2. Round 6 leaves a leftover stitch | Miscounting the 2 skipped stitches between the 12 granny clusters on Round 6. | Count 36 sts on Round 5 first and place a marker every 6th st; exactly 2 clusters must fit into each 6-st section. |
| 3. Small hole at center of instep | Loose yarn-over when jumping from the first space to the second space of cl2tog in Rounds 8–9. | Snug the working yarn firmly after the 2nd dc of cl2tog before inserting your hook into the second space. |
| 4. Toe decrease twists off-center | Natural clockwise drift of stitches worked in joined crochet rounds. | Fold the bootie flat along the foundation chain spine before Round 8 and adjust Marker 1 & 2 to sit dead-center at the toe. |
| 5. Ankle cuff feels too snug to slip on | Fastening off color changes tightly or working Round 14 hdc edge too tightly. | Work Round 14 (30 hdc) with a 4.5 mm hook so the top rim retains full stretch for the heel to pass through. |
| 6. Strap pulls or sags under button weight | Sewing the 20 mm button only to the strap fabric instead of anchoring through the cuff. | Pass the needle through both the strap and the Round 12 cluster of the cuff behind it on all 6 sewing passes. |
Finishing, Care & Maker’s Progress Checklist
Finishing and Care
- Weaving in Ends: Turn each bootie inside out. Thread each 10 cm color-change tail onto a blunt tapestry needle and weave it horizontally through the back base of 3 clusters of the matching color stripe, then back through 2 stitches in the opposite direction before trimming flush. Read our step-by-step guide on how to weave in crochet ends so they never unravel.
- Shaping & Blocking: Lightly mist the finished booties with cool water (do not soak the wooden buttons), stuff the toe box and ankle cuff with clean tissue paper or a rolled washcloth to the exact finished dimensions (12.5 cm sole length, 18.8 cm cuff circumference), and allow to air-dry completely on a flat towel.
- Washing & Care: Hand wash gently in cool water (30°C / 86°F max) using mild wool or baby detergent. Do not bleach, wring, or tumble dry, as heat can crack or warp natural wooden buttons. Reshape while damp and dry flat away from direct heat.
Maker’s Progress Checklist
- Step 1 — Swatch & Gauge: Crochet test swatch with 4.0 mm hook and confirm 16 sts = 10 cm (1.60 sts/cm) in both sc and granny clusters.
- Step 2 — Bootie 1 Stage 1 (Sole): Work Color A Foundation ch 10 and Rounds 1–5 to 36 sts; verify 22.5 cm perimeter (12.5 cm × 6.9 cm oval).
- Step 3 — Bootie 1 Stage 2 (Foot & Instep): Work Striped Rounds 6–9 (Colors B, C, D, E) with cl2tog decreases in Rounds 8–9 down to 30 sts (18.8 cm circumference, 5.6 cm height).
- Step 4 — Bootie 1 Stage 3 (Ankle Cuff): Work Striped Rounds 10–13 (Colors C, D, B, A) and Round 14 hdc rim (30 sts, 10.6 cm total height).
- Step 5 — Bootie 2 (Complete Second Bootie): Repeat Stages 1–3 identically for the second bootie and verify matching measurements.
- Step 6 — Button Straps (Piece 2 × 2): Crochet two 9-st × 3-row Color A straps and verify each measures 5.6 cm × 1.7 cm.
- Step 7 — Assembly & Finishing: Sew Left Strap at sts 22–24, Right Strap at sts 7–9, attach both 20 mm wooden buttons over Round 12, weave in all ends, and block to shape.
Frequently Asked Questions
Are the left and right baby booties crocheted differently?
No. Both booties (Piece 1) are worked identically from Foundation through Round 14. Left and right shaping is created during assembly by attaching the left button strap across sts 22–24 (Cluster 8) and the right button strap across sts 7–9 (Cluster 3) on Round 14 so the wooden buttons sit on the outer ankle of each foot.
Does the wooden button unfasten to put the bootie on?
No. In this pattern, the side strap and 20 mm wooden button are sewn through both the strap and Round 12 of the cuff as a decorative accent. The 30-stitch ankle cuff measures 18.8 cm (7.4 in) in circumference, providing 4.8 cm of slip-on ease over a target 14.0 cm baby ankle so the bootie slips on and off without a buttonhole.
Do I work into the stitches or the spaces between granny clusters on Rounds 7–13?
Only Round 6 is worked into the top loops of the single crochet stitches from Round 5 (working 1 cluster and skipping 2 stitches around). In Rounds 7 through 13, all 3-dc granny clusters (cl) and cluster decreases (cl2tog) are worked directly into the wide spaces between clusters from the round below.
Can I make these booties in a solid color instead of five colors?
Yes. The customer guide uses five shades totaling an estimated 35 g / 70 yds per bootie (70 g / 140 yds per pair, or a range of 64–76 g / 128–152 yds per pair). If working in a single color, one standard 100 g (200 yd) skein of worsted-weight (#4 Medium) yarn provides enough yardage for a full pair, and you can slip stitch into the space between clusters at the start of each round instead of fastening off between stripes.
Does the pattern include non-slip sole instructions for walking toddlers?
Non-slip sole treatments are not specified in the pattern guide. The sole is constructed from five rounds of worsted-weight single crochet (with Round 4 worked in the back loop only to form a defined ridge).
Share Your Finished Booties & Download the Printable Guide
If you crochet a test piece or a finished pair of Hearthside Granny-Stripe Button Booties, I would love to hear how the fit and instructions worked for you! Email your feedback or photos of your finished booties to [email protected] or tag Abby’s Stitches when sharing online. You can also grab the printable customer guide here: Download the Hearthside Granny-Stripe Button Booties PDF Customer Guide.
(c) 2026 Abby Marlow / Abby’s Stitches. Personal use only. Please do not copy or republish this pattern.